Thursday, April 29, 2010

Mojito-marinated chicken breasts


Keeping with the mojito theme and because I have a lot of mint growing in my yard, I decided to try a new recipe out of Bon Appetit's Fast Easy Fresh cookbook. This is the first recipe I've tried out of my new cookbook and I have to say it was very tasty. You could definitely taste the hint of mint in the chicken. I ended up only marinading the chicken for an hour and completely forgot to flip the plastic bag. However, it still turned out great. I don't have mint syrup, so I created my own mint syrup as indicated below. I just dumped the contents in the saucepan to the small bowl with the rest of the ingredients for the marinade. The mint syrup is very similar to the simple syrup I made for my Mojito drinks except for the added mint. Enjoy.

Look for mint syrup in the coffee and tea aisle at the super market. If it is unavailable, you can make one by stirring 1/4 cup sugar and water in a small saucepan over medium heat until the sugar dissolves; mix in 2 tbsp chopped mint and cool.

3/4 c fresh lime juice
1/2 c plus 2 tbsp light rum
1/2 c finely chopped fresh mint plus whole sprigs for garnish
6 tbsp mint syrup
1 tbsp vegetable oil
1 tbsp coarse kosher salt
6 chicken breast halves with skin and bones

3 large limes, quartered lengthwise

Whisk lime juice, 1/2 cup rum, chopped mint, mint syrup, oil, and salt in bowl. Place chicken in resealable plastic bag. Pour marinade over; seal bag. Turn bag to distribute marinade. Chill at least 1 hour and up to 4 hours, turning bag twice.

Place lime quarters in shallow bowl. Pour remaining 2 tablespoons rum over, tossing to coat. Let stand at room temperature.

Prepare barbeque (medium heat). Grill chicken until cooked thorough, about 16 minutes per side. Transfer to platter.

Grill limes until soft and slightly charred, about 5 minnutes. Garnish platter with mint sprigs. Squeeze grilled limes over chicken.

(Click here for printable recipe)

Monday, April 26, 2010

Apricot Pork Chops

Cooking tonight’s dinner, I was a technological marvel. It’s true. I was channeling Judy Jetson. Sadly, the phenomenon was not the cooking technique or culinary gadgetry. Today, I got a new cell phone – the Droid Eris – and along with it a Bluetooth. I cooked dinner tonight, while on the phone, with both of my hands free for stirring, chopping onions, and turning pork chops with the greatest of ease.

Not impressed? You should be. This was my first Bluetooth experience. I got to chat with my brother while whipping up tonight’s new recipe. My new phone, its accessories, and tonight’s dinner turned out wonderfully.

You may notice I have an apricot marmalade trend forming. That’s just because it’s hard to find a small jar of it, so I want to use it all before it goes bad!


This picture is from my new phone, but I haven't yet figured out proper settings for it. I may have accidentally taken this as an action shot.

Ingredients:
4 (4-ounce) boneless loin pork chops
1/4 cup prechopped onion
1/4 cup apricot preserves
1 tablespoon low-sodium soy sauce
2 teaspoons bottled minced garlic
1/4 teaspoon salt
1/4 cup sliced green onion


Heat a large nonstick skillet over medium-high heat. Coat pan with cooking spray. Add pork to pan; cook 6 minutes on each side or until done. Remove from pan; keep warm.
Add prechopped onion to pan; sauté 4 minutes or until lightly browned. Stir in preserves, soy sauce, garlic, and salt; cook 3 minutes or until thickened. Add pork to pan, turning to coat. Sprinkle with green onions.
Recipe from MyRecipes

Peach preserves or marmalade could be used instead of apricot marmalade if you wanted to mix up this recipe. Also, I did not use a single measuring spoon while I was cooking. All of my measurements were guesstimates, but the result turned out tasty.
Finally, as a note, I promise my next post won’t involve apricots!
Happy cooking!
-KSP


(Click here for printable recipe)

Tuesday, April 20, 2010

Iron Chef Wine: Brie with Drunk Raisins


1 1/2 cups water
1 cup Chardonnay
1/4 cup sugar
1 tbsp of vanilla extract
1 cup golden raisins
1 wheel of brie or camembert
1 french baguette

In a medium-size saucepan, combine the water, wine and sugar. Bring to simmer over medium-high heat until the sugar is dissolved, about 5 minutes. Add vanilla extract to the sauce and stir. Add sauce to the raisins in a medium bowl. Let the sauce & raisins cool at room temperature for one hour then refrigerate overnight. I only refrigerated for a couple of hours and while it was still good, I don't think the wine really soaked into the raisins.

Drain the raisins and set aside. KEEP the liquid. Put liquid back in the saucepan and bring to a boil. Reduce to about 1/3 cup, or until it looks like light syrup and is a deep golden color. This should take somewhere around 20 minutes (give or take 10 minutes). Watch carefully so the syrup doesn't burn. If it starts to foam, remove from heat immediately. The syrup will continue to thicken as it cools. Let it cool completely.

Preheat oven to 400 degrees. Slice the French baguette into 1/4 inches pieces. Bake for 8 to 10 minutes or until golden brown or just crispy. I poured a little oil over them, but I don't think you need it.

Heat the Brie at about 300 for 10 minutes. I am guessing here because I did 325 for 15 minutes and it was tooo much. So keep an eye on it. You want it slightly melted, but to still hold it's form. Then just pour the syrup & raisins on top and serve.

(Click here for printable recipe)

Monday, April 19, 2010

Iron Chef Wine: Ham with Champagne and Vanilla Glaze


Usually, I leave the big ticket dinner items for my mom to make. Ham, turkey, Pot Roast, etc. But, for this particular Iron Chef, I wanted to show my grit and make a big ticket item. Perhaps this would get me the big win for once. So, I ventured into unknown territory and made a Ham for the first time. It didn't get me the win. But, never fear it is still a good dish. I'm even eating the left over ham for my lunch this week.

I did have problems figuring out what type of ham to buy (even though the recipe distinctly states a bone-in smoked ham). But, hey that's what Mom's are for. She suggested I try Walmart or Food Lion. And, I found my Ham at Walmart for a very reasonable price. Don't go to Kroger for your ham, though. They are very pricey. And, I had planned on starting the ham about 3 hours before the party began. My mom suggested I start right away. So, I started cooking the ham about 4 hours before the party, which proved to be the perfect time. I was able to get the ham ready and myself ready with plenty of time to spare. I followed this recipe to the "T." Enjoy!

Ingredients
1 (11-pound) 33%-less-sodium smoked, fully cooked bone-in ham
24 whole cloves
Cooking spray
1 1/2 cups Champagne or sparkling wine, divided
1 (2-inch) piece vanilla bean, split lengthwise
1 cup apple jelly


Preparation
Preheat oven to 350°.

First you trim whatever fat is on the ham. Next, I took each clove and individually placed it into the ham in a diamond shape. Place ham, bone end up, in a roasting pan coated with cooking spray. Next, I pour 1 cup Champagne over ham and baked for about 45 minutes at 350°.

I've always wanted to scrape seeds from a vanilla bean and that's exactly what I got to do next. Scrape the seeds into a small saucepan, and then you add 1/2 cup champagne to the pan and toss the vanilla bean into the pan as well and bring to a boil. Cook for about 2 minutes. Next, I stirred in the apple jelly and cooked for an additional 3 minutes or until the jelly dissolves, stirring constantly. Remove from heat. Be sure to take out the vanilla bean.

Take out the ham after about 45 minutes and pour half of Champagne mixture over ham. Bake for an additional 30 minutes; pour remaining Champagne mixture over ham. Bake an additional 30 minutes or until ham is thoroughly heated. Then place ham on a platter; cover loosely with foil. Let stand 15 minutes.

I don't really recommend the next step. I thought it ended up making the ham too salty, but feel free to try it. I took out a zip-lock bag and placed in a 2 cup glass measure cup or bowl and pour drippings from the roasting pan into the bag. Let stand for 10 minutes. The fat from the roasting pan will rise to the top. Snip off one corner of the bag and drain the drippings into a bowl; stopping before the fat layer seeks out. Throw out the bag. Serve sauce with ham.

I found this recipe here.

(Click here for printable recipe)

Iron Chef Wine: Marinated Shrimp with Champagne Beurre Blanc

Have you ever heard of that diet book entitled, “French Women Don’t Get Fat”? Seems like they are rubbing it in a little, don’t you think? Especially since all the food they send over to America seems to be particularly unhealthy. French fries, French toast, and pretty much anything from Julia Child’s cookbook. I can perfectly picture those beautiful, lithe French women snickering as they puff away on their glamourous cigarettes saying, “Ha, ha, ha! We have tricked ze Americans and now zey are fat and miserable! Send zem more recipes made with butter!” And that’s when they invented the Beurre Blanc, a fancy schmancy name for butter sauce. But, after tasting this recipe (the Iron Chef Wine winner) I think you’ll agree that clogging your arteries tastes pretty darn good.


Sauce base
2 cups Champagne or other dry sparkling wine
1/3 cup finely chopped shallots
2 tablespoons Champagne vinegar or other white wine vinegar
1/4 teaspoon whole black peppercorns

Shrimp
1 cup Champagne or other dry sparkling wine
1/4 cup extra-virgin olive oil
3 tablespoons minced shallots
1/2 teaspoon freshly ground black pepper
24 extra-large uncooked shrimp (about 2 pounds), peeled with tail left intact, deveined
1 tablespoon minced fresh chives
1 tablespoon minced fresh tarragon
1 tablespoon minced fresh parsley
Nonstick vegetable oil spray
1 stick chilled unsalted butter, cut into 8 pieces

A few quick notes... if you’ve never used shallots before, you can usually find them near the garlic, as they are sort of a mix between garlic and onion. The nicer grocery stores almost always carry them, but they can be somewhat expensive. You don’t need many for this recipe, so it’s worth it in my opinion. I used a fairly inexpensive Brut Champagne and the sauce was very tasty, but obviously the better the Champagne, the better the flavor. And finally, I used the white wine vinegar since I knew that was something I’m likely to use again, versus Champagne vinegar, which is not a common ingredient.

You can make the sauce base up to four hours ahead of time, which makes things a lot easier if you are having a party or something and want to serve this dish warm. It’s fairly simple, just mix the four ingredients in a saucepan and bring to a boil. Then, let it boil until the liquid is reduced to about half a cup, which will take around 20 minutes. The more you reduce it, the more tart it becomes, so don’t overdo it. In the meantime, mix up your marinade. Stir the Champagne, olive oil, shallots and pepper in a small bowl. Put the shrimp in a large ziplock bag and pour the mixture over, making sure the shrimp are coated. Marinate for at least a half hour, and no longer than one hour.

I made my beurre blanc sauce before cooking the shrimp because I wasn’t sure I could handle both at once. If you are a skilled multitasker or have some help, you can do them at the same time. Just remember that the shrimp will cook fairly quickly, while the sauce takes about ten minutes to pull together. Warm up the sauce base in a saucepan over medium-low heat. Be very careful never to let it boil or the sauce will break. Add the chilled butter one slice at a time, whisking it in until it’s fully melted. Take it slow and don’t rush it. Once all the butter is melted in, it’s done! Just add a little salt and pepper to taste. Broil the shrimp until just opaque in the center, about 2 minutes each side. Then put the shrimp on a serving platter and pour the sauce over them. Finish with a sprinkling of minced chives, tarragon and parsley. It might be a good idea to serve this with some French bread, or simply let your guests lick it off the plates, as some of the highly cultured ladies at our Iron Chef party may have done. And I don’t think even those uberthin French ladies would fault them for that.  


(Click here for printable recipe)

Sunday, April 18, 2010

Iron Chef Wine: Port Wine Chocolate Cake

I make a creamy cheesecake that my brother requests on his birthday every year, and I make an apple pie that is the essence of America, baseball, and blue jeans. However, as delicious as those to recipes are, that was the extent of my baking.

Yesterday, for our fourth Iron Chef competition (more details to come on Iron Chef nights later), I tackled a new baking challenge. It taught me that cream of tartar sauce is found among the spices and not among the liquid baking ingredients, that separating eggs is not nearly as intimidating as I had thought it to be, and that Bundt pans create works of beauty.

Here’s the recipe (from allrecipes.com):
Port Wine Chocolate Cake Recipe

Ingredients

  • 10 (1 ounce) squares unsweetened chocolate
  • 3/4 cup butter
  • 5 egg yolks
  • 3/4 cup white sugar
  • 3/4 cup port wine
  • 1/2 cup all-purpose flour
  • 5 egg whites
  • 1/2 teaspoon cream of tartar
  • 3 tablespoons white sugar
  • 1 cup chopped walnuts
  • 1 cup semisweet chocolate chips
  • 1/2 cup butter
  • 1/2 tablespoon corn syrup
  • 1/2 cup port wine
  • 1/2 teaspoon vanilla extract

  1. In the top of a double boiler, melt unsweetened chocolate and 3/4 cup butter, stirring occasionally, until smooth. Set aside to cool to room temperature. Preheat oven to 350 degrees F (175 degrees C). Grease a 10 inch Bundt or tube pan.
  2. In a large bowl, beat egg yolks and 3/4 cup sugar together with an electric mixer on High speed until light and fluffy, about 5 minutes. Gradually stir in the 3/4 cup of port wine and flour. Fold in the cooled chocolate mixture.
  3. In a clean bowl, whip egg whites with cream of tartar until frothy. Gradually whisk in 3 tablespoons sugar, and continue to whip until stiff peaks form. Fold 1/3 of the whites into the batter, then quickly fold in remaining whites until no streaks remain. Quickly fold in walnuts. Pour batter into prepared pan.
  4. Bake in the preheated oven for about 45 minutes, or until tested done with a toothpick. Cool in pan 10 minutes. Invert onto serving plate. Cool completely.
  5. To make the glaze: In the top of a double boiler, over lightly simmering water, combine chocolate chips, 1/2 cup butter and corn syrup. Stir frequently until chocolate is melted. Stir in the remaining 1/2 cup port wine and vanilla until mixture is smooth. Set aside to cool for about 30 minutes. Pour glaze over the cooled cake.

I bought the unsweetened chocolate squares not realizing that 8 ounces came in a box, not the 10 I needed, so I was 2 oz. short when I made it. This didn’t seem to hinder the final result, though.
Note, this is by no means a healthy recipe. This cake was rich and decadent, something for special occasions or something for when you have to pull out the big guns for cooking competitions. Hopefully, if you try it, there won’t be people voting who don’t like chocolate, who will pull down your average score!
Happy cooking,
-KSP


(Click here for printable version)

Friday, April 16, 2010

Fettuccine with Leeks and White Beans

Martha Stewart has a series of Spring pastas on her website. There were several that got my attention, this one in particular. It is light and yet very hearty. I am posting the picture from Martha's website because the dish I made was delicious but it wasn't pretty.


1 tbsp olive oil
2 bunches of leeks
2 cans (15 1/2 ounces each) cannellini beans, drained and rinsed
2 cans (14 1/2 ounces each) reduced-sodium chicken broth (3 1/2 cups)
1/2 teaspoon dried sage
12 ounces fettuccine
1 Lemon
1/2 cup heavy cream
1/2 cup finely grated Parmesan cheese, plus more for serving

Directions
In a large skillet, heat 1 tablespoon oil over medium heat and add leeks. Cook leeks stirring often, until softened, about 5 minutes.

Use a potato masher to mash about one third of beans. Martha has you do this in the pan, but I found you couldn’t tell what was a third of the beans after you mix it with the broth. Then add beans, broth, and sage to the pan with leeks and bring to a boil; reduce to a simmer. Cook until sauce has thickened but is still soupy. (Martha says about 10 minutes, but I left mine on for about 20 minutes).

Meanwhile, in a large pot of boiling salted water, cook pasta according to package. Drain; rinse under cold water until cool.

After simmering, cut your lemon in half and squeeze into the sauce then stir (don’t use a fancy juicer that will produce too much juice). Next, stir in cream and Parmesan. Last stir in the pasta

(Click here for printable recipe)

Steve's Mom's Spaghetti Sauce

When you think of homemade spaghetti sauce, you may think of old Italian grandmothers (yes, the same ones we pissed off by cheesing our tilapia) standing over huge pots and stirring, stirring, stirring all day long. But to me, spaghetti sauce is romantic. It’s sexy. And Italian grandmothers? Not so sexy. That’s why the best part of this recipe is the fact that Steve makes it for me. So ladies, I urge you NOT to make this recipe. You need to make your man cook it. And if you don’t have a man, just invite one over and force him to cook it. Fair warning, you may fall in love (with the sauce, and the man.)


Half a large onion or a whole small onion.
Garlic, chopped. Three to four cloves.
Half pound of bacon.
1 16oz can Hunt’s tomato sauce
1 8oz can Hunt’s tomato sauce
1 Tbs butter
1 Tbs sugar
½ tsp oregano
½ tsp basil
¼ tsp cayenne (optional)
Parmesan cheese
Spaghetti

The first step is to pour yourself a glass of wine. Then, sit back and tell your man to get cooking. He should start by prepping the onion and garlic. Have him dice the onion, cutting it bigger or smaller based on your preference. We prefer ours a little bigger for some textural contrast in the sauce. Don’t be afraid that the garlic and onion will ruin the romance later—if you both have garlic breath, it cancels out! Next, have him cut the bacon into bits, about ¼ inch. He should warm up a pan to cook the bacon first. Now would be a good time to put on some water to boil for your spaghetti. Add a little olive oil to the water to stop the spaghetti from sticking together. Have him fry the bacon to the desired doneness. It can be a little under since it will have more cooking time in the sauce later, but if you like it crispy, now’s your only chance.

When the bacon is done, have him take it out of the pan (a draining spoon works well here) and sit it on a few paper towels to soak up some grease. He should pour out almost all of the grease, leaving just a little to do the onion and garlic. Add a little pepper to the onion and garlic and cook it until the onion is clear and soft. Tell him to be careful not to burn the garlic with a pan that’s too hot. When the onion and garlic is done, he should turn down the heat to a simmer and add the tomato sauce, herbs, sugar, bacon and cayenne. Have him swirl in the butter and stir until it’s completely melted in. Simmer for about ten minutes. (Now’s a good time for that romance I was talking about.) Hopefully your water is boiling by now, so you can cook the spaghetti. This is the only step in the process that I actually handle myself, but feel free to have him do that part too.

Once ten minutes of smooching has passed, it’s ready to serve! (If you go a little longer, don’t worry, it’ll keep.) Sprinkle on some parmesan cheese and serve with garlic bread. Candlelight and some nice wine completes the romantic evening. As for what to serve for dessert… I’ll let you handle that. Buon appetito!


(Click here for printable recipe)

Wednesday, April 14, 2010

Lemon Fettuccine with Bacon & Chives


I often go to Big Girls Small Kitchen's blog and see what those gals have been up to in the culinary world. They recently made this Pasta dish, and I thought I would give it a go. I've been craving a really good homemade pasta dish. Normally, I'm a Traditional Red Sauce and Spaghetti kind of gal. I thought I would give this one a try and be a little more adventurous. It sounded reasonable; bacon, wine, cheese. How could it possibly go wrong? Well, it did. I don't know if it was the Romano Cheese, the lemon, or the wine, but something about it just didn't jive with me. Feel free to give it a go, and let me know if you have any success with it. I pretty much followed the recipe exactly, but I did add a dash of garlic salt to it.

Ingredients
3 slices bacon
1/4 cup white wine
1/2lb fresh fettuccine
2 tbsp finely chopped chives
1/2 lemon, juiced
1/4 cup grated pecorino
1/4 tsp crushed red pepper flakes
1/4 tsp salt

In a skillet, cook the bacon until brown and crispy on both sides. Set aside, and when cool, crumble with your fingers. Turn the heat down to medium-low and deglaze the pan with the wine. Cook for a minute or two, until the alcohol has burned off. Set aside in a mixing bowl.

Then bring a large pot of water to boil. Cook the pasta until al dente. Add to the bowl with the wine and toss together with the bacon, chives, lemon juice, cheese, salt, and red pepper.

(Click here for printable recipe)

Saturday, April 10, 2010

Lime Pie


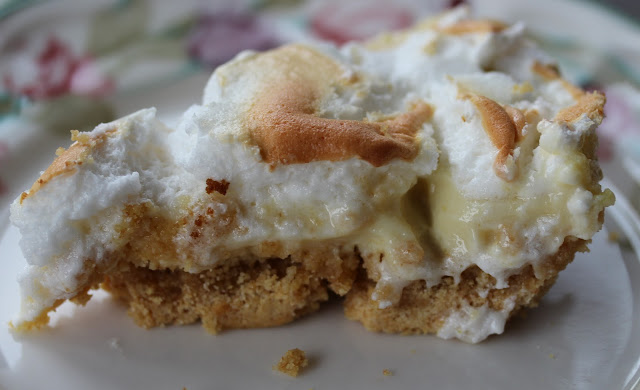
This is a recipe my mom has made for years. I love limes and graham crackers so how could this possible go wrong? It doesn't. It is very limey and very good. This is a recipe my Mom got from my Grandma, and has been handed down to me. Or, maybe I stole it. Alas, this recipe has been around since I was a kid. When I went to visit my Grandma last summer in Illinois, I made this recipe from memory. Grandma thought the pie was too limey. Perhaps I overdid it on the lime zest. I thought the pie crust tasted funny. My Grandma is a big believer in keeping items in the freezer for a long, long time. So, I have a feeling the graham crackers were stale. So, lessons learned; don't over zest the lime filling and don't use stale graham crackers. Enjoy!

Pie Crust
1 2/3 cup Graham Cracker Crust
1/4 cup sugar
1/4 cup plus 2 tbsp melted butter

Combine graham cracker and sugar in a bowl and mix. Then stir in melted butter. Place in a pie plate and press firmly into plate. Bake the pie crust at 350 degrees for about 10-12 minutes. Then remove from oven and let cool. Proceed with making the filling and the meringue.

Lime Filling
3 egg yolks (keep the egg white in separate bowl)
1 14 oz can Sweetened Condensed Milk
1 tsp lime zest
1/2 cup fresh lime juice (about 3-4 limes)

Combing the above ingredients and stir well. Pour into Pie Plate.

Meringue
Stir well the 3 egg whites and add a teaspoon of cream of tarter and mix until fluffy then add about 3 tbsp sugar until stiff peaks form. Pour on top of filling.

Bake at 350 degrees for about 8-10 minutes until Meringue is a nice golden color.

After pie has cooled, place in refrigerator for about 3-6 hours until cold.

(Click here for printable recipe)

Grilled Pork Tenderloin with Green Mango

Okay, I have a confession to make. I didn't make this recipe. Instead, I ate it. I went over to my parent's house to have some pork tenderloin with mango. I didn't know I was having a pork tenderloin lettuce wraps of sorts. But, it was so good and so pretty that I had just had to post this recipe that my Mom made. She told me that she followed the recipe exactly, but used the Dry Sherry instead of Sake. As she had sherry on hand. She was pretty sure she grilled the pork longer than the 22 minutes, but used a thermometer to get the exact temperature. My Dad cheated and added Baslamic Dressing to his wrap. Shh. Don't tell Mom. Enjoy!


Pork

1/4 c. pineapple juice
2 tbsp. finely chopped, peeled fresh ginger
1 tbsp. low-sodium soy sauce
1 tbsp. sake (rice wine) or dry sherry
4 large garlic cloves, minced
1 lb. pork tenderloin, trimmed
1/4 tsp. salt
1/4 tsp. freshly ground black pepper
Cooking Spray

Salad

1/2 c. shredded carrot
1/3 c. chopped fresh mint
1/3 c. chopped fresh basil
1/4 c. chopped fresh cilantro
1/2 tsp. kosher salt
1/4 tsp. crushed red pepper
1 large Green Mango (unripe) peeled and shredded
1 large Jalapeno, seed and finely chopped
8 Boston Lettuce Leaves
1 c. Mung Bean Sprouts

1. Prepare grill to medium-high heat

2. To prepare pork, combine first 6 ingredients in a large zip-top plastic bag; seal. Marinate 1 hour, turning occasionally. Remove pork from bag; discarde marinade. Sprinkle pork evenly with salt and pepper.

3. Place pork on grill rack coated with cooking spray. Grill 22 minutes or until thermometer registers 155 Degrees, turning occasionally. Remove from heat, let stand 10 minutes. Cut into 1/2 inch thick slices. Cut each slice into thin strips, and keep warm.

4. To prepare salad; combine carrot and next 7 ingredients (through jalapeno) in a medium bowl, toss well.

5. Place about 1 1/2 oz. pork on each of 8 lettuce leaves, top each serving evenly with 1/4 cup mango mixture and two tbsp bean sprouts.


(Click here for printable recipe)
Apricot-Lemon Chicken

When the last step of a recipe is “Sprinkle with lemon rind,” I normally turn the page, close the browser, or some other similar action paired with a deep sigh. Someday, I’ve always thought, I’d tackle such recipes, but ‘sprinkling with lemon rind’ just seemed too fancy for an every day dinner, right?


I proved myself wrong, and shake my head at myself for avoiding that last lemon rind touch. This easy final panache totally made the meal last night, especially after a long, exhausting week. Come Friday, we all need a little chic elegance on our plates, right?

Ingredients
1 teaspoon curry powder
1/2 teaspoon salt
1/4 teaspoon freshly ground black pepper
  4 (6-ounce) skinless, boneless chicken breast halves
Cooking spray
1/3 cup apricot spread (such as Polaner All Fruit)
2 tablespoons fresh lemon juice
2 tablespoons water
2 teaspoons grated lemon rind


1. Combine first 3 ingredients in a small bowl; rub mixture over chicken.
2. Place a large nonstick skillet over medium-high heat. Coat pan with cooking spray. Cook chicken 6 minutes on each side or until done. Remove chicken from pan, and keep warm.
3. Add apricot spread, lemon juice, and 2 tablespoons water to pan, stirring until smooth. Cook over medium heat 1 minute. Spoon sauce over chicken; (and of course) sprinkle with lemon rind.
This recipe was easy and delicious. I highly, highly recommend it. Happy cooking!
-KSP


(Click here for printable recipe)

Chipotle Deviled Eggs

I have a sordid history with deviled eggs. My sister used to make fun of me mercilessly (and in front of the neighbor boys) for the way I ate them. I am a firm believer that a deviled egg is a one-bite wonder. But my sister used to make me laugh while I was eating that one bite, which I’m sure I don’t have to tell you, wasn’t very pretty. But I’m an adult now, and more importantly, my sister lives 750 miles away, so I’m free to eat deviled eggs the way I want to. These are the deviled eggs from my childhood, with the more adult addition of chipotle to take them to the next level.


Eggs
Mayo
Dijon mustard
Chipotle in adobo sauce
Salt
Smoked paprika

I’m not giving amounts because this recipe can be made with any number of eggs and it’s really a matter of taste and texture to get you to the right proportions. I recommend tasting (with a clean spoon) throughout until it gets to where you like it.

Start by boiling your eggs. I’m loving the method I used in the potato salad recipe, it’s working really well. I’ll repost it here. Put the eggs in a pot and just cover them with cold water. Bring the water to a boil and let them boil for about one minute. Then remove them from the heat and let them sit, covered, for about 15 minutes. Then rinse them with cold water until they are cool and ready to peel.

Slice the eggs in half and put the yolks in a small bowl. They should pop right out. Put the whites on a plate. Break the yolks up with a fork before adding mayo. Some people like their filling to be super smooth, in which case you’ll need to use a processer. I personally like it a little more rustic, so I just stir with a fork. Add enough mayo to make the mixture creamy, but not so much that it tastes like mayo. I suggest starting with less than you think you’ll need and then adding until it gets to the right texture. For 18 eggs I put a little less than half a cup in. Add about a tablespoon of Dijon mustard. This won’t be a dominate taste, it just adds a little depth. Chop up the chipotle. I usually do 2 or three peppers. Keep in mind that it will get spicier as it rests. Add a few dashes of salt, to taste.

Next comes the messy part. I use a plastic bag with one corner cut off to pipe the filling into the egg whites. Just spoon the filling into the bag and use it as you would a frosting bag. When all the eggs are filled, sprinkle them with smoked paprika to give them a finished look. Refrigerate them before serving, and then enjoy them in one bite. Just don’t let anyone make you laugh.
(Click here for printable recipe)