Friday, June 29, 2012

Pasta w/ Zucchini, Basil, and Goat Cheese

So, our next Iron Chef is tomorrow and the secret ingredient is Basil. I really love basil so I was excited to try out some recipes. I figured this recipe from Supernature  might be a hit because for one it has goat cheese and two, well, it has basil. I really enjoyed this pasta dish. I don't think it's an iron chef winner, but it is still a really great recipe for a weeknight dinner. It was very easy to make and different than your typical pasta dish. I hope you like it. I know I did! Enjoy!


Ingredients:
½ tsp dried chilli flakes, approximately
1 tsp sea salt
1 medium brown onion, peeled and finely diced
2 tbsp lemon juice                                                
2 large garlic cloves, finely diced
6 tbsp extra virgin olive oil
4 oz goat’s milk cheese, diced if soft, or grated if firm
.75 pound of dried pasta (any kind)
2 c green zucchini, ends trimmed
Freshly ground pepper
Freshly grated parmesan to serve
Handful fresh basil leaves, torn

Grate zucchini on a grater with the large holes side. Then, take a heavy pan and pour in the olive oil and cook the onion, garlic, half the basil leaves, red chili peppers, salt, and pepper.  Now, cook for about 2 to 3 minutes over medium heat. At this point, get your pot of water boiling and add in the pasta. Add in the zucchini and cook for about 5 to 8 minutes. Supernature's tip about not cooking the zucchini for too long was certainly accurate, because the green definitely disappeared from the zucchini. I added the lemon juice next (as is recommended) but I wish I hadn't. Next time I make this I will not add the lemon juice. If necessary, add in additional salt and pepper. Drain the pasta once it's al dente. Add the pasta to the zucchini mixture and toss. Spoon the pasta mixture into bowls and top with goat cheese and more basil if desired. Enjoy!

Thursday, June 21, 2012

Baked Chicken Wings with Spicy Dijon Molasses Sauce

I’ve got kind of a thing for chicken wings. During football season I’d estimate that I probably eat a chicken wings at least once every 24 hours. That might be a slight exaggeration, but the point is, I like wings a lot. So, naturally, I’ve saved up a lot of recipes to try at home. I made one that was such a colossal failure that I didn’t post it here. But these turned out pretty ok. I wouldn’t say that I’ve found the perfect recipe quite yet, but this is a nice stop on the way to perfection. It’s got a little spice, a little sweet, and the mustard gives it a complexity and sets it apart from your normal wings. I found the recipe on Living Lou’s blog and made a couple tiny tweaks (incorporated below).


Spice Rub
1 tbsp chipotle chili pepper powder
1 tsp sweet paprika
1/2 tsp dried oregano
1/2 tsp coriander
1/2 tsp dried mustard
1/2 tsp cumin
1/4 tsp salt
1/2 tsp freshly ground black pepper
1 tbsp brown sugar

Sauce
1/4 cup Dijon mustard
1/4 cup spicy mustard
1/4 cup molasses
5 tbsp ketchup
2 tbsp honey
1 tbsp chili garlic sauce
1 tbsp Worcestershire
1 tbsp brown sugar
1 tsp chipotle hot sauce
1/2 tsp garlic powder
1/2 tsp onion powder

3 pounds chicken wings

I actually used Kroger drummies for this instead of actual wings. If you use wings, make sure to break them down and remove the tips. Preheat the oven to 375. Mix your spice rub ingredients together in a bowl and then pour it over the drummies, mixing them around to make sure they are all evenly covered. I laid them out on a foil lined baking sheet which made them super easy to clean up after. Cook them for 15-18 minutes on one side, then flip them and cook for 15-18 minutes on the other. Mine went for 17 minutes each side.

While the wings are baking, mix up your sauce ingredients in a bowl. Refrigerate it until you need it. After the wings have baked the full time, take them out of the oven and set it to broil. Put the wings in a large bowl and pour about half of the sauce over them, mixing to make sure they are all coated. They should look pretty delicious right now, but don’t skip the next step!

Lay them back out on the baking sheet (you may want to lay out new foil) and broil for two minutes on one side, and one minute on the other. Now they are ready to serve with the remaining sauce for dipping. Or you could go with the classic Ranch or bleu cheese, but they aren’t crazy spicy so I don’t think you need it. Hope you like them, and look forward to some more wing recipes in the future as I try to find a favorite!

(click here for printable recipe)

Monday, June 18, 2012

Chicken Tikka Masala

I’ve only made Indian food once before, but it still is one of my favorite recipes on this blog: Butter Chicken. Given that, it’s strange that I never tried another Indian dish in all this time. I blame it on Garam Masala. It’s a spice mixture that tends to appear in a lot of Indian recipes, and it’s one spice that I don’t have in my obsessive hoarder alert of a spice shelf. But, I finally got my grubby little hands on a small jar of it at Penzey’s Spices, and set off to make Chicken Tikka Masala straight away. I’m glad I did.

This dish is actually a lot like Butter Chicken, but the Garam Masala gives it a sweeter flavor. It’s also not as spicy, although you can adjust the spice levels. My husband felt that this had a more present tomato flavor as well, but I didn’t notice that. I found the recipe on Tasty Kitchen.

There is one thing I will change the next time I make this. The chicken cooking process just didn’t work for me, and I don’t think the chicken itself got incredibly flavorful. I think the next time I will cut it in cubes before marinating, then skewer it and grill it to get that good char. I gather that this is normally made in a very hot Tandoor oven, so I think a grill might simulate that more closely than a broiler. I also cut down on the cream because I don’t think you need that much.


Ingredients:
3 whole Chicken Breasts
Kosher Salt
Ground Coriander
Cumin
1/2 cup Plain Yogurt
2 Tablespoons Butter
1 whole Large Onion, diced
4 cloves Garlic, minced
1 piece (approximately 2 Inches) Chunk Fresh Ginger, minced
3 Tbsps Garam Masala
1 Chili pepper (I used Serrano), diced small (optional)
1 can (28 Ounce) Diced Tomatoes
2 Tsps Sugar
1 cup Heavy Cream

This is the way the original recipe says to do the chicken, but check out my note above—I think that change will make a difference. Sprinkle the chicken breasts on both sides with salt, coriander and cumin. Then pour the yogurt over them and spread it around so they are coated. Cook them under the broiler on a wire rack set above a foil lined baking sheet. Five to seven minutes on each side until they are just cooked through and are lightly charred. Remove them and set aside to cool for now.

In a large skillet, melt 2 tablespoons of butter before adding in the diced onion. Cook over medium high heat until the onions are slightly brown. Add in the garlic and ginger, plus a tablespoon of salt. Add in the Garam Masala and also your chili pepper if you like things to be spicy. Stir them in, and then pour in the whole can of tomatoes (including the juice) and the sugar. Stir well, scraping the bottom to deglaze, and then let the mixture simmer for 5-10 minutes.

In the meantime you can chop up the chicken into bite-sized pieces, and now is probably a good time to start your rice. Add in the chicken, cream and a handful of chopped cilantro, and your second favorite Indian dish is ready to serve!


(click for printable recipe)

Sunday, June 17, 2012

Chocolate Chip Banana Bread

I was at Physical Therapy the other day, when a nice man came by the office giving away vegetables and bananas from his farm. Don't worry; he's a patient at the office and he was advertising his farm on his truck. So, I'm sure he is legit. :) Well, I picked out some yellow squash as that was all he had left. I also grabbed a bunch of bananas. The bananas were very ripe. And, I only like to eat bananas when they are barely green. So, I figured I would use these bananas to make banana bread. I've made this recipe once before, and I can't believe I haven't posted it on the blog yet. The bread comes out very moist. Plus, the chocolate chips give a nice flair to boring ol' banana bread. I really think you should give it a try. You won't regret it one bit. Enjoy!

 
Ingredients:
1 c sugar
1 stick butter, softened
1 1/2 c mashed bananas
2 eggs, room temperature
2 tsp vanilla
2 c all-purpose flour
1 1/2 tsp baking powder
1 tsp baking soda
1/2 tsp salt
1/4 tsp cinnamon
1/8 tsp nutmeg
1 cup semi-sweet chocolate chips


Pre-heat oven at 325.

Take your bowl from a standing mixer, and add in the butter and sugar. Beat on medium speed until light and fluffy. Add in the mashed bananas, vanilla, and eggs. Beat well. Take a small bowl and add in the flour, baking powder, baking soda, salt, cinnamon, and nutmeg. At medium-low speed; gradually add the dry ingredients into the banana mixture. Fold in the chocolate chips until well incorporated. Pour the batter into a greased and floured 9x5x3 loaf pan. Cover loosely with a tent of aluminum foil. Bake for 40 minutes. Remove foil from oven and bake for an additional 20 minutes or until the toothpick comes out clean. Remove from oven and let cool. Invert the loaf pan onto a plate. Banana bread should come out easily once cooled. Enjoy!


(click for printable recipe)

Friday, June 15, 2012

Honey Cake with Honey Frosting

I tried many, many, many recipes for iron chef honey. Honey was a very difficult ingredient to make work for a dessert. You would think it'd be easy, but, nope; it wasn't. I really did like the honey sesame brittle, but it was too sticky to eat. The doughnuts were delicious but they are best eaten right away. The recipe that I probably should have stuck with was this honey cake with honey frosting from The Cake Blog. It really tasted like honey and it was actually pretty good. I think I just really wanted to do something different than making yet another cake. But, sometimes it is best to stick with the tried and true in the end. The recipe was posted as cupcakes, but since one of our friends isn't a big cupcake fan I just made it into a cake. I didn't change up this recipe at all. I think you will like it. I know I did. Enjoy!


Ingredients for Cake:
1 stick butter, room temperature
3/4 cup sugar
2 eggs
1 1/2 cups all-purpose flour
1 tsp baking powder
1/2 tsp salt
1/2 cup buttermilk
1/4 cup honey
1 tsp vanilla

First set your oven to 350 degrees. If you are making cupcakes take out one dozen cupcake pan and line with cupcake holders. Or, use an 11x7x1.5 inch baking dish and spray liberally with cooking spray.
Now, in a medium sized bowl stir together the dry ingredients (salt, flour, and baking powder). Set aside. Next, take a small bowl and stir together the honey, buttermilk, and vanilla. Set aside. Then, take your mixing bowl and add in the butter and sugar and beat until fluffy. Add the eggs one at a time. Beat well. Gradually add in the wet and dry ingredients alternating between the two until you end with the dry ingredients. Mix well. Pour into your cupcake liners and/or the baking dish. Bake for 20 to 25 minutes or when a toothpick comes out clean when inserted into the cake. Set aside to cool.

Ingredients for Frosting:
1 1/2 sticks unsalted butter, room temperature
4 oz cream cheese, softened
3 cups confectioner’s sugar
3 Tbsp honey
yellow food coloring (optional)
yellow sugar sprinkle

Clean out your bowl from the standing mixer, and then add in the butter and cream cheese. Stir well. Gradually add in the powdered sugar. Stir in the honey, next. Add in a couple drops of the food coloring if desired. Spread on the cupcakes or cake and sprinkle with yellow sugar sprinkles if desired. Enjoy!

(click for printable recipe)

Wednesday, June 13, 2012

Chocolate Ice Cream with Peanut Butter Cap'n Crunch

There are two items in my house that are at war. One is my ice cream maker. The other is my scale. They just do not get along. My scale has been winning out for awhile but this week the ice cream maker got back in the fight in a big way. A big chocolatey, peanut buttery way.

I used a chocolate ice cream recipe from Jeni, of Jeni’s Splendid Ice Creams via David Lebovitz. But I wanted to do something different and that’s why I added the Peanut Butter Cap’n Crunch at the very end. It was actually quite good at the beginning. But by the time the ice cream had hardened, I realized that the Cap’n just doesn’t hold up well to ice cream. Sadly, it got a little mushy. However, the chocolate ice cream was fantastic! Really rich and extremely chocolatey. I would recommend just making the chocolate ice cream and use the Cap’n Crunch as a topping if you so desire.

Ingredients:
1 cup whole milk
4 teaspoons corn starch
1 cup heavy cream
1 cup evaporated milk (unsweetened condensed milk)
2/3 cup sugar
2 tablespoons light corn syrup
1/3 cup unsweetened cocoa powder
3 ounces semisweet chocolate, chopped
1/4 teaspoon sea salt
1/2 teaspoon vanilla extract

In a very small bowl or prep dish, make a slurry with the corn starch and 3-4 tablespoons of the milk. Mix until it’s smooth. In a large saucepan, heat up the rest of the milk, cream, evaporated milk, sugar and corn syrup. I actually didn’t have evaporated milk, only sweetened condensed milk and the powers of the Internet told me that was not a suitable substitute. However, you can just use regular cream and that’s what I did.

When the milk mixture comes to a moderate boil, whisk in the cocoa powder very well and let it boil for about 4 minutes. You’ll know if the boil is too much if the milk starts to foam up and threaten to boil over. Just turn the heat down some if that happens. Try to break up any clumps of cocoa you see.

Next pour in your slurry. You may need to mix it again to loosen it up. Cook for about one minute while stirring constantly until it thickens slightly. This happened almost immediately for me. Take it off the heat and add your chocolate and salt and stir until everything is melted and smooth. Then add the vanilla.

For this next step it’s helpful to have an extra set of hands so get someone to help you if you can. Pour the mixture through a sieve into a Ziploc bag. Be careful because it’s very hot. Zip the bag closed and put it in a bowl filled with ice to cool down for about a half hour. You will want to check it and move the ice around as it melts to make sure the mixture is getting cool.

Once it’s cool, put the mixture into your ice cream maker and follow the instructions for freezing it. Once the mixture had the consistency of soft serve, I added the Cap’n Crunch. You can either leave the mixture in your canister and put it in the freezer to set up, or pour it into another container. I pour it into another container because I find that the ice cream maker canister freezes it so solid that it’s hard to ever get out. I found these great little pints on Amazon that work great. They make it easy to give away my ice cream, which makes my scale feel better about the whole thing. 


(click for printable recipe)

Tuesday, June 12, 2012

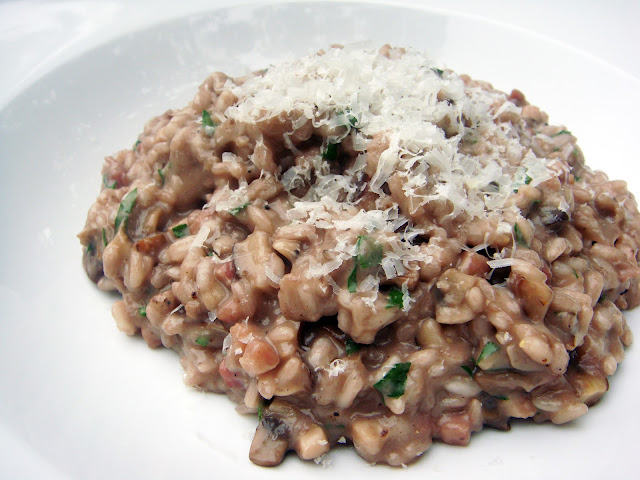
Risotto Rosso

I’ve made risotto once before, and it was definitely delicious enough to make up for the time it takes to actually prepare it. But for whatever reason, I haven’t made it since, until now. And I think I’ve found the secret to really good risotto! Ready? Here it is: get your husband to stir. That’s it! You can do everything else, but leave the stirring to someone else and it tastes even better.

This recipe is not too different from the other mushroom risotto that I made, but this one also includes red wine and pancetta, which just sends it over the top. It’s warm, creamy, filling and full of flavor. I found the recipe at food52 and it was the winner of their best risotto contest! I have to concur. I think it was named for the red wine that the author used to make it. The only thing I changed was to use 4 oz. of pancetta instead of 2 because the package I got was 4.


Ingredients
2 Tbsp. olive oil, divided
3 Tbsp. butter, divided
4 oz. diced mushroom caps, shiitake or cremini (or both!)
4 oz. diced pancetta
1/4 cup diced shallots
1 cup carnaroli rice, or use vialone nano or arborio
1/2 cup fruity red wine (I used Merlot)
2 cups beef broth
3 cups chicken broth
1 oz. Parmigiano Reggiano, finely grated
2 Tbsp. chopped Italian parsley
Salt and pepper to taste

Start by getting everything prepped and ready so that you can follow the steps smoothly. In a separate saucepan, combine the two broths and bring to a simmer. Keep it at a simmer throughout. In large pan, heat 1 tablespoon each of oil and butter over medium heat and then add the pancetta. Cook just until the fat begins to cook (about 5 minutes) and then add the mushrooms. You want these to get golden and slightly crisp. Use a slotted spoon to remove the pancetta and mushrooms and set aside.

Add another tablespoon of oil to the pan, move the heat to medium high, and add your shallots. Cook them just until they begin to get soft and then add the rice. We used Arborio since that’s what we had from the last risotto. Cook the rice until it’s completely opaque but not golden. Steve and I had a lively discussion about the difference between opaque and translucent at this point, which was fun. Once your rice is ready, pour in the wine and cook until the rice is pink and the wine has evaporated.

Now turn your heat down to medium low. Here’s where the time gets invested. Add ½ cup of the broth to your pan of rice. Stir it continuously until the broth is completely absorbed by the rice. This happens quickly at the beginning but much more slowly as you move along. Continue to add the broth ½ cup at a time until there is only 1 cup of broth left. At that point you can add the mushrooms and pancetta back into the mixture before continuing to add in the broth. When all the broth is used, your rice should be creamy. If it seems way too thick, you can always add a little more broth. If it’s too loose, just cook it longer.

Add your last 2 tablespoons of butter and stir until they melt in, then do the same with the Parmesan. Finally, stir in the parsley and salt & pepper to taste. You don’t need as much salt as you might think, as the pancetta gives it a good saltiness. Serve it right away, perhaps with a little more Parmesan on top if you are so inclined (as we are). It’s a labor of love, but that’s love you can taste. And isn’t that the best kind?

(Click for printable recipe)

Friday, June 8, 2012

Whole Wheat Bagels


There's something about home-made bread that just makes me feel like a better person. Healthier. More accomplished. A successful “home-maker” for making my house smell so wonderful. A courageous soul for taking on the task.

Actually no courage was required here. The bagel making process was surprisingly easy.

When they came out of the oven, they were just shy of perfect, but who can complain on a first attempt. My husband was drawn to the kitchen by the smell. He looked them over with an approving nod and didn't hesitate when I told him they were ready to try.

“They're a bit more brown than normal bagels,” he said as he brought it to his mouth.

“Whole wheat flour,” I responded.

He grimaced (not quite the health nut I attempt to be), but then later I noticed a few more bagels missing from the finished batch. Apparently my healthy home-made bagels were pretty good after all.


This recipe was taken from the “When Pigs Fly” blog at the suggestion of my wonderful neighbor who guided the way with the bagel-making fun.

Ingredients:
2 ¼ cup hot water (read the directions on your yeast for exactly how hot... it makes a difference!)
2 Tbsp. plus 1/3 cup honey, divided (local would be awesome... though mine was only from the local Kroger)
2 ¼ tsp. sea salt
5 cups whole wheat flour
2 tsp. INSTANT yeast (I had my yeast in 2 ¼ tsp. Packets; I guestimated here)

Directions:
-Measure out water and heat in microwave to recommended temperature. (I measured with a meat thermometer, but there are definitely better ways).
-Mix hot water, yeast, 2 tablespoons of honey, and sea salt.
-Add in the flour one cup at a time, mixing as you go with a spoon. When all of the flour is added, it will be too thick for the spoon and it will be time to knead. At this time, additional water may be necessary (it was for me) if the mixture is too dry/not coming together into a dough. Conversely, if it's too sticky, more flour may be added.
-When the dough is “slightly stiff,” knead your heart out for 8-10 minutes. Wear a content Martha Stewart smile while doing so.
-If making plain bagels, transfer dough into a large bowl and cover with a towel. (I decided to make two varieties of bagels at this point, splitting the dough in half into two bowls. One remained plain bagels. The second – my sweet tooth's rebellion against all the healthiness – became dark chocolate chip. I kneaded that dough more to thoroughly mix in the chocolate chips. Dried cranberries or blueberries would also be awesome. I was out of craisins, which was my original intention.)
-Let the dough rise, covered for a few hours until doubled in size.
-Pound the risen dough down after it's doubled, and then divide into 12 balls (or 6 balls of each variety). Let it rise again for 10 minutes.
-Bring water to boil in a large pot. Mix in 1/3 cup honey (easier if you are patient and really wait for it to boil). Return to a simmer.
-Preheat oven to 425 degrees.
-Form each dough ball into a bagel shape, poking a hole in the middle, roughly 1 – 1 ½ inches in diameter.
-Carefully drop 3-4 bagels at a time into the simmering water depending on the size of your pot. They will float at the top. Let them simmer for 30 seconds on each side, and then place on a cookie sheet ,either greased or on parchment paper. Be sure you wait until the water is simmering here. If it is still slightly boiling, you will have pock-marked bagels. (My first three had this issue. Are you noticing a patience issue here? Hmmm...)
-After all bagels have simmered in the honey water, bake 20 minutes.
-Remove from oven, inhale, take pride in your bagel-making prowess!

Happy baking!

KSP


(Click here for printable recipe)

Wednesday, June 6, 2012

Spicy Sweet Shrimp

There are a lot of ways you can serve shrimp. In the immortal words of Bubba, "There's shrimp soup, shrimp stew, shrimp salad, shrimp and potatoes, shrimp burger, shrimp sandwich..." But you know what? Sometimes, you just want to eat shrimp. Shrimp all by itself. One at a time. And that's what we did with this recipe. I'd been cooking all day for a party and didn't feel like making a big meal, so I just made shrimp. No side. No starch. Just shrimp. And it was excellent. Just the right amount of sweetness paired with the perfect bit of heat. It's a nice change of pace from the other spicy shrimp recipe that we eat fairly often. And it uses today's hot (literally) ingredient: Sriracha. It was the "Best Shrimp Recipe" on food52, which is a really great resource for dinner ideas.


Ingredients
1/3 cup olive oil
1/3 cup Sriracha
1 tsp Worcestershire
3 cloves garlic, minced
1 handful cilantro, roughly chopped
1 tsp sugar
Salt & Pepper
2 pounds of large shrimp, peeled & deveined

The directions are super simple: just mix all the ingredients in a plastic bag or bowl. Don't be afraid to use a good amount of salt and pepper. Let it marinate for 2-4 hours. Then skewer the shrimps and grill. Depending on how hot your grill is it should only take about 2 or 3 minutes a side. Serve them on the skewers or slide them off with a fork. They are delicious enough that you don't need to add a thing!

(Click for printable recipe)

Reposted: Your Last Potato Salad Recipe

I'm reposting this recipe because, well, it's potato salad season. And also I've finally gotten my own photo. I also updated the ingredients slightly.

You know that saying, “As American as apple pie”? It’s total BS. I mean, come on. When was the last time you had a slice of apple pie? Might as well say, “As American as goat cheese.” Or “As American as Choco-tacos.” I say we should pick something else. Something we eat at every cookout. Something that screams Fourth of July with every bite. Something like potato salad. Say it to yourself. “As American as potato salad.” Makes sense right? Well it will, after you try this recipe.


Ingredients
4 pounds medium red-skinned potatoes, unpeeled, scrubbed
8 dill pickle spears, chopped (about 1 1/2 cups)
3 celery stalks, chopped (about 1 cup)
1 small red onion, chopped (about 1 cup)
4 hard-boiled eggs, peeled, chopped
2/3 cup mayonnaise
2 tablespoons Dijon mustard
2 tablespoons apple cider vinegar
2 tablespoons minced fresh dill
Salt and pepper to taste


Probably the best way to start is by hardboiling the eggs. I hate boiling eggs because it should be so easy and it never is. Look up “the perfect boiled egg” online and you’ll find twenty different ways to do it. This is how I do it. There may be better ways out there, but this works for me. Put the eggs in a pot and just cover them with cold water. Bring the water to a boil and let them boil for about one minute. Then remove them from the heat and let them sit, covered, for 12-15 minutes. Then rinse them with cold water until they are cool and ready to peel.

While the eggs are boiling, you can also boil the potatoes. I’ve done this both ways and I think the best way is to boil them whole. If you cut them up first, they boil faster, but the skins tend to fall off. So, throw them in the pot with cold water and let them boil until they are fork tender. Then drain and let them cool before chopping them up. Make sure you have a sharp knife!

Put the chopped potatoes, eggs, celery, onion and pickles together into a large Tupperware container (for easy storage). I suggest mixing up the dressing separately so you are sure it’s fully combined. Then pour it over the potato mixture and stir carefully. I like to let it sit overnight before serving, but you can also serve it right away. Just make sure everything is fully cooled. I guarantee it will be a hit at your next cookout, and soon you’ll be saying, “As American as potato salad,” along with me.

(Click here for printable recipe)

Sunday, June 3, 2012

Ara's Brownies

Not only do we play volleyball at Richmond Volleyball Club, but we also enjoy eating and drinking. Sometimes, food is brought in from home to help celebrate teammate's birthdays, anniversaries, etc. Well, one particular night Ara (one of the volleyball players at the club) brought in some brownies. She asked if we wanted a piece. I mean who am I to turn down a brownie, so I said sure. Man, that brownie was so yummy. I didn't have just one brownie; I had three! Since I liked it so much I decided to ask her for the recipe. Fortunately, she knew it by heart. I decided to make these brownies the other night. They are very gooey and the top has a crispy outer layer. Enjoy!

Ingredients:
2 sticks unsalted butter
4 oz. unsweetened chocolate
4 eggs
2 cups sugar
1 tsp vanilla
1/2 c flour

First, take a 9x13 pan and spray with cooking spray. Set the oven to 375 degrees.
Next, take 2 sticks of butter and the 4oz of unsweetened chocolate and put in a small saucepan. Melt on low heat. Once melted set aside to cool. Next, mix together the eggs, sugar, and vanilla. Stir in the flour and the cooled chocolate mixture. Pour the mixture into the baking pan. Bake for 20 to 25 minutes. When you stick a toothpick into the brownie it may come out with chocolate. That's okay. As long as the brownie is set it should be good. Set aside to cool, and then place in the fridge for an hour. Sprinkle with confectioner sugar. Enjoy.

(Click for printable recipe)