Thursday, December 29, 2011

Hazelnut Gelato (or is it Ice Cream?)

Okay, maybe I've become a bit of a nut (no pun intended) with the Nutella thing. But, there really is a ton you can do with this stuff. Plus, it is sooooo very good. Well, I came across this recipe for Hazelnut Gelato and I bookmarked it a while ago. I had the perfect opportunity to make it for Christmas this year, and I am so glad I did. I mean it was divine, spectacular, fabulous. Sigh. I'm so glad I bought this ice cream maker from Sur La Table this past Spring. The look on my mother's face when she tried this gelato (or is it ice cream?) was priceless. She really liked it. But, then the look on my face was probably even more priceless when I saw my sister make a look of disgust when she tried it. Of course, she was kidding, but she got me for a minute there. The reason why I call this Hazelnut Gelato (or is it Ice Cream?) is because my mom and sister were wondering which one it was. To be honest, I have no idea. It's probably ice cream, but, no matter, it was delicious either way. I highly recommend this recipe. It was wonderful!

Ingredients:
2 cups whole milk
1 cup heavy cream
1/2 cup sugar, plus 1/4 cup
4 egg yolks
1/2 teaspoon vanilla extract
1/2 cup chocolate-hazelnut spread (recommended: Nutella)
1/2 cup toasted hazelnuts, crushed

First thing you do; take the hazelnuts place on a baking sheet and insert this into a 350 degree oven for about 5 minutes. Remove from oven, and carefully place the hazelnuts into a dishtowel. Fold the towel together and rub the hazelnuts together. This helps remove the shell from the nuts. Remove the nuts from the towel, and shake out the towel into your garbage can (to remove the shells). Place the towel over the hazelnuts and using a meat tenderizer smash the nuts. Place the smashed nuts in a bowl, and set aside. Next, take the milk, heavy cream, and sugar and pour this into a small saucepan. Place over medium-low heat and cook just enough so the sugar dissolves. I just let it sit on the burner for about 3 minutes, stirring occasionally. Now, take the egg yolks and place into a standing mixture and whisk the yolks. Pour in half the milk mixture into the egg yolks and stir to combine. Pour the egg mixture into the saucepan. Cook this over low heat until the mixture becomes thick enough to coat the back of a wooden spoon about 10 minutes.

Now, take your nutella and vanilla and place this into a medium bowl. Place a strainer over the medium sized bowl and pour in your milk/egg mixture. Stir this until the nutella is nice and dissolved. Chill mixture for at least 5 hours (overnight is fine) until it's nice and cold. Follow your ice cream directions to finish it off. For mine; I poured in the nutella mixture into my ice cream maker and when it started to form into ice cream (about 15 minutes) I added in my hazelnuts. Enjoy!

(click here for printable recipe)

Swedish Tea Ring

Ever since I was a little girl my mother has made these English Tea Rings for Christmas day breakfast. Basically, they are a type of cinnamon roll. The rolls, however, are much fluffier than cinnamon rolls and they don't have as much cinnamon goodness. The other difference is the rolls are made into a ring instead of rolled and cut. As far as the flavor goes; they are very delicious. Just the right amount of cinnamon. I absolutely love them. Well, I wanted to make these for my neighbor who has helped me out a lot since I've lived in this home. I found this recipe for a Swedish tea ring, and I thought it looked pretty similar to the version my mom made. I decided to give it a whirl. Boy, they turned out excellent. The cardamon and lemon zest really gave the rolls a nice zing. I highly recommend this recipe. And, it was really easy to make. Enjoy!


Ring Dough:
1 package instant yeast (2 1/4 tsp)
1/2 cup milk
1/4 cup butter, softened
2 Tb sugar
1 egg, beaten
1/4 tsp salt
1 tsp. cardamom
zest of one lemon
2 1/2 - 3 cups all purpose flour

Filling:
1/4 cup butter, softened
1/4 cup brown sugar
1/2 TB cinnamon
1/2 cup walnuts, chopped

Glaze:
1 cup powdered sugar, sifted
2 Tb milk
1/4 tsp vanilla extract


First, heat your milk in the microwave for about a minute and a half until the reading of your thermometer comes out to 105-110 degrees. Set aside. Next, add in the flour, sugar, salt, cardamon, instant yeast, butter, and lemon zest into your bowl. Briefly, mix together. Now, with the dough hook attached pour in your milk and egg; mix until it forms a nice dough that pulls apart from the bowl. Turn the dough onto a floured surface and knead for a couple minutes until the dough becomes smooth and shiny. Take a large bowl; lightly spray with cooking oil, and place your dough into the bowl. Cover with plastic wrap and place the bowl in a warm oven (around 80 degrees). Let rise until doubled in size...about an hour or two. I let mine rise for 2 hours.

Once the dough has doubled in size, remove from the oven. Punch down the dough, and turn out onto a floured surface. Roll the dough into a 12x18 rectangle. Now, get your filling together. I did not use walnuts. Pour the sugar/cinnamon mixture onto the dough and spread evenly leaving a slight border around the dough. I did make another batch of the cinnamon sugar mixture because I didn't think it was enough. Roll your dough into a log starting at the short end of the dough. I had to kind of pull the dough as I rolled to make it long enough so I could make it into a ring. Once you have the dough in the form of a ring, take scissors and cut every inch or so only about 3/4 of the way. You don't want to cut the ring. Twist each piece slightly so the rolls fan out from the ring. Place the ring on a parchment lined cookie sheet and put plastic wrap over the dough. Place in your 85 degree oven and let rise for an additional hour. Remove from oven; and pre-heat at 375 degrees. Place the ring in the oven and let cook for about 20-30 minutes or until the rolls have a nice golden color. Remove from oven. And, let cool on a cooling rack. When completely cooled; gather together the ingredients for the glaze into a small bowl. Pour with a spoon over the ring. Enjoy!

(Click here for printable recipe)

Wednesday, December 21, 2011

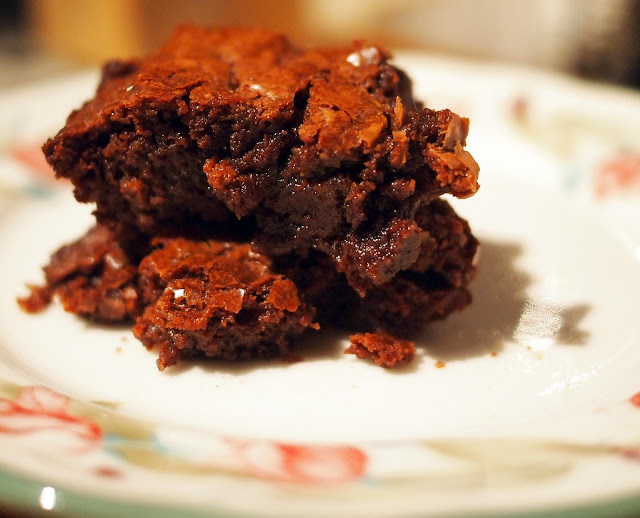
Nutella Brownies

The second Christmas dessert post is yet another brownie recipe. But, this isn’t just any brownie recipe; this is a Nutella brownie!! And, this brownie is very, very good! It’s a moist brownie, and comes out perfectly every time I bake them. Yes, I’ve made them twice in a week. Can you blame a girl?! I’m always looking for new nutella recipes, and I found this one at this blogger’s website . It’s really good. I made these treats for my fellow co-worker's Christmas goody bags. I know they will like them. And, I know you will, too! Enjoy!

Ingredients:
1/2 Cup All-purpose flour
1/4 Teaspoon salt
2 eggs
1 Cup Nutella
1/2 Cup brown sugar
1 Teaspoon vanilla extract
1/2 Cup melted unsalted butter


First, you need to set your oven to 325 degrees. Next, take a small bowl and add in your flour and salt. Set aside. Melt your butter, and when cooled; pour into a mixing bowl. Add the nutella, eggs, brown sugar, and vanilla into the same mixing bowl as the butter. Mix until combined. Gradually add in your flour mixture. Stir until combined. Take an 8x8 pan and place enough foil in it so that you can easily lift the brownie out of the pan. Lightly spray the foil. Pour in your brownie mixture. Bake for about 30 to 40 minutes until an inserted toothpick comes out fairly clean.

(click here for printable recipe)

Walnut Fudge Tart


Just in time for Christmas, I have a couple dessert recipes to post. Christmas is that fun time of year where you get to look for presents for your friends and family. Hang up Christmas lights, the tree, and all your Christmas decorations; having the opportunity to spend some quality time with your family and favorite friends, too. But, the best part of Christmas; is all the baking you get to do! Recently, at my work; some co-workers hosted a Pig Fest. What pray tell could that be; you ask? Well, everyone (in our IT department) gets together and makes some of their favorite dishes and brings it to our 8th and 5th floors. I decided to participate this year, and I stuffed myself silly eating all the glorious food. I decided to make this brownie-like tart from a local chef here in Richmond. I found this recipe when Richmond.com was featuring some “favorite” Thanksgiving recipes from our local Chefs. I thought this pie sounded delicious, and I was definitely right. It was a big hit at the Pig Roast and everyone wanted the recipe. So, here it is. Enjoy!

Crust:
• 1¾ cup flour,
• Pinch salt
• 1/3 cup unsweetened cocoa powder
• ¼ cup sugar
• ¾ cup butter (chilled & cut into 12 pieces)
• 1/3 to ½ cup cold strong coffee

Filling:
• 12 oz. semisweet chocolate, melted
• 2/3 cup sugar
• 2 tbsp. melted butter
• 2 tbsp. milk
• 2 tsp. Kahlua (I used Frangelica since I didn’t have Kahlua)
• ½ cup chopped walnuts, toasted
• 2 eggs

First you need to get your oven nice and heated, so set this to 350 degrees. Next, you want to get going on your crust. Take your flour, sugar, cocoa, and salt and toss in your food processor. Pulse until it starts to look like coarse cornmeal. Then, add about 1/3 cup of coffee and blend just until it’s incorporated. If the dough appears too dry feel free to add coffee one tablespoon at a time. Once the dough is ready; press it into your lightly oiled 10” tart pan (with a removable bottom) and chill.


Now, for the filling: combine your chocolate, sugar, butter, milk, eggs, and walnuts into a bowl and stir to blend. Pour into a chilled tart shell and bake until top is firm and dry. About 30 to 40 minutes. You can always insert a toothpick and see if it comes out clean, too.


(Click here for printable recipe)

Thursday, December 1, 2011

Spinach Garlic Spaghetti

The Muppets are everywhere these days, promoting their new movie (and yes, I AM going to see it.) And I’ve heard Kermit say his famous line “It isn’t easy being green,” about a million times. I like to twist that line to apply to my own life: “It isn’t easy eating green.” At least that is the truth for me. And I think that’s why I was so intrigued by this recipe, and so happy that it actually tastes really good. I’m not sure if it really counts as healthy eating, but at least it’s got some leafy greens involved so that’s a step in the right direction.

Spaghetti
3 tablespoons olive oil
1 package baby spinach
Salt and freshly ground pepper
2 tablespoons heavy cream
4 large garlic cloves, minced
Parmesan cheese

I made enough spaghetti for three servings on the large side, but this recipe is pretty flexible, so just make however much you need. It also called for a full pound of spinach, but I just used one of those small plastic packages (I think about 6 oz) and it was plenty. Again, if you want more spinach, use more.

Get your spaghetti going in boiling water. Then heat the oil in a large skillet over medium heat. Add about a handful of the spinach, cooking and stirring, until it starts to wilt down and get smaller. Then add another handful. Keep this going until all the spinach is wilted. Salt and pepper to taste, and then add the cream. Cook for about 5 to 10 minutes, until the liquid is gone or mostly gone.

Now it’s blender time! Put the spinach mixture and any liquid into the blender (or food processor) and add the garlic. The original recipe said you can just throw in smashed cloves, but I had a hard time getting those to blend, so I would recommend using your handy garlic press. I also added in some Parmesan cheese at this point. Not a whole lot, just like ¼ cup. Then blend! Get it as smooth as possible to make a sauce.

Set aside some of the pasta water, and then drain the spaghetti. I like to put the pasta back in the skillet over low heat, and then pour the sauce on top. Toss it a few times to cover everything. If the sauce seems really thick (mine didn’t) you can use a little bit of the pasta water to loosen it up a little. Once the spaghetti is mixed, serve and sprinkle with more Parmesan cheese. It looks really beautiful on a plate, and tastes even better. 


(click here for printable recipe)