Recently, me and some of my friends went to a local Chinese restaurant called Peter Chang's. Supposedly, he is a well-renowned chef that specializes in szechuan-style cooking. I had heard wonderful reviews about his food, so I really couldn't wait to try it out. Well, we had our reservation set because it's recommended since it's such a busy restaurant (with good reason). And, after a brief wait (while our party all arrived) we were sat down and had a wonderful time. We ordered the sesame chicken, a 3 peppered chicken dish, a pork dish, orange chicken, and a bunch of appetizers. Yes, the food was absolutely fabulous. I've been dreaming about it ever since and I would really like to go back soon. In the mean time, to satisfy my craving for the orange chicken I had; I decided to make it at home. I had seen this recipe from Annie's Eats a while back, and decided to give her version a try. I have to say it was very good. It doesn't quite live up to Peter Chang's Orange Chicken, but it was still really flavorful and had a nice kick to it. If you like Chinese food, and would like to satisfy your craving for orange chicken via a homemade recipe then this is for you.
Ingredients:
For the marinade and sauce:
¾ cup low-sodium chicken broth
¾ cup freshly squeezed orange juice
1½ tsp. finely grated orange zest
6 tbsp. white vinegar
¼ cup soy sauce
½ cup brown sugar (dark or light)
3 cloves garlic, minced
1 tbsp. fresh ginger, grated
1/4 tsp red pepper flakes (optional)
¼ tsp. cayenne pepper
1½ lbs. boneless chicken thighs or breasts, cut into bite-sized pieces
1 tbsp. plus 2 tsp. cornstarch
2 tbsp. cold water
8 thin strips orange peel (optional)
For the coating and frying:
3 large egg whites
1 cup cornstarch
½ tsp. baking soda
¼ tsp. cayenne pepper
3 cups peanut or canola oil
To make the sauce combine the ingredients from the chicken broth thru the cayenne into a small bowl. Stir well. Reserve about 3/4 of the sauce and pour into a zip-lock bag. Add in the chicken pieces to the bag and let marinate for 30 to 60 minutes in the fridge. Next, pour the remaining sauce mixture into a small saucepan and heat on medium-high until it comes to a simmer. Take a small bowl and whisk the cornstarch and water together. Add this to the sauce.Continue simmering until the sauce thickens. Once thickened to your desire, remove the saucepan from the stove and add in the orange peel if using.
To prepare the coating for the chicken, get out a plate and a bowl. Whisk the eggs in the bowl until frothy. In the plate, combine the cornstarch, baking soda, and cayenne pepper. Remove the chicken from the fridge and drain in a colander. Pat the chicken dry and then add half the chicken into the egg mixture. Coat well. Remove from eggs, give it a good shake, and add it to the cornstarch mixture. Coat well. Set aside. Do this again for the remaining half of the chicken.
If you are going to make rice to serve with your orange chicken I would get this started before frying up your chicken. The frying process goes fairly quickly.
Take out your dutch oven or a heavy pot and pour in the oil. Using a candy thermometer heat up the oil until it reaches a temperature of around 350 degrees. Once the oil is ready, place half the chicken into the pot. It should only take a minute to cook the chicken thru. Carefully, remove the chicken using a skimmer and place on a plate covered with paper towels. Do this again for the remaining chicken. I double fried mine so it would have a crispier crust. I just placed the chicken back into the oil and fried for an additional 30 seconds. If necessary, reheat your sauce and then toss with the chicken. Serve with your rice and enjoy!!
Saturday, August 25, 2012
Friday, August 24, 2012
The New Best Recipe's Quick Tomato Sauce
One of my favorite dishes to make is pasta. I should probably just make that trip to Italy one of these days to see how it should really be done, but in the mean time I’m going to stick to some of my favorite recipes. Now, I posted this recipe a while back and while it was delicious it was a bit cumbersome to make. Boiling tomatoes, dumping them in ice, and peeling the skin does take some time. Fortunately, The New Best Recipe offered a quicker version of that recipe, and this is the one I make ALL the time! I simply love it. It’s so flavorful, so easy, and so good. I made it for my family when visiting Florida last summer and they all loved it too. Seriously, if you haven’t purchased The New Best Recipe you are doing yourself a disservice. Get it. Now! I promise you will love it!
Ingredients:
1 28 oz can diced (or petite diced) tomatoes (preferably San Marazano)
2 tbsp extra-virgin olive oil
2 garlic cloves, minced
3 tbsp chopped fresh basil
1/4 tsp sugar
Salt to taste
1/4 c. pasta water, reserved
Pasta such as spaghetti or angel hair
Take a large sauté pan and heat the olive oil. Add in the garlic and cook until fragrant, but be sure it doesn’t turn brown. Once the garlic is fragrant, add in the diced tomatoes. Simmer for about 10 minutes or so until slightly thickened. Since I don't like a real chunky sauce, I take my potato masher and mash up the tomatoes. This is optional, of course.
While the tomatoes are simmering, get out your pot to cook your pasta in. Throw in some salt to season the pasta, and cook the pasta till al dente. Be sure to remove about a ¼ cup of the pasta water before dumping it in your colander. I have found that it is necessary to add some of the water to help make it a bit juicier. Next, stir in the basil, sugar, and if needed salt. I usually keep adding salt until I feel that it’s seasoned just right. I’ve found that it depends on the can of diced tomatoes you buy how much salt you add. Kroger canned diced tomatoes do not require as much salt as the San Marazano. Go figure. At this point; you may or may not need to add in some of the reserved pasta water. It just depends on how thick or runny you like your tomato sauce. Take the pasta from the colander and it into the tomato mixture. Serve and enjoy!
Ingredients:
1 28 oz can diced (or petite diced) tomatoes (preferably San Marazano)
2 tbsp extra-virgin olive oil
2 garlic cloves, minced
3 tbsp chopped fresh basil
1/4 tsp sugar
Salt to taste
1/4 c. pasta water, reserved
Pasta such as spaghetti or angel hair
Take a large sauté pan and heat the olive oil. Add in the garlic and cook until fragrant, but be sure it doesn’t turn brown. Once the garlic is fragrant, add in the diced tomatoes. Simmer for about 10 minutes or so until slightly thickened. Since I don't like a real chunky sauce, I take my potato masher and mash up the tomatoes. This is optional, of course.
While the tomatoes are simmering, get out your pot to cook your pasta in. Throw in some salt to season the pasta, and cook the pasta till al dente. Be sure to remove about a ¼ cup of the pasta water before dumping it in your colander. I have found that it is necessary to add some of the water to help make it a bit juicier. Next, stir in the basil, sugar, and if needed salt. I usually keep adding salt until I feel that it’s seasoned just right. I’ve found that it depends on the can of diced tomatoes you buy how much salt you add. Kroger canned diced tomatoes do not require as much salt as the San Marazano. Go figure. At this point; you may or may not need to add in some of the reserved pasta water. It just depends on how thick or runny you like your tomato sauce. Take the pasta from the colander and it into the tomato mixture. Serve and enjoy!
Monday, August 6, 2012
Rum Lime Chicken Fajitas
I think my love of fajitas and various forms of tacos has been well documented on this site (here, here, and here). And from the looks of it, my fellow contributors share the love as well (as evidenced here, here and here.) So it's no wonder my bookmarks folder is constantly full of different varieties of my favorite Mexican fare. And when I decided to start trying some of those recipes, it's really no wonder at all that a title including the words "rum" and "lime" immediately jumped out at me. I found it on a site called The Talking Kitchen, and the photos totally sold me. I did change it somewhat, using chicken breasts instead of thighs, sweet onion instead of red, and I added jalapeno to the marinade in an attempt to infuse some spiciness (didn't work). The chicken tasted great before we put it into the fajitas, but it unfortunately it kind of disappeared once inside. The veggies, however, were a big hit. Usually we just salt and pepper them, but this mix of spices was really intriguing. So, I think I'll keep trying on the fajita meat, but we probably have a winner on the veggie side.
Additional: tortillas, cilantro, sour cream, shredded cheese
Mix the rum, lime zest and juice, jalapeno, sea salt, garlic powder and black pepper in a bowl. Make sure all of the rum goes into the bowl and not in your mouth (you can pour your own on the side). You can pour it into a plastic bag to marinate the chicken, or keep in in the bowl if you like. Make sure the chicken is covered, and flip it over after 30 minutes. Marinate about an hour.
Ingredients
3-4 chicken breasts
1/2 c. rum
2 limes, juiced and zested
1 jalapeno, chopped
3/4 tsp sea salt
1/2 tsp garlic powder
freshly ground black pepper
2 bell peppers (your choice)
1 large sweet onion
1/2 tsp cumin
1/2 tsp sea salt
1/2 tsp garlic
1/2 tsp oregano
1/8 tsp cinnamon
freshly ground black pepper
olive oil
Slice up your peppers and onion into strips. Drizzle on a little olive oil and all the spices, stirring to coat everything evenly.
You could absolutely cook the chicken on the grill, but we tried something a little different. We used our cast iron skillet on the grill. Spray it with non-stick spray (they make one especially for the high heat of a grill) and let it get really hot on the grill. Then remove your chicken from the marinade and place it in the skillet. It should sizzle satisfyingly when you set it down, or else it's probably not hot enough. Throw away the extra marinade! I know it's rum, but you've got to draw the line at raw chicken.
Let the chicken sit on one side, grill closed for about 5 minutes. Then flip and do the same on the other. From there use your grill-skills to make sure it's cooked through, depending on the thickness of your cut. Probably another 3-6 minutes. Set it aside under foil and start on your veggies. Toss them into your still hot skillet and let them stand for about 3-4 minutes before stirring. Stir and cook for a total of about 7-9 minutes, getting them nice and brown and tasty! Cook less for more crunch and more for softness.
Slice your chicken into fajita size strips and serve with tortillas, sour cream, cilantro and cheese. You can add salsa or tabasco as you wish. It really isn't spicy at all, which is probably why it's not a total hit at our house, but it is flavorful and the hint of cinnamon on the veggies adds a really interesting flavor dimension. This won't be the last fajita recipe on here, but it is definitely a good addition to our mix.
Wednesday, August 1, 2012
Spicy Italian Meatballs
Everyone should have a good meatball recipe. We’ve tried a
few but haven’t found one that really impressed us until we tried this one from
Keely Marie’s blog. I have to say, I had my doubts when we were making this. At
first the mixture seemed incredibly dry. Then it seemed too wet and sticky. But
in the end, it turned out perfectly delicious. It’s not all that spicy,
although it does have a nice subtle kick. So often meatballs just taste like
bland hamburgers to me, but these have a definite depth of flavor, nice
texture, and stand on their own in a plate of spaghetti and sauce. We doubled
the batch and have about two servings frozen to make an easy meal later.
(Single batch below).
1/2 ground beef
1/2 pound italian sausage (I used Hot)
1 medium onion, diced small
1 large red, yellow, or orange bell pepper, diced small
1 jalapeño, minced
1 tablespoon olive oil
4 garlic cloves, minced
1 cup Italian breadcrumbs (I did half Italian, half panko)
3/4 cup grated parmesan
1/4 teaspoon pepper
1/2 teaspoon salt
1 teaspoon dried oregano (or basil)
1 tablespoon garlic powder
1 egg
3 tablespoons milk
I admit, I used a jar of sauce instead of being a good
little cook and making my own. I felt like focusing on perfecting the meatballs
first would be better than trying to juggle too many spoons at once. But hey,
if you are ambitious and want to do both, there are a couple great tomato sauce
recipes on this site! Here and here.
Start, as always, by doing all your prep work and chopping.
The veggies will be in the meatball, so dice them pretty small. If they get too
big it changes the flavor profile of the meatball, and can also make them
harder to stick together. Heat your olive oil in a pan over medium heat and
then sauté the onion, peppers and jalapeño for about 5 minutes. Add the garlic
and sauté another 30 seconds before setting aside to cool.
In a separate bowl mix up your meats, breadcrumbs, parmesan,
salt, pepper, garlic powder and oregano. This is definitely one of those where
you have to use your hands to make sure that it’s totally mixed. No one likes
to get a big lump of garlic powder in their meatball! Once the sautéed veggies
are cool, add them into the mix and combine well. Add the egg and milk and keep
mixing with your hands until the mixture is uniform.
Wednesday, July 25, 2012
Iron Chef Basil: Chocolate Cake with Basil Buttercream
We had Iron Chef Basil about a month ago now, and I’m just
getting around to posting my recipe. I like to choose the course that seems the
most disparate with the ingredient. So for basil, that was of course dessert! I
found a lot of strawberry-basil desserts but that seemed pretty classic and I
wanted to challenge myself. When I found this recipe for chocolate cake with
basil buttercream on The Vanilla Bean Blog, I knew I had to try it. Besides,
the photos were gorgeous, and we all know that presentation is half the battle
at our Iron Chef competitions. I had a lot of trouble getting the buttercream
to set up, but in the end I think it tasted great. It didn’t have a lot of
basil flavor that first night (darn it!) but it got stronger and stronger every
day. In fact, by the fourth day, it might have been a little too strong, so
you’ll want to eat it fast! This recipe is definitely kind of a process and
reminds me why I don’t back layer cakes all that often, but for a special
occasion (or a competition) it’s worth it. You need to start the night before
to get the buttercream ready, so be prepared!
Cake Ingredients
1 3/4 cup flour
2 cups sugar
3/4 cup good cocoa powder
2 teaspoons baking soda
1 teaspoon baking powder
1 teaspoon salt
1 cup buttermilk, shaken
1/2 cup vegetable oil
2 eggs, at room temperature
1 teaspoon vanilla
1 cup freshly brewed hot coffee
This is Ina Garten’s chocolate cake recipe, and it’s very
good. Mine was a bit dense because I may have overmixed it, so be careful! I
think the recipe was a little hard to follow because it was written for someone
with a stand mixer and surprise!—not everyone has one of those.
Start by preheating the oven to 350 and butter or spray two
8 inch round cake pans. I had non-stick pans but had a panicked moment when the
cakes wouldn’t come out, so even if you do still butter. You could also put a
round of parchment paper in the bottom of the pan.
Sift together the flour, sugar, cocoa, baking soda, baking
powder and salt. I’m not a big sifter generally, but I would do it for this
cake because of the cocoa powder. For some reason that always tends to clump up
on me. Stir the ingredients together until they are well combined.
In another bowl, mix together the buttermilk, oil, eggs and
vanilla until combined. Then slowly add the wet ingredients to the dry while
mixing on low (it helps to have an extra set of hands for this). Next add the
coffee and stir (with a spatula not the mixer) just enough to combine, scraping
the bottom. I can’t stress enough not to overmix this. It will be super duper
liquidy. I was nervous, but don’t be. Pour the batter into the two pans and
bake 35-40 minutes until your toothpick comes out clean. Then remove from the
oven and cool in the pans for 30 minutes before turning them out on to a
cooling rack to finish cooling completely. Now, to make the buttercream.
Buttercream Ingredients
1 1/2 cups whole milk
1/3 cup heavy cream
1 cup fresh basil leaves, packed
1 1/2 cups granulated sugar
1/3 cup all purpose flour
1 1/2 cups (three sticks) unsalted butter, soft but cool,
cut into small pieces
1 tsp pure vanilla extract
The night before stir milk, heavy cream and basil in a
saucepan. I tore the basil leaves in half, thinking that it might let them seep
out more basil flavor (who knows?). Heat on low until just barely simmering and
then remove from heat. Let it cool to room temperature, then refrigerate
overnight. When you’re ready to make the buttercream, remove the basil leaves
from the cream, making sure to squeeze out the leaves.
Whisk sugar and flour together in your saucepan before
adding the basil cream mixture. Cook over medium heat, whisking occasionally
for 10-15 minutes, until the mixture boils and thickens. Then move the mixture
to a bowl and beat on high speed until it is cool, about 7-9 minutes. I know
it’s a pain to mix that long if you don’t have a stand mixer, but don’t skimp.
If the sauce is too hot your buttercream won’t set.
You want your butter to be soft but cold. What I did was let
it soften at room temperature, but then put it back in the fridge 10-15 minutes
before I needed it. Reduce your mixing speed to low and add the butter, mixing
until it’s fully incorporated. Then turn your mixer up to medium high speed and
beat until the frosting is light and fluffy and frosting like! Should only take
a couple minutes. Add the vanilla and mix until it’s combined.
Now you need to check the consistency. If your frosting is
too soft (mine was) put it in the fridge to chill and then beat again until it’s
right. If it’s too hard, you can set the bowl over hot water (simmering at
most) and beat until it softens a little. Hopefully you won’t have to do either!
You should know how to frost a layer cake but just in case…
start by topping one layer with frosting, then put the second layer on top. Now
you’re ready to frost the rest of the cake, and decorate with a few basil
leaves on top. We didn’t eat the leaves with the cake though! It’s a strange
flavor combination but it definitely works, and I think the cake recipe will
definitely become a staple of mine.
Monday, July 23, 2012
Chipotle shrimp tacos
I called Jon today and said, "I have five words for you. Are you ready? Homemade. Plaza Azteca. Shrimp. Tacos." He drooled onto the phone.
We love us some Plaza Azteca. For those who don't know, it's a chain (but small and seemingly localish) of Mexican restaurants. While I will eat some Combination Dinner #1 without complaint at other places, Plaza Azteca goes above and beyond that sort of menu. Lobster enchiladas, y'all. And shrimp tacos.They're simple, three soft tortillas wrapped around smoky bites of shrimp with some cheese (but not too much) and a pico de gallo topping of onion, tomato, cilantro and jalapeno.
That, at least, was my assumption about the ingredients when I started envisioning our copycat recipe. And I was so right, that we literally ate these things an hour ago and I'm already blogging it. It was that good.
We figure this makes about eight tacos.
You'll need:
A pound of shrimp, de-shelled and de-tailed, deveined, peeled and cut in half (31-40 count)
1 chipotle pepper in adobo (minced)
2-3 teaspoons adobo sauce
Most of a large Vidalia onion (or sweet onion), diced; you'll use the rest for the pico
Two to three Roma tomatoes, diced (we saved out a bit for the pico)
One-half medium bunch cilantro (we used only the leaves) chopped
1 jalapeno, chopped (and deseeded)
One tablespoon olive oil
About a tablespoon of lime juice
1/2 teaspoon garlic powder
1/2 teaspoon dried oregano
1/2 teaspoon dried parsley
Salt to taste (maybe a quarter teaspoon)
Ground black pepper
Pinch sugar
1 "fat" tablespoon of cumin.
Flour tortillas
Queso quesadilla cheese (we used Cacicque brand).
For pico de gallo:
Two to three tablespoons (or to taste; we like a lot) cilantro (we used only the leaves) chopped
1 jalapeno, chopped (and deseeded)
Onion and tomato as mentioned above
So from this list, you can see that Jon was left unattended to season the shrimp mixture. Only he would describe a measurement as "fat." In fact he eyeballed most of the spices, and this is his guess about how much of the dry seasonings he put in. Whatever he did, it worked.
Dice the onion -- we did about 3/4 in the shrimp itself, and reserved 1/4 for the topping, which I diced more finely. Dice the tomato (and if you like tomato, you may want the third for the pico topping, but we don't much like raw tomato so put most of it in with the shrimp mixture). Mince one chipotle pepper.
Chop the jalapeno and pluck as much cilantro if you want (stems are fine to use, we just don't). Mix in a bowl with the 1/4 finely diced onion and some tomato. I splashed a little lime juice in at this point. Set aside.
Chop or grate a small bowl of cheese, depending on how much you like cheese.
Heat the oil in the skillet and add the onion, tomato, chipotle, adobo sauce, the dried spices, and lime juice. Cook about four minutes on medium heat, or until onions start to get translucent. Add shrimp and cook about another four minutes on high heat. or until cooked through.
And that's it. We heated flour tortillas and scattered some cheese on first -- in the restaurant version, the cheese is melty, but while I was lobbying to heat each tortilla and cheese in a skillet, Jon convinced me that would take too long. So we just warmed up the tortilla, added cheese and the shrimp mixture and the pico topping, and stuffed our faces.
It was our first time cooking with a chipotle pepper, but it was the key to making this dish taste similar to the restaurant version we were copying. It wasn't exactly the same perhaps, but it was damn similar (and good!), so we were pretty proud.
We love us some Plaza Azteca. For those who don't know, it's a chain (but small and seemingly localish) of Mexican restaurants. While I will eat some Combination Dinner #1 without complaint at other places, Plaza Azteca goes above and beyond that sort of menu. Lobster enchiladas, y'all. And shrimp tacos.They're simple, three soft tortillas wrapped around smoky bites of shrimp with some cheese (but not too much) and a pico de gallo topping of onion, tomato, cilantro and jalapeno.
That, at least, was my assumption about the ingredients when I started envisioning our copycat recipe. And I was so right, that we literally ate these things an hour ago and I'm already blogging it. It was that good.
We figure this makes about eight tacos.
You'll need:
A pound of shrimp, de-shelled and de-tailed, deveined, peeled and cut in half (31-40 count)
1 chipotle pepper in adobo (minced)
2-3 teaspoons adobo sauce
Most of a large Vidalia onion (or sweet onion), diced; you'll use the rest for the pico
Two to three Roma tomatoes, diced (we saved out a bit for the pico)
One-half medium bunch cilantro (we used only the leaves) chopped
1 jalapeno, chopped (and deseeded)
One tablespoon olive oil
About a tablespoon of lime juice
1/2 teaspoon garlic powder
1/2 teaspoon dried oregano
1/2 teaspoon dried parsley
Salt to taste (maybe a quarter teaspoon)
Ground black pepper
Pinch sugar
1 "fat" tablespoon of cumin.
Flour tortillas
Queso quesadilla cheese (we used Cacicque brand).
For pico de gallo:
Two to three tablespoons (or to taste; we like a lot) cilantro (we used only the leaves) chopped
1 jalapeno, chopped (and deseeded)
Onion and tomato as mentioned above
So from this list, you can see that Jon was left unattended to season the shrimp mixture. Only he would describe a measurement as "fat." In fact he eyeballed most of the spices, and this is his guess about how much of the dry seasonings he put in. Whatever he did, it worked.
Dice the onion -- we did about 3/4 in the shrimp itself, and reserved 1/4 for the topping, which I diced more finely. Dice the tomato (and if you like tomato, you may want the third for the pico topping, but we don't much like raw tomato so put most of it in with the shrimp mixture). Mince one chipotle pepper.
Chop the jalapeno and pluck as much cilantro if you want (stems are fine to use, we just don't). Mix in a bowl with the 1/4 finely diced onion and some tomato. I splashed a little lime juice in at this point. Set aside.
Chop or grate a small bowl of cheese, depending on how much you like cheese.
Heat the oil in the skillet and add the onion, tomato, chipotle, adobo sauce, the dried spices, and lime juice. Cook about four minutes on medium heat, or until onions start to get translucent. Add shrimp and cook about another four minutes on high heat. or until cooked through.
And that's it. We heated flour tortillas and scattered some cheese on first -- in the restaurant version, the cheese is melty, but while I was lobbying to heat each tortilla and cheese in a skillet, Jon convinced me that would take too long. So we just warmed up the tortilla, added cheese and the shrimp mixture and the pico topping, and stuffed our faces.
It was our first time cooking with a chipotle pepper, but it was the key to making this dish taste similar to the restaurant version we were copying. It wasn't exactly the same perhaps, but it was damn similar (and good!), so we were pretty proud.
Spaghetti all’Amatriciana
There are some great Italian restaurants in the Richmond
area. When asked to pick favorites, most Richmonders say Mama Zu’s or Edo’s
Squid—two classics and fantastic, to be sure. But my favorite has to be
Maldini’s in Forest Hill. I may be a tad biased because I lived in that
neighborhood previously, and frequently ate in or had it delivered. Just
thinking about it now is making me hungry. One of the dishes that my husband
frequently ordered was the Spaghetti all’Amatriciana. So when I saw a recipe
for it on Saveur, I thought it might be a good weekend project. Well, my
husband definitely liked it. It was a little too intense for me, but I am more
of a white sauce person myself. It had a lot of flavor, definitely was not a
subtle dish. But don’t take my word for it, try it for yourself!
Ingredients
12 oz. thick-cut bacon, cut crosswise into ¼" strips
2 tbsp. unsalted butter
2 medium carrots, finely chopped
1 large yellow onion, finely chopped
Kosher salt, to taste
4 cloves garlic, finely chopped
1 sprig rosemary
1 sprig sage
2 tbsp. red wine
1 (28-oz). can crushed tomatoes
2 tbsp. olive oil
2 tsp. freshly ground black pepper
1 tsp. crushed red pepper flakes
1 lb. dried spaghetti
Finely grated Parmesan
Start by getting out your trusty Dutch oven. I swear, that
is one kitchen piece that gets almost as much work as our chef’s pan. Cook the
bacon over medium heat until it’s good and crispy, about 15 minutes or so.
Scoop out the bacon (but leave the grease) and put it on some paper towels for
later. Next you want to melt the butter with the bacon grease and then toss in
the carrots and onion. Season with a little salt and cook about 6 minutes so
the veggies are soft. Add half of the garlic, plus the rosemary and sage and
cook about 2 minutes. You may want to tie your herbs together with kitchen
string. We didn’t, and they were hard to scoop out later (which I think added
to the intensity of the flavor). Next pour in your wine and deglaze the pan.
Cook until the wine evaporates, about 5 minutes or so, and then add in the
tomatoes. Bring this to a boil, and then turn the heat down to medium low. Now
comes the part where you put down the spoon and walk away. Cook partially
covered and cook about 2 hours until thickened, stirring every once in awhile.
Your next step is to take out the herbs and throw them away.
Ours fell apart and there were rosemary leaves everywhere, so hopefully it
holds together a little better for you. You’ll want to get as much of it out as
possible. If you want a smooth sauce, you can blend it (much easier if you have
an immersion blender!) but we didn’t. Seemed like an unnecessary step to me.
The recipe also said to only use 3/4ths of the bacon to add back to the sauce,
but we threw it all back in. I mean, it’s bacon. Add the rest of the garlic and
oil, pepper and red pepper flakes and let it sit (still keeping it warm) while
you get the noodles ready.
We made fresh pasta for this, so that’s why our noodles aren’t
exactly spaghetti, if you’re paying attention at home. Once your pasta is
ready, mix it into the sauce and toss to coat, then serve with a little
Parmesan grated on top! It should be slightly spicy with a strong tomato
flavor. It wasn’t my favorite, but my husband gobbled it down, so try it out
and see what you think!
Sunday, July 22, 2012
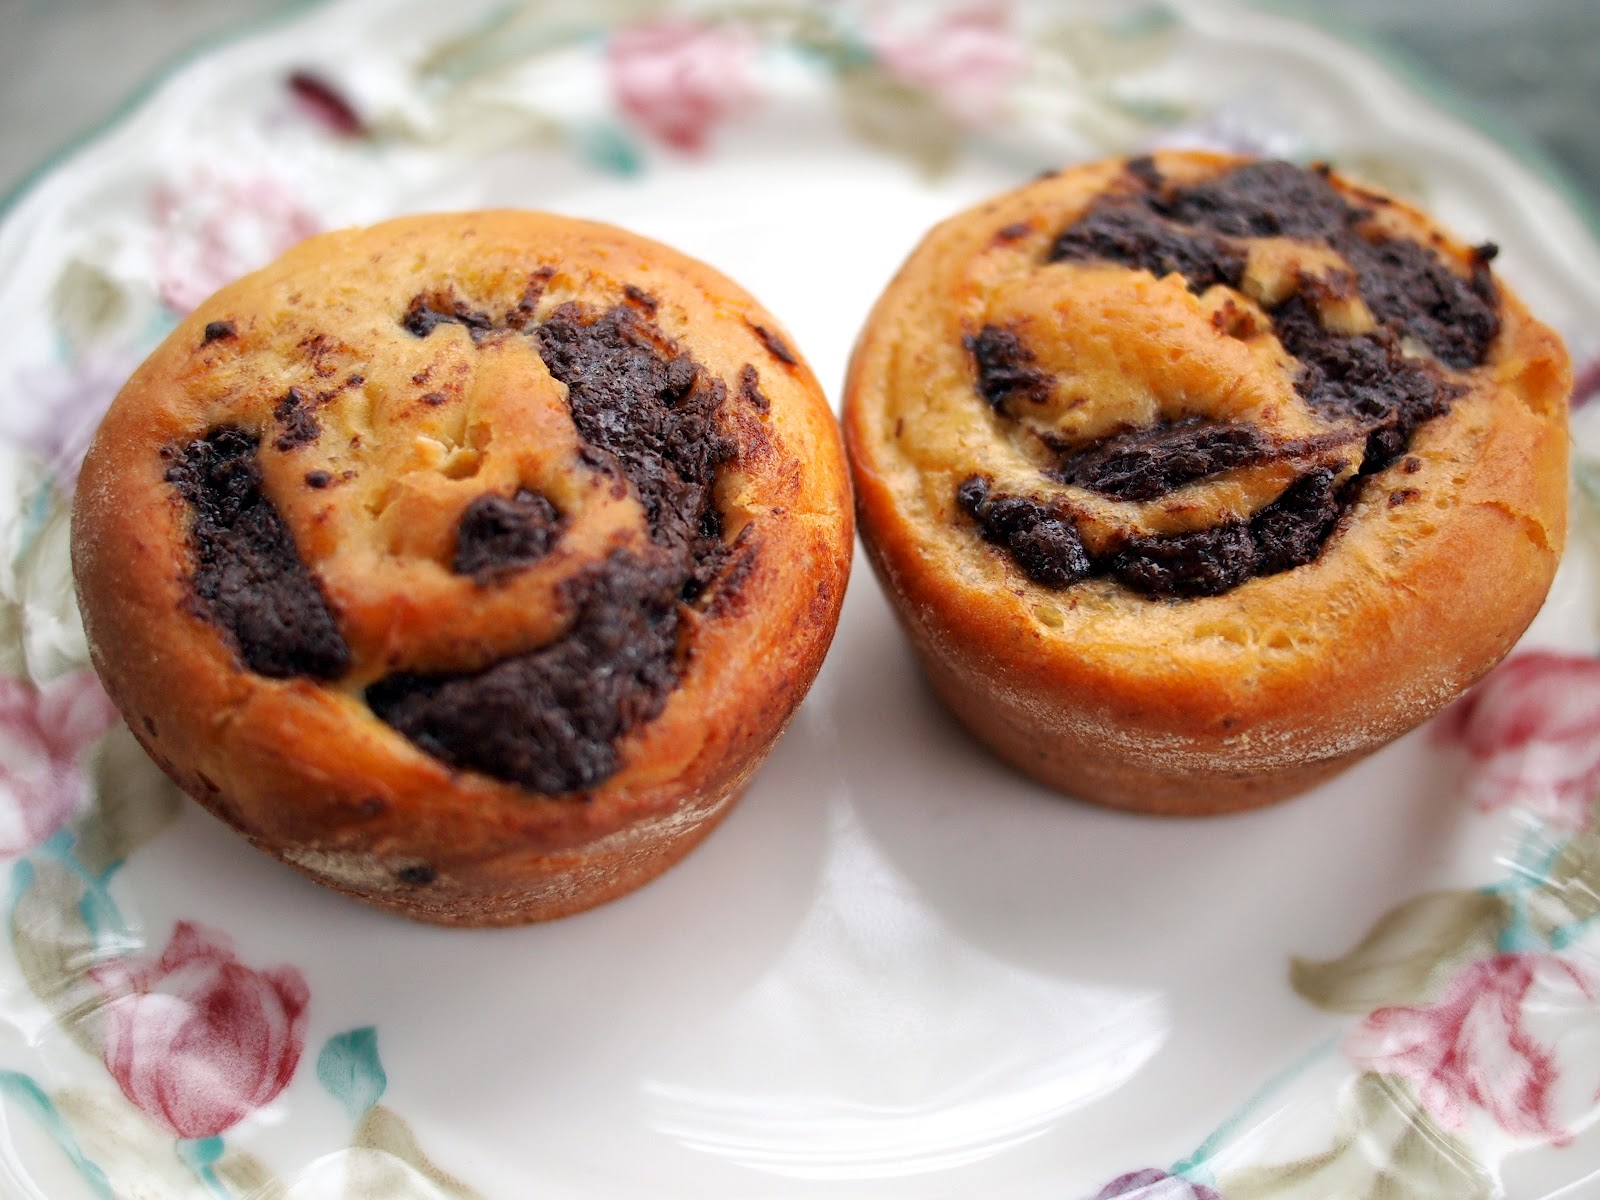
Chocolate Swirl Buns
So, I probably have more dessert recipes on this blog than anything else. But, there's nothing wrong with that, right? I mean a girl has to have her sweets. And, boy do I have my sweets. It's probably one of the things I love the most about being in the kitchen: baking. I love to make dough, cookies, brownies, ice cream, popsicles, cakes, etc. I love the smells and taking that first bite. It's just heaven to me. So, yesterday I decided to bake. It was cloudy. It was raining. And, I wanted something sweet. So, I decided to make these buns from smitten kitchen. The only bummer thing is that I ended up over-baking them a bit. Sigh. They're still good, though. I highly recommend this recipe. It is really easy and scrumptious. Enjoy.
Made 16 buns for me, but recipe says 12.
Ingredients:
Dough
1/2 cup (120 ml) milk, preferably whole
1/4 cup (50 grams) plus a pinch of granulated sugar
1 1/2 teaspoons (5 grams) active dry yeast
1 large egg, brought to room temperature
2 cups (250 grams) all-purpose flour, plus more for work surface
1/2 teaspoon table salt
3 tablespoons (45 grams) unsalted butter, at room temperature, plus additional for bowl and muffin tins
Filling
3 tablespoons (45 grams) unsalted butter, at room temperature
1/4 cup (50 grams) granulated sugar
1/2 pound (225 grams) semisweet chocolate
Pinch of salt
3/4 teaspoon ground cinnamon (optional)
Egg wash (optional)
1 egg
2 teaspoons (10 ml) heavy cream or milk
To make the dough, take a small bowl and add in the warm milk (110 to 115 degrees) and a pinch of sugar. Sprinkle in the yeast and let sit for about 5 minutes until the yeast foams. While the yeast is dissolving, take a medium sized bowl and whisk the eggs and 1/4 cup sugar. Slowly, whisk in the yeast mixture. Next, take the bowl from you standing mixture and stir the flour and salt with the paddle attachment. While mixture is on low, slowly add in the egg mixture. Mix well. Then, add in the butter. Mix well. Change out the paddle attachment to the dough hook. Let knead for about 10 minutes on low speed. Prepare a large bowl by spraying with cooking spray. The dough will be very sticky and stringy. That's okay. Form into a ball and place in the large bowl. Wrap with plastic wrap and place the bowl in a warm draft-free place (I prefer my oven set at 85 degrees) for about an hour or until the dough has doubled in size. My dough took about 2 hours to rise.
While the dough is rising, get your filling ready. I used semi-sweet chocolate chips so I didn't have to do any chopping. Throw your chocolate, salt, sugar, and cinnamon into a food processor. Process until relatively fine. Add in the butter and process until well incorporated. Set aside. Now, remove the dough from the oven (or wherever you had it) and punch it down. Turn out onto a floured surface and let rest for about 5 minutes. Then, roll out to about 11 inches wide and 20 inches long. Sprinkle the chocolate mixture all over the dough. Tightly roll into a log starting at the shorter end of the dough. It will form into a long log. Carefully slice the dough using a sharp serrated knife into 1 inch pieces. Place swirl side up into your greased muffin sheets. I had to use 2 muffin sheets because I ended up 16 buns. Place back in your draft-free/warm environment for another 30 minutes. I placed a towel over the buns. Remove the buns from the oven and set to 350 degrees. Once the oven is ready; add the buns and cook for about 15 to 20 minutes. Deb (from smitten kitchen) said the dough should register 185 to 190 degrees when they're ready. I think my thermometer might be off, because mine got up to 180 degrees and I placed them back in the oven for a couple minutes. At that point, I should have just left them out because I ended up overbaking them. Bleh. Lesson learned. Cool on a wire rack. enjoy!
Ingredients:
Dough
1/2 cup (120 ml) milk, preferably whole
1/4 cup (50 grams) plus a pinch of granulated sugar
1 1/2 teaspoons (5 grams) active dry yeast
1 large egg, brought to room temperature
2 cups (250 grams) all-purpose flour, plus more for work surface
1/2 teaspoon table salt
3 tablespoons (45 grams) unsalted butter, at room temperature, plus additional for bowl and muffin tins
Filling
3 tablespoons (45 grams) unsalted butter, at room temperature
1/4 cup (50 grams) granulated sugar
1/2 pound (225 grams) semisweet chocolate
Pinch of salt
3/4 teaspoon ground cinnamon (optional)
Egg wash (optional)
1 egg
2 teaspoons (10 ml) heavy cream or milk
To make the dough, take a small bowl and add in the warm milk (110 to 115 degrees) and a pinch of sugar. Sprinkle in the yeast and let sit for about 5 minutes until the yeast foams. While the yeast is dissolving, take a medium sized bowl and whisk the eggs and 1/4 cup sugar. Slowly, whisk in the yeast mixture. Next, take the bowl from you standing mixture and stir the flour and salt with the paddle attachment. While mixture is on low, slowly add in the egg mixture. Mix well. Then, add in the butter. Mix well. Change out the paddle attachment to the dough hook. Let knead for about 10 minutes on low speed. Prepare a large bowl by spraying with cooking spray. The dough will be very sticky and stringy. That's okay. Form into a ball and place in the large bowl. Wrap with plastic wrap and place the bowl in a warm draft-free place (I prefer my oven set at 85 degrees) for about an hour or until the dough has doubled in size. My dough took about 2 hours to rise.
While the dough is rising, get your filling ready. I used semi-sweet chocolate chips so I didn't have to do any chopping. Throw your chocolate, salt, sugar, and cinnamon into a food processor. Process until relatively fine. Add in the butter and process until well incorporated. Set aside. Now, remove the dough from the oven (or wherever you had it) and punch it down. Turn out onto a floured surface and let rest for about 5 minutes. Then, roll out to about 11 inches wide and 20 inches long. Sprinkle the chocolate mixture all over the dough. Tightly roll into a log starting at the shorter end of the dough. It will form into a long log. Carefully slice the dough using a sharp serrated knife into 1 inch pieces. Place swirl side up into your greased muffin sheets. I had to use 2 muffin sheets because I ended up 16 buns. Place back in your draft-free/warm environment for another 30 minutes. I placed a towel over the buns. Remove the buns from the oven and set to 350 degrees. Once the oven is ready; add the buns and cook for about 15 to 20 minutes. Deb (from smitten kitchen) said the dough should register 185 to 190 degrees when they're ready. I think my thermometer might be off, because mine got up to 180 degrees and I placed them back in the oven for a couple minutes. At that point, I should have just left them out because I ended up overbaking them. Bleh. Lesson learned. Cool on a wire rack. enjoy!
Wednesday, July 18, 2012
Shrimp Scampi Pasta
I didn't like shrimp growing up. Or maybe, I just didn't have the occasion to like it. My mom is very allergic, so we understandably never ate it at home. And when we went to restaurants, I guess I just didn't want to try it. But in the last few years I've been cooking it more and more, and in many different ways. It's so versatile, soaks up flavors like a sponge, and is relatively healthy, so shrimp is finding it's way to my dinner table more often than not. This Shrimp Scampi Pasta dish isn't the most healthy of the shrimp meals I've made (6 tablespoons of butter will do that) but it is very flavorful. Lots of lemony brightness, a touch of heat, and garlicky, buttery shrimpy deliciousness makes this a new favorite pasta dish. The recipe is from Ina, and I only changed it a smidge. She used linguine, but my husband and I are angel hair people. Use whatever pasta you like!
Ingredients
1.5 pounds angel hair pasta (or pasta of your choice)
6 Tbsps unsalted butter
5 Tbsps olive oil
8 garlic cloves, minced
2 pounds large shrimp, peeled and deveined
Salt & pepper
3/4 cup chopped fresh parsley
Zest from one lemon
1/2 cup freshly squeezed lemon juice
1/4 tsp red pepper flakes
Get your pasta going first. Oil, salt, water, you know the drill. Cook according to the directions. In the meantime, start melting your butter and oil over medium heat in a large skillet. Add the garlic and cook for just a minute, making sure not to burn the garlic. If you want, you could actually remove it from the heat and let the garlic and butter do a mind meld for awhile to increase the garlic flavor. Or just keep going through if you're hungry-- it's still going to be plenty garlicky. Add the shrimp, 1 tbsp salt and about a half teaspoon of pepper and cook about five minutes, until the shrimp just turns a little pink. Then remove from the heat and stir in the lemon zest, lemon juice, parsley and red pepper flakes. Add a little more of the red pepper flakes if you like it spicy (you know I do!). Make sure it's well combined and then add your drained pasta into the pot, tossing and stirring to coat every noodle. You could serve it with a sliced lemon if your guest wants even more lemon flavor, or put a few sliced lemons on top for prettiness. Hope you love it as much as we did!
Tuesday, July 17, 2012
Braised Short Ribs
When you’re looking over a menu and see the word “braised” you
know you’re going to get something really good. Cooking something low and slow for a long time means the flavors have a chance to really develop and the meat turns into something that just melts in your mouth. So any time I find myself with a free weekend and an appetite, I get down my trusty Dutch Oven, get some great meat, and start braisin'!
Beef Short Ribs are a great choice for braising. They're much meatier than most ribs, and not too fatty. I got this recipe from The Pioneer Woman, who always had delicious, though not super healthy, recipes. But when you're braising meat, I think you should put health out of your mind and just enjoy! We got our ribs at Fresh Market, which is a nice place for high quality ingredients. We can't always find cuts like Short Ribs at Kroger.
Ingredients
8 whole Beef Short Ribs
Kosher salt and pepper to taste
1/4 cup flour
4 oz diced pancetta
2 Tbsp olive oil
1 medium onion, diced
3 carrots, diced
2 shallots, minced
2 cups red wine
2 cups beef broth
2 sprigs thyme
2 sprigs rosemary
First you want to season your meat with salt and pepper (both sides!) and then dredge them in flour and set them aside. After that, cook your pancetta in the Dutch Oven over medium heat, making sure to get it very crispy and render all the fat. The recipe says to remove the pancetta, keeping the grease but we thought it'd be very silly to just waste all that meaty goodness, so we left it in. Totally up to you what you want to do.
Add the olive oil and brown the ribs on all sides on high heat. It shouldn't take too long, about 45 seconds a side. You're not trying to cook the ribs, just brown them. Be careful about burning here, you don't want to have to throw away that flavorful oil, so if things start to get black, turn down the heat.
Once the ribs have been browned, turn down the heat to medium and cook the diced onions, carrots and shallots for two minutes. Pour in your wine and deglaze the pan (scrape the tasty browny bits off the bottom). Bring this to a boil and cook for another couple minutes before adding the broth, 1 teaspoon salt and lots of fresh ground pepper. Gather up your browned ribs and submerge them into the liquid and add the whole thyme and rosemary sprigs. I like to tie my sprigs together with string. Seems to help them stay together and not let all the leaves fall off into the broth.
Add the olive oil and brown the ribs on all sides on high heat. It shouldn't take too long, about 45 seconds a side. You're not trying to cook the ribs, just brown them. Be careful about burning here, you don't want to have to throw away that flavorful oil, so if things start to get black, turn down the heat.
Once the ribs have been browned, turn down the heat to medium and cook the diced onions, carrots and shallots for two minutes. Pour in your wine and deglaze the pan (scrape the tasty browny bits off the bottom). Bring this to a boil and cook for another couple minutes before adding the broth, 1 teaspoon salt and lots of fresh ground pepper. Gather up your browned ribs and submerge them into the liquid and add the whole thyme and rosemary sprigs. I like to tie my sprigs together with string. Seems to help them stay together and not let all the leaves fall off into the broth.
Cook in the oven with the lid on at 350 degrees for two hours. Remember to cover your Dutch Oven's top knob with foil, to prevent it from drying out and cracking over time. After two hours, reduce heat to 325 degrees and cook for another 30-45 minutes until the ribs are tender and falling off the bone. Remove from the oven and let sit with the lid on for 20 minutes. She says to skim fat off the top of the liquid. This has always been difficult for me to accomplish, so I skipped it, but you can totally try if you are game.
We served the ribs with some brown sugar glazed carrots (yum!) but you could serve with mashed potatoes for a hearty meal. You could also add a little flour or cornstarch to the broth and thicken it over heat if you wanted more of a gravy. Anyway you do it, the ribs themselves will be very flavorful, tender and braised to perfection!
Sunday, July 15, 2012
Chocolate Ice Cream with Reese's Peanut Butter Cups
So, today is National Ice Cream Day. I don't know who needs an actual excuse to eat ice cream, but if you do there you go. I just gave you an excuse. Now, if you want an excuse to eat ice cream every day then here you go; July is National Ice Cream Month!!! I made David Lebowitz's Chocolate Ice Cream and added chopped Reese's peanut butter cups. The result turned out deelicious. The chocolate ice cream came out super smooth and very chocolaty. I'm seriously loving David Lebowitz The Perfect Scoop cookbook. It has such great recipes, and so far all the ones that I've tried have turned out wonderfully. So, here's to National Ice Cream Day and National Ice Cream Month. Now, go eat some ice cream! Enjoy!
Ingredients:
2 c. heavy cream
3 tbsp. unsweetened Dutch-process cocoa powder
5 oz. bittersweet or semisweet chocolate, chopped (I used 3/4c. semi-sweet chocolate chips)
1 c. whole milk
3/4 c. sugar
Pinch of salt
5 large egg yolks
1/2 tsp vanilla extract
2 cups chopped Reese's peanut butter cups (optional)
First, take a medium sauce-pan and warm the cream along with the cocoa powder, whisking thoroughly to blend the cocoa. Bring the mixture to a boil, then reduce the heat and simmer at low for about 30 seconds, whisking constantly. Remove from heat and stir in the chocolate. Stir until smooth. Then, stir in the remaining cream. Pour the mixture into a large bowl, and place a mesh strainer on top of the bowl. Set aside.
Clean out your saucepan, and then warm the milk, sugar, and salt. In a separate bowl, whisk together the egg yolks. Slowly pour the warm milk into the egg yolks, whisking constantly. Then, scrape the egg mixture back into the saucepan. Stir the mixture constantly over medium heat, scraping the bottom as you stir. The mixture should thicken and eventually coat your spatula or wooden spoon. It literally took me 30 minutes of standing there stirring. Pour the custard through the strainer and stir it into the chocolate mixture until smooth. Then stir in the vanilla. Stir until cool over an ice bath. Chill the mixture thoroughly in the fridge. Once chilled, freeze it in your ice cream maker. My mixture came out pretty thick, so I had to whisk it vigorously to thin it out before adding it to my ice cream maker. Once the ice cream has formed; add in the chopped Reese's peanut butter cups. Pour into your air-tight container and freeze. Enjoy!
Ingredients:
2 c. heavy cream
3 tbsp. unsweetened Dutch-process cocoa powder
5 oz. bittersweet or semisweet chocolate, chopped (I used 3/4c. semi-sweet chocolate chips)
1 c. whole milk
3/4 c. sugar
Pinch of salt
5 large egg yolks
1/2 tsp vanilla extract
2 cups chopped Reese's peanut butter cups (optional)
First, take a medium sauce-pan and warm the cream along with the cocoa powder, whisking thoroughly to blend the cocoa. Bring the mixture to a boil, then reduce the heat and simmer at low for about 30 seconds, whisking constantly. Remove from heat and stir in the chocolate. Stir until smooth. Then, stir in the remaining cream. Pour the mixture into a large bowl, and place a mesh strainer on top of the bowl. Set aside.
Clean out your saucepan, and then warm the milk, sugar, and salt. In a separate bowl, whisk together the egg yolks. Slowly pour the warm milk into the egg yolks, whisking constantly. Then, scrape the egg mixture back into the saucepan. Stir the mixture constantly over medium heat, scraping the bottom as you stir. The mixture should thicken and eventually coat your spatula or wooden spoon. It literally took me 30 minutes of standing there stirring. Pour the custard through the strainer and stir it into the chocolate mixture until smooth. Then stir in the vanilla. Stir until cool over an ice bath. Chill the mixture thoroughly in the fridge. Once chilled, freeze it in your ice cream maker. My mixture came out pretty thick, so I had to whisk it vigorously to thin it out before adding it to my ice cream maker. Once the ice cream has formed; add in the chopped Reese's peanut butter cups. Pour into your air-tight container and freeze. Enjoy!
Grilled Asian Pork Tenderloin with Peanut Sauce
I'm pretty bummed that I couldn't find a favorite recipe of mine. I went to a cookout many years ago, and a friend made these asian pork tenderloins. The marinade was super delicious. Unfortunately, I can't remember who the friend was nor can I find the recipe. Friend, if you are out there and have an inkling of what I'm referring to please hit me up. I tried googling asian pork tenderloin marinade but didn't have a whole lot of luck. But, I did come across this peanut marinade from Fine Cooking. This recipe is a keeper, y'all. It kept the pork super moist and the peanut sauce packed a ton of flavor. I did add some red pepper flakes at the advice of some of the commenters and I added a tablespoon of sesame oil. I still hope to find my original asian marinade recipe, but I will be making this one many more times. Enjoy!
Ingredients:
1 cup light coconut milk
1/2 cup smooth peanut butter, preferably a natural variety
1/4 cup soy sauce
3 Tbs. fresh lime juice
3 Tbs. dark brown sugar
2 large cloves garlic, minced (2-1/2 tsp.)
2 tsp. ground coriander
1 tsp. red pepper flakes (optional)
1 Tbs. dark sesame oil (optional)
2 small pork tenderloins (about 2 lb. total)
Vegetable oil for the grill
Take your medium sized bowl and add in the coconut milk thru the sesame oil. Stir well. Pour into a large zip-lock bag and place the pork tenderloin in the bag. Coat the pork tenderloin with the marinade. Marinate for an hour or more for better flavor. Once your ready to grill pour the marinade into a small saucepan and set to medium heat. Place the pork tenderloin on a well-oiled grill. Grill for about 10 minutes on both sides. Remove pork from grill. Set on a plate and let rest for 5 minutes. I had to put my pork back on the grill because it was a bit too pink for me. I served my pork with white rice. Pour some of the peanut sauce on the pork tenderloin and even your rice. Enjoy!!
Ingredients:
1 cup light coconut milk
1/2 cup smooth peanut butter, preferably a natural variety
1/4 cup soy sauce
3 Tbs. fresh lime juice
3 Tbs. dark brown sugar
2 large cloves garlic, minced (2-1/2 tsp.)
2 tsp. ground coriander
1 tsp. red pepper flakes (optional)
1 Tbs. dark sesame oil (optional)
2 small pork tenderloins (about 2 lb. total)
Vegetable oil for the grill
Take your medium sized bowl and add in the coconut milk thru the sesame oil. Stir well. Pour into a large zip-lock bag and place the pork tenderloin in the bag. Coat the pork tenderloin with the marinade. Marinate for an hour or more for better flavor. Once your ready to grill pour the marinade into a small saucepan and set to medium heat. Place the pork tenderloin on a well-oiled grill. Grill for about 10 minutes on both sides. Remove pork from grill. Set on a plate and let rest for 5 minutes. I had to put my pork back on the grill because it was a bit too pink for me. I served my pork with white rice. Pour some of the peanut sauce on the pork tenderloin and even your rice. Enjoy!!
Thursday, July 12, 2012
Iron Chef Basil: Lemon Basil Ice Cream
I have found that the simpler the recipe the higher the likelihood of success at our Iron Chef competitions. It's like they say on Iron Chef - execution is everything. This is a really interesting recipe that is a perfect for cleansing your palate after a good meal.
2 cups milk
1 cup heavy cream
1 cup packed basil leaves
1 teaspoon lemon zest
1 pinch of salt
4 egg yolks
3/4 cup sugar
Most important and often overlooked, make sure to freeze your ice cream maker drum 24 hours in advance.
In a medium saucepan, combine milk, heavy cream along with zest, basil and salt. Bring the mixture to a gentle boil then remove from heat and let the flavors infuse. Let it sit while stirring occasionally for about 10 minutes or until its not longer hot, just warm. Then using a food processor, blend the basil and milk mixture until smooth.
Whisk together egg yolks and sugar until it's light and fluffy, the color should be pale yellow. Add the blended basil and milk mixture slowly to the yolks. Add about 1/4 cup at a time, stirring constantly. Return the mixture to the medium saucepan on low heat until it thickens. Stir regularly. You will know it's thick enough when you can leave a distinguishable track mark with your finger on the back of the spoon. Let it cool for 15 minutes. I was in a hurry so I opted for a quick 5 minute cool in an ice bath. Put the mixture in your ice cream maker and run for about 20 - 30 minutes.
2 cups milk
1 cup heavy cream
1 cup packed basil leaves
1 teaspoon lemon zest
1 pinch of salt
4 egg yolks
3/4 cup sugar
Most important and often overlooked, make sure to freeze your ice cream maker drum 24 hours in advance.
In a medium saucepan, combine milk, heavy cream along with zest, basil and salt. Bring the mixture to a gentle boil then remove from heat and let the flavors infuse. Let it sit while stirring occasionally for about 10 minutes or until its not longer hot, just warm. Then using a food processor, blend the basil and milk mixture until smooth.
Whisk together egg yolks and sugar until it's light and fluffy, the color should be pale yellow. Add the blended basil and milk mixture slowly to the yolks. Add about 1/4 cup at a time, stirring constantly. Return the mixture to the medium saucepan on low heat until it thickens. Stir regularly. You will know it's thick enough when you can leave a distinguishable track mark with your finger on the back of the spoon. Let it cool for 15 minutes. I was in a hurry so I opted for a quick 5 minute cool in an ice bath. Put the mixture in your ice cream maker and run for about 20 - 30 minutes.
Spicy Corn Salad
Side dishes are the orphaned children of the kitchen. The
supporting cast that never gets acknowledged. The main is the star, and usually
gets all of our focus. By the time we get around to thinking about what to
serve alongside the lead act, it’s too late, or we’re too tired to do more than
put a bag of frozen veggies in the microwave, or heat up a packet of
chicken-flavored rice. Side dishes totally get the shaft, and so lately I’ve
been trying to do them a little more justice. This Spicy Corn Salad is a
variation of a recipe I found on Macaroni and Cheesecake (blech! Sorry, but
that’s an unappetizing name for a food blog. Just sayin’.). I added red onion and a chili pepper, and it really added to the flavors. We liked it so much
that we even saved the leftovers and ate them again! I know that’s what
leftovers are for, but we don’t always go back for them. It’s great when it’s
warm, and I also enjoyed it cold the next day. Spicy, fresh and full of great
corn flavor, it definitely takes center stage.
4 ears of corn
1 ½ Tbsp olive oil
Salt & Pepper
2 Tbsp cilantro, chopped
1/4 cup red onion, diced
1/2 Tbsp mayo
1 Tbsp sour cream
Juice of 1/2 lime
3 Tbsp shredded Parmesan
¼ Tsp ground cayenne pepper
1 Chili pepper, minced
First, cut your corn off the cob carefully. Don’t get any
cob in there. Don’t get any finger in there either. Also try to get as much
silk off the corn as possible, because it won’t be pleasant to eat later. Put
the corn in a small bowl and add olive oil, salt & pepper and stir. Spread
the corn out on a baking sheet and roast for about 15 minutes at 400 degrees.
It’ll be nice and golden and corny.
When it’s done, add the corn to a medium bowl and then just
throw all the other ingredients in there and stir! I used a habanero because
that’s what I had laying around. I also felt the pain of habanero oil on my
fingers for like, a day and a half. So be careful when you cut your chili. I
also didn’t have sour cream. I think that would have added a little extra bit
of goodness.
Sunday, July 8, 2012
Iron Chef Basil: Chicken in Basil Cream Sauce
Yes, I'm a competitive person. Yes, I like to win. Yes, I'm disappointed. I really thought I had a chance with this Iron Chef, because this dish is really delicious. I also really love basil, so I was very excited to try some recipes. Eh. I didn't win. I think it was partly because everyone was very full with all the courses that came prior to mine. Maybe if the dishes weren't so filling I might have had a better chance. But, with a refreshing dessert and a drink that started out everything; I didn't have a chance. No matter. I will continue to make this recipe. I love the combination of sun-dried tomatoes, cream, and basil. I'm glad I found The Girl Who Ate Everything's blog, because I've tried other recipes of hers and they've all been great. Here's to the next Iron Chef. Enjoy.
Ingredients:
1/2 cup milk
1/2 cup dried Italian bread crumbs
4 skinless, boneless chicken breasts
3 tablespoons butter
1 clove garlic (1/2 teaspoon minced)
1/2 cup chicken broth
1 cup heavy whipping cream
1/4 cup sun-dried tomatoes, chopped
1/2 cup grated Parmesan cheese
1/4 cup chopped fresh basil
1/8 teaspoon black pepper
Grab a shallow bowl and pour in the milk. Then, take a medium-sized plate and pour the bread crumbs onto it. If your chicken breasts aren't thin; wrap them in plastic wrap and pound with a meat tenderizer till they are about 1/4 inch thick. Take the chicken and dunk both sides in the milk and then cover the chicken with the bread crumbs. Take your skillet and add in the butter. Set the stove to medium. Cook the chicken on both sides until the juices run clear. I believe it took my chicken 8 to 10 minutes to cook. Set aside the chicken and keep warm. I cleaned out my skillet a bit with a paper towel. Add another tablespoon of butter and cook the garlic for a minute. Add in the chicken broth and stir. Bring to a boil and stir any of the browned bits that may reside in the pan. Next, stir in the heavy cream and the sun-dried tomatoes. Boil and stir for a couple minutes. Reduce heat and add in the basil, Parmesan, and pepper. If you want a thicker sauce cook a bit longer; say 5 minutes. Pour sauce over the chicken and serve. Enjoy!
Ingredients:
1/2 cup milk
1/2 cup dried Italian bread crumbs
4 skinless, boneless chicken breasts
3 tablespoons butter
1 clove garlic (1/2 teaspoon minced)
1/2 cup chicken broth
1 cup heavy whipping cream
1/4 cup sun-dried tomatoes, chopped
1/2 cup grated Parmesan cheese
1/4 cup chopped fresh basil
1/8 teaspoon black pepper
Grab a shallow bowl and pour in the milk. Then, take a medium-sized plate and pour the bread crumbs onto it. If your chicken breasts aren't thin; wrap them in plastic wrap and pound with a meat tenderizer till they are about 1/4 inch thick. Take the chicken and dunk both sides in the milk and then cover the chicken with the bread crumbs. Take your skillet and add in the butter. Set the stove to medium. Cook the chicken on both sides until the juices run clear. I believe it took my chicken 8 to 10 minutes to cook. Set aside the chicken and keep warm. I cleaned out my skillet a bit with a paper towel. Add another tablespoon of butter and cook the garlic for a minute. Add in the chicken broth and stir. Bring to a boil and stir any of the browned bits that may reside in the pan. Next, stir in the heavy cream and the sun-dried tomatoes. Boil and stir for a couple minutes. Reduce heat and add in the basil, Parmesan, and pepper. If you want a thicker sauce cook a bit longer; say 5 minutes. Pour sauce over the chicken and serve. Enjoy!
Subscribe to:
Posts (Atom)