Thursday, January 31, 2013

(Semi) Cuban Quesadillas

I’m calling these “semi” Cuban because I know my Blogmate, (is that a word? It is now.) Emily, is a big fan of Cuban sandwiches, and these are definitely not authentically Cuban. I don’t want Emily coming after me Cuban-style. That wouldn’t end well. So anyway, these are in the style of Cuban sandwiches, just in a quesadilla form and I found the recipe on a blog called Culinary Colleen. The ingredients are simple, a tasty marinated pork, whole grain mustard, pickled jalapenos, Gruyere cheese and prosciutto. My husband, who is also a Cuban sandwich fan, liked these a lot, particularly the pork, which was flavorful and citrusy. For me… I’m not sure it’s a flavor combination that is totally in my wheelhouse, but that’s certainly not to say it wouldn’t be in yours.


Ingredients
4 cloves garlic minced
Juice of 2 limes
Juice of 1 large orange
2 tsp. cumin
1 tsp. coarse salt
1 tsp. fresh black pepper
1.5 pounds pork tenderloin
2 Tbsp. olive oil
4 flour tortillas
4 slices prosciutto
4 oz. grated gruyere cheese
Pickled jalapenos
Mustard

Start with your marinade. Mix your garlic, lime juice, orange juice, cumin, salt and pepper in a gallon freezer bag (or your favorite marinating dish). Add in your pork and marinate for up to 4 hours. We actually couldn’t find a pork tenderloin that would be reasonable for two people, so we just got thinly sliced pork chops on the bone and marinated those. If you go with a thinner sliced pork, you don’t need to marinate it for quite as long.

Heat your oil in a skillet over medium high heat and then brown the pork on all sides, which should only take a few minutes. Then cook in on a broiler pan at 350 degrees. A tenderloin should take about 20 minutes or so. Ours was done in ten. Slice the pork into quesadilla size slices.

Now, to assemble your quesadilla. Do NOT do what I did and think you can save time by making a two tortilla quesadilla. It just doesn’t hold together at all. The easiest way is to use one tortilla and fold it over. For some reason, this method held it all together much better. So fill half the tortilla with pork, cover it with a slice of prosciutto, a good number of pickled jalapenos (spread them out) and a sprinkling of Gruyere. For some reason, the only Gruyere I can find is smoked, which I do not like. So I used Gruyere for my husband but sharp white cheddar for myself. Anyway, spread the other half of the quesadilla with some nice mustard, and then fold over.

Heat your skillet (which you’ve wiped out since browning the pork), and put in the quesadilla with the cheese side down. I find that this melts the cheese faster and helps the whole thing hold together better. Cook until the cheese is melted and both sides are nice and browned (usually about 3-4 minutes a side). Then slice your quesadilla in half and serve! It may be only semi Cuban, but it’s wholly delish! 

Wednesday, January 23, 2013

Thai Soup: Tom Kha Gai

I’m on a kick. A soup kick. You may have noticed. Here’s another good one to add to the list that I found on The Daring Gourmet. It’s spicy, and if that surprises you, then you haven’t been paying attention to my recipes. Even with plenty of (light) coconut milk, it’s more of a brothy soup than a creamy soup. It’s easy, filling and even somewhat healthy. Overall, both my husband and I really enjoyed it, and definitely recommend you try it. However, one word of warning… it does not keep. So eat it all the first day. (You’ll want to!)


½  Tbsp vegetable oil
1 ½  Tbsps Thai red curry paste
3 cups chicken broth
3 cups unsweetened coconut milk (I used “light”)
1 large lemongrass stalk, trimmed and cut into 2-inch pieces
6 thin slices fresh ginger
2 Thai chilies, cut in thin slices
3 Tbsps fresh lime juice
2 Tbsps Asian fish sauce
1 lb chicken breast, cut into thin strips
1 cup white button mushrooms, sliced thinly
1 cup frozen yellow corn (optional)
Cilantro or basil leaves for garnishing

We couldn’t find Thai chilies at Kroger (it’s hit or miss) so we used two habaneros. We did not seed them, but if you are sensitive to spice, you may want to. Start by warming the oil over medium heat in your soup pot. Add in the curry paste, and stir about a minute to a minute and a half.  Next, stir in the chicken broth, coconut milk, lemongrass, ginger, chilies, lime juice, and fish sauce and bring it to a simmer, about 5 minutes.  We were out of fish sauce so we just used soy sauce. Then add in the thinly sliced chicken and simmer for 15 minutes. We added the corn in at the same time as the chicken because we felt like it needed some more veggies. Pay close attention and don’t let it boil! I didn’t and I think that my coconut milk ended up doing weird things because of it. Add the mushrooms and simmer for another 5 minutes.  Salt to taste. Remove the lemongrass and ginger before serving. This is the hide and go seek portion of the dinner—have fun with that.  Serve with a garnish of fresh Thai basil leaves or cilantro.

Saturday, January 19, 2013

Momofuko Compost Cookies

Back in October we had Iron Chef Chips and I was tasked to make a dessert utilizing the "secret" ingredient chips. Well, I tried a lot of recipes before I eventually settled on the Ice Cream Chipped Pie. One of the recipes I tried is this Momofuko Compost Cookie from Plumpie Cooks. It was actually a pretty big hit amongst my co-workers, but I didn't feel it tasted a lot like chips. However, it was a very tasty cookie. I enjoyed the saltiness that the chip brought to the cookie as well as the combination of reese's peanut butter chips and the variety of chocolate chips. Plus the fun thing about making momofuko compost cookies is you can use a variety of ingredients from oats to rice krispies to ritz crackers. It's all up to you and what you like as far as what to include in the cookie. Enjoy!


Ingredients:
1 cup unsalted butter (2 sticks), room temperature
1 cup granulated sugar
3/4 cup light brown sugar
1 Tbsp corn syrup
1 tsp vanilla extract
2 large eggs
1 3/4 cups all purpose flour
1/4 cup graham flour (optional)
2 tsps baking powder
1 tsp baking soda
1 tsp Kosher salt
1 cup oats
2 1/2 cups your favorite baking ingredients (options: chocolate chips, other flavored chips, Rollos, Cocoa Krispies, m&m’s, reese’s peanut butter cups)
1 1/2 cups your favorite snack foods (options: chips, pretzels, yogurt covered pretzels, ritz crackers, etc.)

Set your oven to pre-heat at 375 degrees. Take a medium bowl and combine the flours, baking powder, baking soda, and salt. Set aside. Take out your standing mixer with the paddle hook, and beat the butter, brown sugar, and corn syrup for two minutes until fluffy and pale yellow in color. Then add in your eggs and vanilla and mix. Scrape down the sides of the bowl with a spatula as you see fit. Mix for an additional 5 to 10 minutes until the mixture becomes a pale color and kind of doubles in size.  Slowly add in the flour mixture. Mix just until the dough comes together being careful not to over-mix. On low speed, add in your favorite ingredients that you will be using; chip, chocolate chips, reese's peanut butter chips, pretzels, etc. Beat until it is just incorporated. Take out your baking sheets and line with parchment paper. Using an ice cream scoop, scoop out the dough onto the sheets.

Once your cookies are portioned onto you baking sheets wrap with plastic wrap and refrigerate for one hour or up to one week. According to Plumpie Cooks; if you bake the cookies while they are at room temperature they will not set properly in the oven. Pre-heat your oven to 375. Remove the plastic wrap and bake for 9 to 12 minutes. You may want to turn the baking sheet half way thru the cooking process to ensure even cooking. Around 9 minutes the edges of the cookies will start to brown; let them bake a couple minutes longer especially if they still look doughy in the center. Remove from oven and let cool on a wire rack.

Thursday, January 17, 2013

Chicken Curry Soup

With the cold, rainy weather plaguing Richmond in the last two weeks, one thing is for sure: it’s full on Soup Season. Seriously, I think Winter should be late November through December, and then Soup season can be January and February. Maybe even March. Anyway, my seasonal suggestions aside, I made a really awesome soup last night. I found this Chicken Curry Soup on Will Cook For Friends and instantly knew it was right up my alley. Spicy, brothy, no beans—yeah that hits all my checkmarks. My only gripe about the soup, and it’s a small one, is that it probably could have used a few more vegetables. I know, that doesn’t sound like me, but it did need just a little bit more, maybe a daikon or some root vegetable. I thought it was delicious, my husband did too, and I’m looking forward to having the leftovers again soon!


Ingredients
1 Tbsp olive oil
2 boneless, skinless chicken breasts
1 tsp. cumin
1 tsp. cinnamon
1/4 tsp. allspice
1/2 tsp. kosher salt
1 large yellow onion
1 serrano chile (optional)
5-6 cloves garlic, minced
2 TBSP curry powder
1/2 tsp. freshly grated ginger
1/4 cup honey
4 cups low-sodium chicken broth
1/2 cup fresh cilantro, chopped
2 limes, juiced
Salt to taste
White or brown rice, for serving

The original recipe called for bone in chicken breasts, but I didn’t want to have to deal with shredding it off the bone, although I’m sure that brings more flavor. I didn’t feel like the chicken was lacking in any way, though. Start by trimming any excess fat off your chicken. In a small bowl, mix cumin, cinnamon, allspice and kosher salt, and sprinkle the mixture over the chicken, rubbing it in well. Heat your oil over medium heat and sear the chicken on each side, about 3-4 minutes a side. Then set it aside.

Add your onions and serrano into the pot and sauté for around 3 minutes. The original recipe didn’t call for serrano, but I wasn’t convinced the curry powder would bring enough heat. Well, the soup ended up pretty spicy (in a good way) so I would say if you’re not into that, leave out the serrano.

After about 3 minutes, add in the garlic, ginger and curry powder and mix well for about another minute before stirring in the honey and chicken broth. I use Swanson’s 100% fat free broth to make it even healthier. Put your chicken back in the broth and bring it to a boil, then turn the heat to low and simmer covered for about 30-40 minutes. If you use bone-in chicken it will need to go longer than breasts will to cook all the way through.

Once the chicken is done, pull it out and shred it, then return it to the pot along with your lime juice and cilantro. Taste it and salt it accordingly. If it’s not spicy enough, add in some cayenne pepper. If it’s too spicy, you can bring it down with some more honey or coconut milk. Serve it over a half-cup of rice. Happy Soup Season! 

Saturday, January 12, 2013

Strawberry Daiquiri

When I was in my early twenties; one of my favorite alcoholic beverages was Strawberry Daiquiri's. I hadn't quite discovered the deliciousness of coconut rum, white wine, or Mojitos. So, whenever I would go to a restaurant or a local bar that would be one of my favorite beverages to order. Eventually, I did graduate to malibu and diet cokes as my go to beverage, but strawberry daiquiri's have always held a special place in my heart. The other night I wasn't really in the mood for wine, and didn't have mint for strawberry mojitos. So, I decided to make strawberry daiquiri's since I had the ingredients for it. I have to say this really hit the spot, and it was really delicious. I kind of made up my own recipe, but I think you will enjoy it as much as I did!


Ingredients:
1/2 a bag of frozen strawberries
2 or 3 shots of light rum
1/8 cup of simple syrup (optional)
1/2 banana
juice of half a lime

Throw all of the above ingredients into your blender and mix well. Pour into your favorite glass and enjoy!

Thursday, January 10, 2013

Tuna Melt Bites

Before the holidays, I found myself with a little bit of time off. And despite my long to do list and ambitious plans of what I’d get done, I did little more than hang out around the house and make cookies. What was most difficult about being home during the week, however, was lunch. I am not normally much of a lunch planner. Either I have a Slimfast shake (when I’m being good) or go out around my office (when I’m not). At home on the weekends, the husband and I usually have a late breakfast and a somewhat early dinner and skip lunch altogether. Thus, our house is not exactly the haven of lunch-type foods. So I stuck my head in our overstuffed pantry to see what I could make and heard the stack of canned tuna calling my name.

I’ve always been a fan of canned tuna, by my aforementioned husband is not. So, a few cans have been sitting, abandoned, in my pantry for awhile now. I pulled one out and decided to make an impromptu tuna salad based on what I had around the kitchen. It turned out really tasty! And since I didn’t want to just eat the tuna salad cold, I decided to use up some ciabatta (my favorite kind of baguette) and make little mini tuna melts. They were so easy, made with on-hand ingredients, and filled me up.


1 can Tuna in water, drained
1 celery stalk, diced small
2 Tbsps red onion, diced small
1 pickle spear, diced small
1 ½ Tbsp mayonnaise
1 Tsp Dijon mustard
Pinch of salt
1/8 Tsp cayenne (optional)
1 Tbsp fresh dill (optional
A few slices of Baguette
Sliced cheddar

It’s really simple. Preheat the oven to 400, then just mix the ingredients together. If it seems like it needs a little more mayo to hold everything together, just add it. Taste and add salt (or any other spice) as needed. I tried adding a little Italian spice mix to it once and didn’t like the way it turned out. But dill was great, and even a little lemon juice adds some brightness.

Once you have the salad made, spoon it out onto your slices of baguette. Try to balance the bread and tuna ratio. Top with a slice of cheese. I used cheddar but use any kind you like (pepperjack, maybe?). Then bake for about 10 minutes. Keep an eye on it. You want the cheese to melt and get a little bubbly without burning, and the bread should get a little crunchy but still soft in the middle. And that’s it! A nice, simple but delicious lunch, even for the most lunch-challenged people among us. 

Wednesday, January 9, 2013

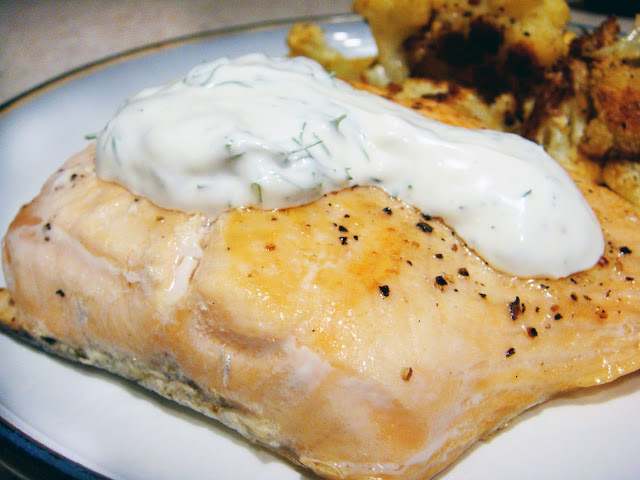
Salmon with Lemon Dill Dressing

I’m constantly on the look out for simple, yet flavorful meals. Because despite my best efforts, there are nights where I have to work late, or my husband does, or where I’m just too beat to spend much time on a meal. Those are the nights where we end up ordering something unhealthy like Chinese or pizza, unless I have a simple, quick meal on hand to make. This salmon recipe that I found on Drizzle and Drip fits the bill perfectly. It’s very quick and easy to make, with ingredients that for the most part you would generally have on hand, and best of all—it packs a lot of fresh, delicious flavors. Lemon and dill with a perfectly cooked salmon are the perfect complements to each other.


2-4 salmon filets
olive oil
½ cup sour cream
1 tbsp mayonnaise
1 ½ tbsp finely chopped dill
juice of 1/4 of a lemon
ground black pepper and salt to taste

The original recipe calls for crème fraiche, but I think sour cream worked well as a substitute, and if you wanted to make it healthier, I don’t think a low-fat sour cream would hurt it. You could also cut the mayonnaise entirely, in my opinion. I did cut the recipe down some because it made way too much for just two people. All you really need is a tablespoon or two at most for each fillet.

Simply mix together the sour cream, mayo, dill, lemon juice and salt and pepper in a small dish and set it aside. Rub salmon lightly with olive oil and season with salt and pepper. Pan fry it over medium high heat, starting with the skin side down for 2 minutes. Flip it over for 3 minutes, then back on the other side for the last two minutes. If you like your salmon cooked completely through (shame on you!) you might have to cook it longer.

After that, just serve with a dollop of dressing on top. It is bright and lemony with lots of dill flavor to complement the unfussy salmon. And it’s so easy! 

Sunday, January 6, 2013

Vietnamese-Style Chicken Noodle Soup

I've been fighting a cold for the past couple days. And, I was feeling pretty awful yesterday. So, I decided that I really wanted soup for dinner. I browsed thru some recipes on the web for the best soups for colds, and didn't really find anything that appealed to me. Next, I looked thru a couple of my favorite cookbooks. I really like my Cook's Illustrated cookbook. It's pretty similar to my favorite New Best Recipes, but this cookbook has a lot more recipes.

I had heard that Pho is really good for colds, so I decided to make this chicken noodle soup from Cook's Illustrated. Wow! It was really good and really spicy since I decided to add Sriracha and red chili peppers from my garden. It really helped to open my sinuses. Plus, it was very flavorful. I also decided to add a cinnamon stick to the broth since I saw that was added to another Pho-style soup. If you have a cold you are trying to kick; I highly recommend you try this soup. And, even if you just want a warming soup on a cold, winter day this will do the trick. Enjoy!


Ingredients:
8 oz wide rice noodles

Broth and Chicken
5 cups low-sodium chicken broth
12 oz boneless, skinless check thighs (about 3 thighs), trimmed (I used 2 chicken breasts)
4 garlic cloves, peeled and smashed
1 (2 inch) piece fresh ginger, peeled, cut into 1/8 inch rounds, and smashed
2 star anise pods
3 tbsp fish sauce
1 tbsp soy sauce
2 tsp sugar
1 cinnamon stick (optional)
Salt

Vegetables
4 cups shredded napa cabbage
2 scallions, sliced thin on bias
1/2 cup fresh mint, large leaves torn in half
1/2 cup fresh cilantro leaves
2 tbsp chopped unsalted roasted peanuts
lime wedges
1 tsp diced jalapeno peppers
Sriracha

For the noodles, I followed the directions on the box to make pasta out of them. Basically, you bring salted water to a boil, add the noodles, stir, and let cook for 4 to 6 minutes until al dente. Drain and immediately rinse with cold water. Drain and set aside. Or, you can go ahead and distribute the noodles into bowls.

For the broth and chicken, take a large pot and add all ingredients except salt to a boil over medium-high heat. Reduce heat to low and then simmer, partially covered, so that the flavors can meld about 10 to 15 minutes. Or, until chicken is cooked thru. Using a slotted spoon, remove the chicken and when cool enough to handle slice thin. Continue letting the broth to cook for an additional 10 minutes. Then, strain the broth thru a fine-mesh strainer into a bowl. Then, return the broth to the pot and discard the ingredients in the strainer. Season with salt to taste. Cover broth and keep hot over low heat until ready to serve.

For the vegetables, divide cabbage and chicken among bowls with noodles, and ladle in the broth. Sprinkle each serving with scallions, mint, cilantro, peanuts, sriracha, peppers, and lime wedges.

Carrot Cupcakes

It was our friend's birthday on January 2nd, and we wanted to do something nice for her since she's always doing nice things for us. I found out from her husband that one of her favorite desserts is Carrot Cake. Since we were going to celebrate the night we played volleyball; I thought it would be a great idea to make these into cupcakes. I found this recipe from Simply Recipes and I thought it turned out great. My only gripe, and really I was the only one who noticed, was the abundance of cardamon in the cake. I think 2 teaspoons of cardamon is a bit much, so the next time I make these I will cut it back to just a teaspoon. Overall, the birthday girl really liked the cupcakes, and I think they were a big hit. Enjoy!


Ingredients:
  • 1 cup of chopped walnuts
  • 1 pound of carrots
  • 3 large eggs
  • 1/2 cup of buttermilk (or add a teaspoon of lemon juice to regular milk and allow to stand for 10 minutes)
  • 1 teaspoon of vanilla extract
  • 2 cups of sugar
  • 1 cup of vegetable oil
  • 1 tablespoon of orange zest
  • 3 cups of all-purpose flour
  • 1 teaspoon of baking soda
  • 2 teaspoons of baking powder
  • 1 teaspoon of kosher salt
  • 2 teaspoons of ground cardamom
  • 1 teaspoon of ground cinnamon
First, pre-heat your oven to 350 degrees, and place the chopped walnuts onto a baking sheet. Put the walnuts in the oven and bake for about 5 minutes. Remove from oven and set aside. Next, rinse carrots and peel and grate. Set aside. Take out the bowl from your standing mixer and add the carrots, eggs, buttermilk, vanilla, sugar, vegetable oil, and orange zest. Whisk thoroughly. Take out a large bowl and add the flour, baking soda, baking powder, salt, cardamom, and cinnamon. Gently stir the flour mixture into the carrot mixture. Be sure not to over-mix. Then, fold in the toasted chopped walnuts. Scoop the cupcake batter into your cupcake muffins using an ice cream scoop. It should make about 24 cupcakes. Place in your 350 degree oven and bake for about 20 minutes (or until a toothpick comes out clean when inserted into the cupcake) making sure you rotate the pans halfway thru the baking time. Allow cool in the muffin pan for about 5 minutes then remove the cupcakes and allow to cool on a wire rack.

Frosting:

To make the frosting; beat a cup of softened butter and 16 oz of softened cream cheese in your standing mixer until well combined. Sift in 1 1/2 cups of powdered sugar. I added a teaspoon of vanilla to give it a flavor boost. Spread onto cooled cupcakes.

Wednesday, January 2, 2013

Nutella Cream Tart

What better way to start out the new year than with a Nutella tart? Yep. That's precisely what we did on New Year's Eve. I was tasked to bring a dessert to the New Year's Eve party, and how could I resist making a Nutella dessert? Well, to break up the Nutella-monotony; I brought this Brown Butter Ice Cream, which was also a big hit. Thanks to Megan's Cookin for posting this recipe. It is so, so, so good. It isn't a heavy dessert, but smooth and silky. You can definitely taste the Nutella, but I think the flavor of this hazelnut spread is taken down just a tad by the addition of cream cheese, heavy cream, and sweetened condensed milk. Yeah, this isn't a pie you want to eat if you've made New Year's resolution to eat healthier or get in shape, but once you do meet your resolutions this is the perfect tart to celebrate with! Enjoy!


Ingredients:
Pie Crust:
  • 25-30 chocolate wafers, crushed
  • 6 Tablespoons unsalted butter, melted
  • Pinch of salt
Filling:
  • 1 3/4 cups heavy cream, divided
  • 1 cup nutella
  • 3/4 cup (6 ounces)cream cheese, softened
  • 1/3 cup plus 2 Tablespoons sweetened condensed milk
  • dark chocolate shavings, for garnish
To make the pie crust; add the chocolate wafers to your food processor and process until the cookies are fine crumbles. Melt your butter and add a pinch of salt. Then combine the cookie mixture with the butter. Press into your 9 inch tart pan. Place the tart in the freezer and start your filling.

To make the filling; combine the nutella, cream cheese, sweetened condensed milk in your standing mixture.  Mix until combined but don't over-mix. Take out a medium bowl, and add in 3/4 cup of the heavy cream. Then using an electric hand mixer beat until the heavy cream forms soft peaks. Gently, fold in the whipped cream into the nutella mixture until it's well combined. Take out your tart from the freezer, and gently spoon the nutella mixture over the crust. Whip the remaining cup of heavy cream until it forms soft peaks. Gently, spread this on top of the nutella mixture. Refrigerate for a couple hours, or overnight.

Brown Butter Ice Cream w/ Chocolate Chips

I've become a convert of browned butter. It really gives a flavor boost to a dish. You can utilize browned butter in giving steaks more flavor, adding a nice boost to chocolate chip cookies, and now gives a complex and nutty flavor to ice cream. This ice cream is probably fairly similar to butter pecan ice cream, but I'm not too positive. However, it is a very delicious ice cream and relatively easy to to make. I came across this recipe on Portuguese Girl Cooks' Blog. To take it up a notch I decided to throw in jumbo semi-sweet chocolate chips. If you like the nuttiness of browned butter then I think you will like this ice cream. It's creamy, smooth, and delicious. As a matter of fact; it was a big hit at a New Year's party I attended. People even went back for seconds! Enjoy!


6 tablespoons (3/4 sticks) unsalted butter
2 cups heavy whipping cream
1 cup whole milk
6 large egg yolks
1/3 cup granulated sugar
1/3 cup packed dark brown sugar
1/4 teaspoon salt
1 teaspoon vanilla extract
6 oz jumbo semi-sweet chocolate chips

Take out a small frying pan; and melt the butter over medium to medium-high heat. Swirl the pan some to help with the browning. It'll take around 5 to 10 minutes for the butter to brown. You don't want the butter to burn, so pay careful attention to it as it cooks. The butter should have a nice nutty smell and look amber in color. Pour the butter thru a fine mesh strainer into a small bowl and set aside.
Take out a large saucepan, and bring the milk and heavy cream to a simmer. Meanwhile, add the egg yolks, vanilla, sugars, and salt to a standing mixer. Stir until the mixture is nice and thick. Slowly, add in the browned butter. Slowly, whisk in the hot milk mixture into the standing mixer. Then, immediately add it to your saucepan and cook (while stirring) until the temperature of a candy thermometer reads 170 degrees. Plus, the back of the spoon should have a nice coating on it. This will take about 5 minutes.
Strain the custard into a bowl and place in the fridge for a couple hours until cold. Once the custard is cold; process in your ice cream mixture according to the manufacturer's directions. Right at the end of the ice cream making add in the semi sweet chocolate chips. Then, pour into a container and seal air-tight. Place in your freezer and freeze until firm.