Monday, February 27, 2012

Pistachio and Goat Cheese Grapes


This recipe was a hit at our iron chef nuts. Kim made this for her appetizer and she ended up grabbing second place. I believe this was my first time trying goat cheese and pistachios, and I couldn't believe how much they worked with the red grapes. I loved this so much that I've been making it ever since. I decided to make it today because I had some goat cheese and pistachios. I just needed the grapes, so a quick trip to the Kroger proved fruitful. Heh, heh. Anyway, if you are going to a party this is a delicious option that will prove to be a hit. Enjoy!


Ingredients:
4.5 oz goat cheese, chilled
5 oz red seedless grapes
6 oz pistachio nuts, chopped

First, make sure you have clean hands. Now, all you do, is take a piece of goat cheese and kind of pat in your hand. Take a grape and roll it in your hand so that the goat cheese covers the grape. You may have to add some more goat cheese to the grape so that it is completely covered. Then, roll the grape in the chopped pistachios. Once all the grapes are covered with goat cheese and pistachios; place on a plate and chill in the fridge for about an hour. You may serve whole or sliced. Enjoy.

Thursday, February 23, 2012

Cilantro Pesto Orzo


This is our first pesto. I know that’s hard to believe, and now that I made it I can’t believe that it’s taken this long either. Not only is it incredibly flavorful, it’s also somewhat healthy, and so easy too. You just throw all the ingredients into a blender or food pro and blammo! Instant pesto. I suspect this pesto would be great on any kind of pasta, but it just so happens that this recipe calls for orzo.

Anyway, this is fresh and bright—smells fantastic and has a tiny bit of crunch from pistachios. Plus the little bit of parmesan makes it creamy and delicious. We served it with a fairly simple salmon, and it’s great as a side. On spaghetti it’d make a wonderful main too (and we’ll be trying that as well.) If you’re so inclined I think a little spritz of lemon juice on top would make it even better.


Ingredients
8oz Orzo pasta
1 bunch fresh cilantro
5 cloves garlic, minced
1 tablespoon white wine vinegar
1/4 cup grated Parmesan cheese
1/2 teaspoon cayenne pepper
1/2 cup shelled pistachios
1 lime, juiced
salt to taste
1/4 cup olive oil
1/4 cup chicken stock

I eyeballed all the ingredients, and it turned out great, but those are the measurements from the original recipe, which I got from Lipstick Blogger. To cook the orzo, follow the directions on the package. (Bring water to a boil, add the pasta and let it return to a boil, then cook 8-10 minutes, stirring occasionally. Drain.)

Meanwhile, get out your food pro or blender (I tend to go for the food pro on things like this. It seems to work better for me.) Throw in all the ingredients through the salt (cilantro, garlic, vinegar, cheese, cayenne, pistachios, lime juice, salt) and blend until it forms a paste. Add the olive oil and blend again. Then add the chicken stock in small amounts (about a tablespoon) until it reaches the desired consistency. The recipe didn’t say what the desired consistency was, but I thought it should be more like a thick sauce.

Warm the pesto in a saucepan over low heat and stir until it begins to simmer. Let it cook a little bit to get some of the edge of the garlic out, then pour it over the pasta, mix it thoroughly, and serve! Splash with a little lemon juice if you feel like it. If you aren’t already a pesto lover, this one will certainly convert you. 


(click here for printable recipe)

Tuesday, February 21, 2012

Iron Chef Cheese Recap

We’ve been wanting to use cheese as a secret ingredient for awhile now, but for some reason we only just got around to it. But I’m sure glad we did. It was an excellent night of food. Maybe not the healthiest, but since we only have Iron Chef once every two or three months, it’s probably ok. Well, and there was the Just Dance competition that we had after eating that probably burned a few calories.

We started the night out with the dreaded cheese drink. We had been willing to eliminate this category for this ingredient because… well… “cheese drink.” Who wants to try that? Well, Cara took this as a challenge, and I’d say she was surprisingly successful in making a tasty drink with cheese. Her Strawberry Cheesecake smoothie used cream cheese. It was well balanced because even though you could taste the cheese, it didn’t dominate the flavor. This was way better than the dirty cheese martinis we were afraid of. (Sorry about the blurry pic, I had some light issues on this one).


The appetizers were the place to be, since both of our winners of the evening had this course. Chelyen made Caesar Chicken Salad in Parmesan Cups and walked away with her first Iron Chef win! It was a good thing she made seconds. The Parmesan cups were a really creative way to serve the chicken salad and were deliciously crispy even on their own. I think Chelyen was hoping to take some leftovers home, but no dice!


 Our second appetizer was a cheese ball—but not just any cheese ball. Emily made a Parmesan Crusted Goat Cheese Ball with Basil Oil. She served with little toasted pieces of bread and it was a big hit, earning Emily the second place prize. It was the best presentation of the evening (imo) with the white cheese and bright green basil oil. And it tasted great to boot!


We did the sides and mains all together, so I’ll just go through them in no particular order. Morgan’s side was a spicy, Cheesy Cornbread Muffin. I love me some cornbread (we’re in the South, come on) and this was a good rendition. I think it was cheddar and jalapeño, which is a combo I could never be mad at.


 I made the other side, which fell a little short of my expectation. I had a roasted caprese salad once at a restaurant in Chicago and really enjoyed it. This was my attempt, but I think the tomatoes needed to roast a little longer, and it might have tasted better served warm.


Kim made a really flavorful cheese soufflé. I have never made one, but I hear that they are pretty difficult to pull off, so the degree of difficulty was high here. Plus I’m a sucker for the “breakfast for dinner” thing so she got me there. Didn’t really photograph well on those red plates, but it really did taste great!


Jen made “Company Chicken,” a name I really love. Ok, so it is not the most beautiful looking food—but it was really good and homey. Had that “stick-to-your-ribs” feel to it. Definitely the kind of dish you would make to impress guests. 


 Most of us steered away from the cheeses with really strong flavors since they can be polarizing, but Shu went right at it, using a Stilton blue cheese. She paired it on a sandwich with roast beef and red onions. I really appreciated that the flavor of the cheese was truly the star of the dish, and it was a great pairing of flavors as well.


Finally, we had two desserts. First was Doan’s Cream Cheese Brownies, and really, you can’t go wrong with that recipe. They were fudgy and decadent—everything you want in a brownie. And I know that we ate almost the entire pan of them by the end of the night, so you know they were good.


 Laura, our hostess for the evening, had the most creative dish of the night: Goat Cheese Ice Cream with a Raspberry Sauce. It’s not something you would expect, and we were all a little nervous about trying it. But actually, I think the recipe has some potential. The goat cheese gives ice cream a nice tang that adds another dimension. But in this case I think the ratio of goat cheese was a little too much, since that was a dominating flavor. But the point of Iron Chef is to take risks and get creative, and Laura certainly did that.


It was a great night of food, and wonderful to try recipes with such a well-loved secret ingredient. I was really happy with the variety and creativity that everyone showed, and it was good to get together again. The next Iron Chef hasn’t been planned yet, but be on the lookout! And if you have any cool ideas for ingredients, we’d love to hear them.

Monday, February 13, 2012

Braised Lamb Shanks

I know, I know. I owe you guys a recap of Iron Chef Cheese. I’m slacking. But—when Steve and I made this, I just had to drop everything and write up the recipe for you. Because you need drop everything and make it just as soon as you can. I’m going to throw down a major statement and say: this is the best meal we’ve ever made. Yes, EVER. If I ordered this in a restaurant I would talk about it. I would rub the sauce in my beard if I had one. It’s so good that we’ve named a holiday after it: Shanksgiving! And you better believe it makes Thanksgiving look paltry in comparison. Tender, juicy meat that falls off the bone, packed with flavor and a kick at the end.

I picked up this recipe at Saveur and really there’s not much I would change. We halved it (giving you the halved recipe below) and it was plenty for two. And we opted not to seed the jalapeno because we like a little spice, and really thought it was the perfect amount of heat. Oh, and the directions have you toss out half the vegetables which was really unnecessary. Other than that, we mostly just followed the directions to deliciousness.


Ingredients
2 lamb shanks
Kosher salt and freshly ground black pepper, to taste
1 ½ tbsp. chili powder
1 tsp. ground coriander seed
1 tsp. ground cumin
1/8 tsp. ground cinnamon
3 tbsp. extra virgin olive oil
2 carrots, roughly chopped
2 ribs celery, roughly chopped
2 jalapeños, stemmed, seeded, and roughly chopped
1 medium onion, roughly chopped
5 cloves garlic, smashed
2 sprigs rosemary
3 sprigs thyme
½ cup balsamic vinegar
3 cups chicken broth
1 tbsp. corn starch

1/4 cup water

While this is a pretty straightforward recipe, there are a lot of steps and long cook times, so it’s definitely a weekend project. We got our lamb shanks at Fresh Market, and I would definitely suggest going there or Whole Foods. Kroger had some sad looking shanks and that won’t do this recipe justice. The easiest way to start is just to prep all the vegetables and the spice mix. That way you have everything all ready to go and can just run through it. Since I knew we’d be tossing out the herbs, I tied them together into a little herb bouquet to make it easier. Some of the leaves fell off but I figured that was ok and didn’t try to fish them all out.

Preheat the oven to 350 degrees. Mix your chili powder, coriander, cumin and cinnamon in a small dish. Pat the lamb shanks dry and season with salt & pepper, plus about 1 tablespoon of the spice mix.

In a Dutch oven, heat your oil over medium high heat to sear the shanks. Be careful with this step that you don’t get the oil too hot. We did and it ended up burning some of the spices. If that does happen to you, wipe out the pot before cooking the vegetables or everything will have a burned taste. Brown the shanks on all sides, one at a time, which should take about 6 minutes each. Then set them aside.

Pour your vegetables (carrots, celery, onion, jalapenos, garlic) into the pot with your herb bundle and the remainder of the spice mix. It’s best to have the vegetables down as a bed before pouring the spice on top, in my opinion. Scrape any browned bits from the bottom, and stir occasionally until the vegetables have softened. It took about 10 minutes for us. Next, pour in the balsamic vinegar and stir until it’s mostly evaporated, about 10 minutes more. I was kind of worried about the amount of balsamic in this, but it turned out perfectly, so don’t worry!

Add your lamb shanks back into the pot and pour the chicken broth over them. Add a little salt, to taste and then bring to a simmer. Put the lid on and cook in the oven for 2 ½ hours. We turned the lamb halfway through. One tip I read a long time ago about protecting your Dutch oven when cooking—wrap the handle on the top with foil. Apparently after awhile the handle can get brittle and break, and is expensive to replace.

All right, once your lamb is cooked and the house smells fantastic, take the shanks out of the pot (carefully) and place them in separate bowls, or on a serving plate, depending on how you roll. Pour the braising liquid through a strainer to separate out the vegetables. Throw away the herb bouquet and serve the vegetables into the bowls, or on the serving plate around the shanks. Cover them with foil to keep them warm.

Skim some of the fat off the top of the braising liquid (which is easier said than done, I’m afraid). In a small bowl, whisk together the water and cornstarch and then whisk into the braising liquid. Bring the liquid to a boil over high heat and cook until a nice gravy forms. We always seem to have trouble getting sauces to thicken, but this was probably the most successful sauce we’ve ever pulled together. Pour the gravy over the shanks and veggies and enjoy! Then pencil in Shanksgiving on your calendar.

(Click here for printable recipe)

Saturday, February 11, 2012

Chicken Piccata w/ Sauteed Brussels Sprouts


Tonight I wanted to make something relatively healthy. I knew I wanted to make something involving chicken and brussels sprouts. I had purchased frozen brussels sprouts from Trader Joe's. Trader Joe's is my go to grocery store for frozen vegetables. Their prices are insanely reasonably priced. If you've never been find one in your area and go. Now. Anyway, one of the best blogs on the web for healthy recipes is Gina's Skinny Taste. She tries really hard to make popular recipes healthy. I decided to try her Chicken Piccata. She slimmed down Barefoot Contessa's recipe. And, I have to say it was really good. I did not follow a recipe for brussels sprouts. I just thru some stuff together and it turned out pretty great. Give this recipe a try. Enjoy!


Chicken Piccata Ingredients:
2 (16 oz total) chicken cutlet halves, all fat trimmed
freshly ground black pepper
2 large egg whites
2/3 cup seasoned whole wheat dry bread crumbs
olive oil spray (about 1 tbsp worth)
1 tbs light butter
juice of 1 lemon, lemon halves reserved
1/4 cup dry white wine
1/2 cup fat free chicken broth
1 tbsp capers
Sliced lemon, for serving
Chopped fresh parsley leaves, for serving
If you have a pretty thick chicken breast. Go ahead and wrap in plastic wrap and pound with a meat tenderizer until the chicken is about a fourth inch in thickness. Remove the plastic wrap and sprinkle the chicken with salt and pepper. Now, take a small bowl and pour the egg whites in it. Take a small plate and add the bread crumbs. I used panko bread crumbs sprinkled with italian seasoning. Dredge the chicken in some flour.
Take a sautee pan and spray with cooking spray. Set the heat to medium. Now, dredge the chicken in egg whites and then the crumbs. Spray one side of the chicken with cooking spray and place that side down in the warm pan. Spray the side of the chicken that is facing up with cooking spray. Turn the chicken after a couple minutes. Cook until the chicken is cooked thru. It took about 8 minutes for mine to cook. Remove the chicken from the pan and set aside. Clean the pan. Now, add the butter. Once the butter is melted, add the lemon juice, chicken broth, the lemon, salt and pepper. Bring to a boil. Once the sauce has reduced by half; pour over the chicken. Add the chopped parsely and capers. Enjoy.

Brussels Sprouts Ingredients:
Light Bacon 2 slices, cooked and crushed
1 light shallot diced
1 minced garlic clove
Red Pepper Flakes
Sriracha
1/4 cup chopped pistachios
1 cup brussels sprouts, sliced in half
salt and pepper


Cook your bacon until crispy. Set aside. Don't throw out the bacon juice, because you will want to add the shallots and garlic to the pan. Cook for a minute over medium heat. Add in the brussels sprouts. Sprinkle the red pepper flakes and a couple squirts of sriracha. Sprinkle salt and pepper over the brussels sprouts. Cook over medium to medium low heat until the brussels sprouts are tender. Taste a brussels sprout to make sure it's seasoned properly. Adjust seasoning as needed. Serve with the crushed bacon and the chopped pistachios. Enjoy.

(Click here for printable recipe)

Iron Chef Cheese: Parmesan Crusted Goat Cheese w/ Basil Oil


One of my favorite food blogs that I love to peruse is Annie's Eats. I've tried several of her recipes and so far I've loved them all. Last year, she posted a recipe for this goat cheese and basil oil, and I thought it looked so pretty in the picture that I bookmarked it to use in an eventual iron chef. Well, the perfect opportunity arose when we had Iron Chef Cheese. I knew I wanted to make this recipe, but I did try this one as well. It was also tasty. However, I decided to go with the goat cheese with basil oil, because I knew it would be a pretty presentation. This is definitely a tasty recipe, and very easy to make. I was right in making this for Iron Chef Cheese; I took home 2nd place for this one! Give this recipe a try at your next party. Your friends won't be disappointed. Trust me! Enjoy!

Ingredients:
For the goat cheese:
½ oz. Parmesan cheese
¼ cup panko
Freshly ground pepper
4 oz. semi-firm plain goat cheese
1 clove garlic
¼ tsp. coarse salt, plus more to taste

For the basil oil:
¼ cup fresh basil leaves
1 clove garlic
¼ cup extra-virgin olive oil
Baguettes for serving

First thing you do is take your goat cheese and smush it in a medium sized bowl. Sprinkle some ground pepper and the salt into the bowl. Mix together. Take your garlic clove and mince it. Sprinkle salt onto the garlic. Then take a knife and start mashing it until the garlic forms a paste-like consistency. Put this in the cheese bowl, and mix together with your hands. Now, take a food processor and throw in your parmesan and panko crumbs. Pulse until the mixture is nice and fine. Pour this onto a medium size plate. Sprinkle some salt and pepper onto the panko mixture. Now, take your goat cheese and form it into a ball. Roll the goat cheese ball into the panko/parmesan mixture until it is completely covered. Cover with plastic wrap and stick it in the fridge for a bit.

Next, take a small sauce pan and fill with water. Bring to a boil. Place a bowl filled with ice water next to the sauce pan. Place your basil in the boiling water for about 30 seconds. Immediately remove from the boiling water and dunk it into the ice water. This helps the basil retain it's green color. Dry the basil with a paper towel. Take your food processor (hopefully, you cleaned it from the previous step) and place the garlic and basil in it. Pulse until the basil and garlic is finely minced. Scrape down the sides of the food processor. Start the food processor back up again and this time pour the olive oil down the feed tube in a steady stream. Process until completely combined. It should form a green hue. Stop the food processor and strain the mixture thru a fine mesh sieve into a small bowl. Discard the minced basil. Next, remove your goat cheese from the fridge, and discard the plastic wrap. Place the goat cheese in the center of the bowl that has the basil oil and serve with toasted baguettes slices. Enjoy!!


(Click here for printable recipe)

Saturday, February 4, 2012

Peanut Butter Balls


If you know me; you know I have a big-time sweet tooth. I usually find myself wanting something sweet to eat after dinner. But, I want something that is easy and quick to make. I found these peanut butter balls from A Cup of Sugar. I thought they looked awesome. Plus, they sounded pretty easy to make. Well, they were easy to make. However, the texture was a little powdery. I mean they were good, but a tad dry. As a matter of fact, a co-worker bit into one and the powder splattered on his jacket. Lol. So, next time I make these I might add more butter and see if it helps any. They tasted great, though. I hope you give them a try. Enjoy!

Ingredients:
2 1/3 cups confectioners sugar
1 cup graham cracker crumbs
1/2 cup (1 stick) unsalted butter, softened at room temperature
1 cup chunky peanut butter
12 ounces (1 bag) semi-sweet chocolate chips
1 tablespoon vegetable oil
3 cups salted peanuts, finely chopped

When, I made this recipe I halved the ingredients. According to the recipe, this makes 50-60 balls. I thought that was way too many.
First, take a medium-sized bowl and combine the powder sugar and graham cracker crumbs. Stir together. Take the butter and peanut butter and mix together using your hands until combined. As you form the mixture into 1 inch balls, keep pressing into your hands until they form togethe. They will form together. Have patience. Place on cookie sheets lined with parchment paper. Once you are finish; set aside.

Take a small saucepan and a small bowl. Pour in your chocolate chips into the bowl. Add water to the saucepan and heat till it starts to boil. Place the small bowl into the sauce pan. Keep stirring the chocolate chips until completely melted. While the chocolate melts, chop your peanuts and place on a plate. Set aside. Now, remove the pan from the burner. Once the chocolate has cooled slightly take your balls and roll into the melted chocolate. Then, roll the balls into the peanuts. Set on cookie sheets. Let the peanut butter balls air dry. Enjoy.

(click here for printable recipe)

Tuesday, January 17, 2012

Asian Steak Salad

There are days when I would be happy to eat just a simple salad for dinner. Heck, there are days when dinner is hummus and pita chips, or a package of EZ Mac, or (ok, ok) a pint of Ben & Jerry’s. But generally when my husband and I are both home, we try to make a real, honest to goodness dinner. Which makes having a salad for dinner a little hard. Unless—the salad IS a dinner in and of itself. Which is definitely the case for this Asian Steak Salad. In fact, my husband even dubbed it “a keeper” which is the highest form of dinner praise in our house. I got the recipe from the Pioneer Woman, whose recipes are always fantastic (and usually man-friendly). The only changes I think I’ll make in the future is to leave the seeds in the jalapeno (it wasn’t spicy at all) and maybe cut back a smidge on the oil (reflected in the recipe below). I also added about a teaspoon of sesame oil, which was a nice addition to the flavors. 


STEAK MARINADE
Steak, cut of your choosing
2 Tbsps Soy Sauce
1 Tbsp Sherry
3 Cloves Garlic, minced
1 Tbsp Brown Sugar

The original recipe suggested you use Ribeye steak, but for me, that is such a fatty cut of steak that I don’t think it would match well with a salad. It’s great for eating on its own, don’t get me wrong. I love me some grilled ribeye. But for this salad, I used Denver cuts, which I had never heard of before. They were great, though. Evidently they are known as the inexpensive cousin of the New York Strip steak. Mix your marinade ingredients in a Ziploc bag and add the steak, then marinate for a half hour to two hours. In the meantime, make your dressing.

DRESSING INGREDIENTS
3 Tbsps Olive Oil
3 Tbsps Soy Sauce
2 scant Tbsps White Sugar
2 Tbsps Lime Juice
1 Tsp. Sesame Oil
4 cloves Garlic, minced
1 Tbsp fresh Ginger, minced
1 Jalapeno, minced

Whisk together the ingredients for the salad and set aside. You’ll need to whisk again right before pouring over the salad. Cook up your steak as you like it, and slice it into thin strips. I used mixed greens for my salad, and romaine for my husbands, plus mixed in some sliced green onions. Toss the salad with 3/4ths of the dressing, then top with the steak. Pour the remaining dressing over the top of the steak and serve! You could top with cracked black pepper, but I don’t recommend cheese. Just doesn’t fit with this salad, and frankly, you don’t need it. 

(click here for printable recipe)

Tuesday, January 10, 2012

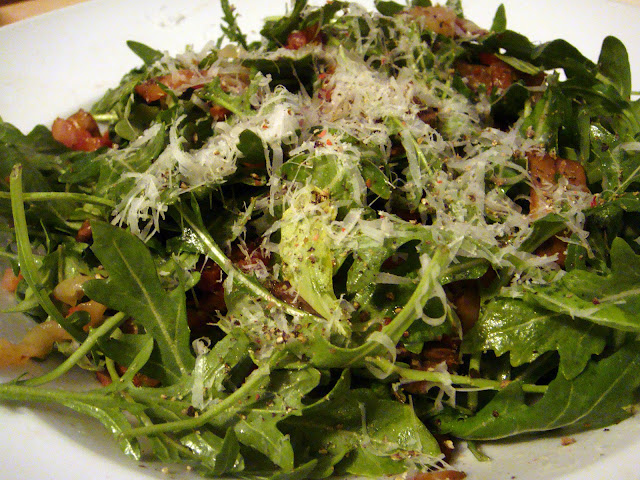
Arugula Salad with Bacon Vinaigrette

It’s January, and with the New Year comes a lot of new resolutions to start exercising, lose weight, and eat healthier. If you know me at all, you know that these are all challenges for, especially the “eat healthier” part. But I’m making an attempt, and that’s why I tried this salad. I’ll admit, a bacon vinaigrette probably isn’t the MOST healthy thing I could have chosen, but come on. Baby steps.

All in all, it was pretty good. In the future I would add a little more seasoning to the dressing, since it was pretty bland. But I love the hot ingredients and dressing with the arugula. The original recipe (from The Pioneer Woman) called for spinach, and I made a second version for my husband with romaine so I’m sure this will work for any lettuce you love.


Ingredients:
Arugula
Bacon
1 red onion, sliced thinly
Mushrooms
Black pepper
Parmesan Reggiano (optional)

Dressing:
3 Tbsps. Reserved bacon grease
3 Tbsps. Red wine vinegar
2 Tsps sugar
½ Tsp Dijon mustard
Dash Salt

Start by frying up your bacon. I made the mistake of trying to get fancy and using some pancetta, but it did not make enough grease for the dressing, so I would recommend sticking with bacon. (We ended up cutting up some bacon to add to it). When that is nice and crispy, remove to a paper towel and remove all but about 2 Tbsps of the grease to a small saucepan. Now start caramelizing your onions over medium-low heat. This should take awhile, around 20 minutes. We didn’t let ours go that long because we like ours slightly less brown. Remove the onions and set aside, then brown your mushrooms over medium heat. Don’t let them get completely soft, just enough so that they are well browned. In the meantime, whisk together the ingredients for the dressing over medium heat until they are combined and heated through. No need for this to simmer; it just needs to be warm.

Now simply assemble the salad with the lettuce, bacon, onions and mushrooms. Pour the warm bacon dressing over the top and toss to coat. Then give it a dose of cracked pepper and if you want, grate a little Parmesan Reggiano over the top. There you have it. Maybe not the healthiest salad in the world, but at least it’s a small step in the right direction. 

(click here for printable recipe)

ps. 200th post! Woohoo!

Sunday, January 8, 2012

Posole Sopa

A couple weeks ago; my mother invited me over for dinner. I usually find out what she is planning on making before I accept. What can I say; I can be picky. On this particular evening she made Posole Soup. I had no idea what it was other than some kinda Mexican soup. I figured it would probably be pretty good as my mother really likes Mexican cuisine. Well, I was right to go over there that evening, because the soup was really good. My mother's soup was spicy and had a ton of flavor. I added some tortilla chips to my soup since I had brought over chips and salsa. It was delicious. I'm not entirely sure what recipe my mother used, but I came across this recipe from My Recipes. I kinda messed up the tomatillos. According to the recipe, you are supposed to boil them before pureeing the tomatillos in a food processor or blender. I forgot to boil, and instead, I immediately pureed them. I read up on boiling and basically it helps soften the flavor of the tomatillo. I found out that a lot of mexican sauces are made with raw tomatillos. So, I didn't feel so bad that I forgot to boil, but I did wash them, fortunately. You should do this after peeling off the husks, because they have a sticky residue. This soup was really good, and quite similar to my mother's recipe. It might be the same for all I know. Enjoy!


Ingredients:
  • 1 pound tomatillos
  • 6 cups chicken stock
  • 2 cups chopped onion
  • 3 pounds chicken breast halves, skinned
  • 4 garlic cloves, chopped
  • 2 jalapeño peppers, seeded and quartered
  • 1 (30-ounce) can white hominy, drained
  • 1 teaspoon salt
  • 1/2 cup chopped fresh cilantro
  • 1/4 cup reduced-fat sour cream
  • 8 lime wedges
I will tell you how I made this soup. Please go to the link above to do it the way it is intended...
First thing I did was boil 4 chicken breasts. I added some pepper and salt to the water and chicken. Once the chicken has cooked thoroughly, remove from pot. Shred chicken and set aside. This is where I messed up the tomatillos; remove the stems and the husk from the tomatillos. Rinse thoroughly. I threw the tomatillos into my food processor and pureed until smooth. Set aside. Take a 4 qt saucepan, and add 6 cups of chicken stock. Set aside. Next, chop your jalapenos, onion, and garlic. Throw the onion, garlic, and jalapeno into a medium-sized skillet; set on your burner at medium heat; and add a tablespoon or two of olive oil. Sautee until the onion is tender...about five minutes. Add in the tomatillo puree that you had set aside from earlier. Stir and let simmer for another 5 minutes. Around this point; start warming up your chicken stock. Add in the chicken and the rinsed hominy. Add in the tomatillo mixture. Add in the juice of 2 limes. Add in a couple tablespoons of cilantro. Season with salt and pepper. Serve in a bowl with diced avocado, crushed tortilla chips, and reduced-fat sour cream. Enjoy!

(Click here for printable recipe)

Saturday, January 7, 2012

Hearty Frittata w/ Bacon, Potato, & Cheddar

For Christmas day, I had brunch with my Dad. Typically, I would make french toast or pancakes. But, I decided to do something with eggs. Normally, I would never make eggs for breakfast, because I really do not like eggs. But, I remember we made frittata's for Christmas one year, and I actually liked it. So, I thought I'd give it a whirl. Plus, I had a new cookbook that I wanted to try a recipe from. The cookbook is called The Cook's Illustrated Cookbook, and it has over 2000 recipes. I highly recommend it. Anyway, I ended up adding additional ingredients to this frittata and it became almost too hearty. But, it was still pretty darn good for my first attempt. If you like eggs; you'll probably like this. Enjoy!

Ingredients: 12 lg eggs
3 tbsp half and half
1/2 tsp salt
1/4 tsp pepper
8 slices bacon, cut into 1/4-inch pieces
1 lb gold potatoes, peeled and cut into 1/2 in cubes
4 oz cheddar cheese, cut into 1/4 in cubes (3/4 cup)
3 scallions, sliced thin on bias
Ham Steak, cubed (optional)
Roma Tomato, diced (optional)

Adjust your oven rack about 5 inches from the broiler element, and heat broiler. Now, take your eggs and a medium sized bowl. Whisk eggs, half and half, salt, and pepper until well combined. Set aside.

Next, cook bacon in 12 inch ovensafe nonstick skillet over medium heat until crisp, 5 to 7 minutes. Using slotted spoon, transfer bacon to paper towel. Pour off all but 1 tbsp bacon fat. Add potatoes to skillet and cook. Stir occasionally until golden browned, 15 to 20 minutes. Stir in cheddar, scallions, and bacon into eggs. Add egg mixture to skillet and cook until eggs are very wet about 3 minutes. Shake skillet to distribute eggs evenly. Cook without stirring for 30 seconds to let bottom set.

Broil until frittata has risen and the surface is puffed and slightly brown, 3 to 4 minutes. When cut with a paring knife the eggs should be slightly wet and runny. Remove skillet from oven; let sit for 5 minutes. Cut into wedges, and serve. I did end up having to bake the frittata for about 10 minutes in a 350 degree oven, because the eggs were very runny on one side. I think I had too many potatoes in the frittata.

(Click here for printable recipe)

Chicken Noodle Casserole

There were a couple dishes my mom started making when I was in high school. One of them was this chicken noodle casserole. It is very easy to make and so comforting and delicious. I really think what helps to make this dish is the fried onions that you place on the casserole during the baking process. I ended up making this because I got some nice casserole dishes for Christmas. The casserole looked beautiful in my new dishes (sorry no pictures). And, of course, it tasted delicious. Enjoy!


Ingredients:
8 oz medium egg noodles
1 tsp salt
1/4 cup butter
1 c. thinly sliced celery
2 tbsp all purpose flour
2/3 c evaporated milk
1 c chicken gravy (I just use the entire bottle)
1/2 tsp parsely flakes
1/4 tsp thyme leaves
dash of pepper
2 c cooked chicken
1 1/2 c canned peas (optional)
1/4 tsp salt
small can of fried onions

Cook your noodles in salted water until tender. Drain and set aside.
Melt butter into a large saucepan. Add celery and cook until tender. Stir in flour. Then add in evaporated milk and gravy and 3/4 cup water. Stir until it boils. Add in the salt, parsely flakes, thyme, pepper, shredded chicken, and the noodles. Stir to combine. Pour into a lightly greased 2 quart casserole dish. Bake at 350 degrees for about 30 minutes. About 25 minutes in; remove casserole dish and sprinkle the fried onions over the noodles. Put back in the oven and cook for remaining 5 minutes. Remove from oven and serve.

(click here for printable recipe)

White Bean & Arugula w/ Crostini

One of my favorite restaurants in Richmond is Edo Squid. I attempted this recipe from New Best Recipe that tastes very similar to Edo's Spaghetti w/ Marinara. Now, I've attempted to make Edo's White Bean & Arugula w/ Crostini. It's one of my favorite appetizers at their restaurant. And, now you can make this in your own home. I feel like this comes really close to their version, and it was super easy to make. And, if you've never had Edo's white bean & arugula...go now. They also offer white bean & arugula with squid if you like that sort of thing. Enjoy!

Ingredients for dressing (from Weekday Vegetarian):
3 tbsp lemon juice
1 tbsp fresh chopped dill (I used about a tsp of fresh italian parsely)
1/3 cup olive oil
1 garlic clove, minced
coarse sea salt
cracked black pepper

Remaining Ingredients:
French baguette
Arugula
Cannelini beans; drained and rinsed

Grab a small bowl; add in the lemon juice, fresh herb, minced clove, sea salt, and pepper; whisk
in olive oil until the dressing emulsifies. I did add a dash of white wine vinegar. Set aside.

Take your french baguette, and thinly slice about 8 pieces (or more). Take a garlic clove and rub on each crostini. Sprinkle some olive oil over each crostini. Place on a cookie sheet and bake in your oven at 350 degrees for about 5 minutes until a golden color. I ended up turning on the broiler (to speed up the process) and broiled for about 40 seconds. Remove from oven.

Take a medium-sized bowl; throw in the arugula and the white beans. Pour the lemon vinaigrette mixture over the arugula and beans and mix together. Sprinkle some additional sea salt and cracked black pepper over the salad if you so desire. To eat; place some of the white bean and arugula onto a crostini and enjoy!!!

(click here for printable recipe)

Wednesday, January 4, 2012

Spicy Rosemary Nuts

Nuts really don’t need much improving. Or at least, that’s what I thought before trying these at a friend’s baby shower. I had a couple. And then my hand just kept going back to the bowl. Again and again, completely out of my control. To say these are addictive is an understatement. They are just a bit spicy, fragrantly herbal, and a touch sweet. And served warm, they are out and out marriage material.


5 Cups of Nuts
4 Tbsps. Fresh chopped Rosemary
3 Tbsps. Butter
2 Tbsps. Brown Sugar
1 tsp. Cayenne

Use any nuts you like. The original recipe called for mixed nuts but I really only like cashews, so that’s what I used. The recipe also called for a teaspoon of kosher salt, but since it’s impossible to find cashews that aren’t pre-salted, I omitted it.

Preheat your oven to 350 degrees and get out a large rimmed cookie sheet. Cover it with foil. Melt the butter and combine the rosemary, brown sugar and cayenne in a large bowl. I highly recommend using fresh rosemary, and can’t guarantee good results if you use dried. Make sure the brown sugar clumps are all gone, and then add in the nuts. Stir well, until every nut is coated with sugary spiciness. The rosemary tends to stick together so spread it out as much as you can.  

Pour the nuts onto your baking sheet and spread them out to one layer so they cook evenly. Then bake for about 15 minutes. If you want you can stir halfway through, but I didn’t and they turned out great. Then pour them in a bowl and start eating them warm. You may want to invite some people over immediately or it’s possible you’ll find yourself with 5 cups of nuts in your belly before you know it. 

(click here for printable recipe)

Thursday, December 29, 2011

Hazelnut Gelato (or is it Ice Cream?)

Okay, maybe I've become a bit of a nut (no pun intended) with the Nutella thing. But, there really is a ton you can do with this stuff. Plus, it is sooooo very good. Well, I came across this recipe for Hazelnut Gelato and I bookmarked it a while ago. I had the perfect opportunity to make it for Christmas this year, and I am so glad I did. I mean it was divine, spectacular, fabulous. Sigh. I'm so glad I bought this ice cream maker from Sur La Table this past Spring. The look on my mother's face when she tried this gelato (or is it ice cream?) was priceless. She really liked it. But, then the look on my face was probably even more priceless when I saw my sister make a look of disgust when she tried it. Of course, she was kidding, but she got me for a minute there. The reason why I call this Hazelnut Gelato (or is it Ice Cream?) is because my mom and sister were wondering which one it was. To be honest, I have no idea. It's probably ice cream, but, no matter, it was delicious either way. I highly recommend this recipe. It was wonderful!

Ingredients:
2 cups whole milk
1 cup heavy cream
1/2 cup sugar, plus 1/4 cup
4 egg yolks
1/2 teaspoon vanilla extract
1/2 cup chocolate-hazelnut spread (recommended: Nutella)
1/2 cup toasted hazelnuts, crushed

First thing you do; take the hazelnuts place on a baking sheet and insert this into a 350 degree oven for about 5 minutes. Remove from oven, and carefully place the hazelnuts into a dishtowel. Fold the towel together and rub the hazelnuts together. This helps remove the shell from the nuts. Remove the nuts from the towel, and shake out the towel into your garbage can (to remove the shells). Place the towel over the hazelnuts and using a meat tenderizer smash the nuts. Place the smashed nuts in a bowl, and set aside. Next, take the milk, heavy cream, and sugar and pour this into a small saucepan. Place over medium-low heat and cook just enough so the sugar dissolves. I just let it sit on the burner for about 3 minutes, stirring occasionally. Now, take the egg yolks and place into a standing mixture and whisk the yolks. Pour in half the milk mixture into the egg yolks and stir to combine. Pour the egg mixture into the saucepan. Cook this over low heat until the mixture becomes thick enough to coat the back of a wooden spoon about 10 minutes.

Now, take your nutella and vanilla and place this into a medium bowl. Place a strainer over the medium sized bowl and pour in your milk/egg mixture. Stir this until the nutella is nice and dissolved. Chill mixture for at least 5 hours (overnight is fine) until it's nice and cold. Follow your ice cream directions to finish it off. For mine; I poured in the nutella mixture into my ice cream maker and when it started to form into ice cream (about 15 minutes) I added in my hazelnuts. Enjoy!

(click here for printable recipe)