Pages

Monday, June 30, 2014

Balsamic Grilled Chicken Drumsticks

It's been awhile since we made chicken legs, so I reached deep into my well of recipes and pulled out this one. I do love a good balsamic recipe, and it's perfect grilling weather. These turned out ok, but not crazy flavorful. That's the problem with some marinades... they just don't get into the meat enough. I think that was the case here. The chicken was good, but the balsamic flavor was just a hint. I think this would be better if there was some sort of glaze you could brush on so that the taste would be a little more pronounced. This was very easy though, so there's that.


Chicken legs, skin on (about 2 lbs.)
1 tbsp mustard (I used Dijon)
1 tbsp fresh rosemary, chopped
1 clove garlic, minced
1/4 cup balsamic vinegar
1/2 cup olive oil
Salt & pepper

Whisk all the ingredients (minus the chicken legs, of course) in a small bowl until the oil and vinegar have put aside their differences and joined together. Put the chicken legs in a large ziploc bag, pour the marinade over them, and put them in the fridge for at least 30 minutes. We had them in there for a few hours. Take them out about 10 minutes before you grill them. Every grill is different but remember with a bone in they need to cook longer than regular chicken breasts. About 20-30 minutes should do it. Then serve with a side of paper napkins. 

Monday, June 23, 2014

Salmon with Fennel, Citrus & Chiles

Fresh salmon is so delicious that you don't even have to do much to it to make it mouth-watering. This recipe is a great example of that. You get a lot of just pure salmon flavor, bumped up a bit by citrus, fennel and some spicy chiles. I made this once before when blood oranges were in season, and although it's good with regular oranges, the blood oranges were definitely better. They have a much brighter, more tart flavor that fused with the fennel and salmon better, so if you can find blood oranges, I recommend using those. This is a really simple recipe (found in Bon Appetit) that only requires a little prep, and some slow roasting time in the oven, and before you know it you're eating some spectacular-tasting salmon. 


1-2 lb. skinless salmon filet
Salt & pepper
1 fennel bulb
1 blood orange (or navel orange)
1 lemon
1 Fresno chile or jalapeño
Fresh dill sprigs
1/4-1/2 cup olive oil
Sea salt

First, preheat your oven to 275 degrees. Place your salmon in a glass baking dish and season it with salt & pepper. If you have skin it's not a big deal, just put it skin-side down and make sure to remove it before serving. Now it's time to prep your fruits and veggies. Thinly slice the fennel bulb, orange, lemon and chile. You can do this with a nice sharp knife, or if you are like the Hubs and are obsessed with the mandoline, that works for the fennel and chile, not so much for the citrus. Once you've sliced everything up, arrange the fennel, chile and citrus plus four sprigs of fresh dill over the top of the salmon. The first time we made it, we followed the directions and put this on the bottom but the result was really tasty fennel, and absolutely no flavor in the salmon. We switched it around this time and that helped. Season one more time and then pour the olive oil all over the top. The original called for 3/4 cup of oil but that just seemed like a ton to us. 

Now, bake for about 30-40 minutes. We went for the full 40 this time and it was perfect. Sprinkle the salmon with sea salt before enjoying. We also found it helped to squeeze some of the citrus over the top of the salmon. Hope you enjoy the clean, simple flavor!


Thursday, June 19, 2014

Spice Rubbed Chicken Tacos

It's taco season! Well, for me it's always taco season, but for the rest of the world, this is the time. It's hard to try new taco recipes because I already have so many I like, but this one seemed a little different, using chicken thighs, and it was dead simple so it's perfect for weeknights. Seriously, it took under 15 minutes from start to delicious finish. I found it on a blog called Food, Fashion & Fun. It's a good mixture of spicy and sweet, with some great char thanks to cooking it on the grill. And the toppings are simple too. Of course, you can put whatever you want on it, but I enjoyed the onion & jalapeño combo (even though one of the jalapeños was extra spicy and about burned my tongue off). If you're looking for a new taco that you can make in a jiffy, this one's for you.


1 1/2 pounds Chicken thighs
1 tablespoon cumin
1 tablespoon smoked paprika
1 tablespoon brown sugar
1 teaspoon chili powder
1 teaspoon ground black pepper
1/2 teaspoon cayenne pepper
1 tablespoon extra virgin olive oil plus more for grilling
1 onion, sliced into 1/2 inch pieces
2 jalapenos, cut in half and sliced

Mix all the spices together in a small bowl, then add the olive oil to make a paste. Rub the paste onto the thighs (use gloves to keep clean). Heat up your grill and cook the chicken. Depending on how thick they are it might be 7-10 minutes or so. While the chicken is grilling, you can throw your onion and jalapeno in a pan with a little olive oil and saute them for about 5-7 minutes. You could also do them on the grill, but you might want to leave the jalapenos unsliced for that. After the chicken is done, toast up your tortillas, and then serve! I just added a little sour cream but you can put anything you want on them. That's the glory of tacos! 

Tuesday, June 17, 2014

Giada's California Lettuce Cups

Recently, I watched an episode of Giada at Home, and it was all about California cuisine. I believe this episode was called California Dream. Sometimes, I dream about how much I would enjoy living in California...especially southern Cali. But, I remind myself how expensive it is, the earthquakes, the fires, the population, and I immediately come back down to earth. Sigh. I will just have to admire it from afar. And, enjoy recipes like this one that Giada invented. I have to say as soon as I saw her make this I knew I wanted to try it. It fits in perfectly with the sugar detox that I'm trying (4 more days people)! I saw one review posted where they gave this recipe 1 star, because they thought it was too sour. I don't know. Maybe this person got a sour grapefruit, and if so I can see how that would be true. But, I thought it tasted delicious. I love the heat the pepper gives as well as the crunch from the almonds. For me, this was fabulous. Plus, my pink grapefruit was on the sweeter side so it worked great. I will say this is a messy dish. The juice from the dressing easily seeps out from the lettuce cup, so be sure you have plenty of napkins handy. But, overall this was a hit, and I've made it two other times since! Enjoy!


Ingredients:
1/4 cup lime juice (from about 4 small or 2 large limes)
2 tablespoons extra-virgin olive oil
3/4 teaspoon salt
1/4 teaspoon freshly ground black pepper
4 red grapefruits
2 avocados
1/2 cup toasted almonds, roughly chopped
1 serrano chile, roughly chopped
1/2 cup fresh cilantro leaves, roughly chopped
1 head Boston or butter lettuce, leaves separated, washed and dried

First, take out your grapefruits and make sure you segment them and place in your bowl. I watched this video to learn how to do it, but I'm still not great at it. Anyway, just go with it and be sure to squeeze out the juice from the segmented grapefruit into your bowl before tossing in the trash (or compost). Next, add your diced avocados to the bowl. Then, add the almonds, chile pepper, and cilantro. Take out a small bowl and combine the lime juice, olive oil, salt, and pepper. Pour this into the bowl with the grapefruit. Toss gently. Spoon the mixture into the separated lettuce leaves, and enjoy!

Thursday, June 12, 2014

Iron Chef Garlic Recap

Alright friends, grab your breath mints, it's time for Iron Chef Garlic! We had a fun night at Shu's place, and tasted a lot of good dishes as well. Garlic is one of those ingredients that everyone loves, but it isn't usually the main ingredient in a dish, so it was a nice challenge to try and make it shine. We opted to not have a drink this time, since none of us wanted to know what a garlic-tini tastes like. But for some reason, we kept the dessert option on the table... so now we all know what garlic truffles taste like. But more on that later, first, the apps!  


We started off strong with Kim's Zucchini Fritters with Garlic Dip. They were one of my personal favorites of the night, and that's coming from someone who doesn't have zucchini high on her preferred veggies list. I got a lot of sharp garlic flavor out of the dip, and nice crunch from the fritters. It was hard not to eat a bunch of them and ruin the rest of the meal (okay, I still ate a bunch of them.)


Morgan served her Garlic Bruschetta next. It had nice big chunks of mozzarella and tomatoes flavored with balsamic vinegar served on garlic covered bread rounds. You know something is good when people are willing to look ridiculous and possibly get messy eating it, and we definitely did both. These were nice, simple appetizers that delivered some great garlic flavor.


Our third appetizer ended up being our runner up for the night. Chelyen's Garlic Risotto Balls with Butter Tomato Sauce were very delicious. I could have eaten the sauce like a soup, it was so flavorful. The risotto balls were extremely tasty too, and a great idea if you ever have leftover risotto (does anyone ever have leftover risotto?).


Garlic bread is classic for very good reason. Cara gave the classic a twist by making it as pull-apart monkey bread. It was great! The bread was nice and soft, pillowy and easy to eat, plus there was plenty of garlic flavor. And if you have kids, they are suckers for this monkey bread so I recommend you try it!


Doan earned her second win with her Garlic Chicken pizza. The white sauce was excellent, nice and creamy and of course, very garlicky in the best possible way. The crust was very crisp and flavorful as well. I'm a big pizza person and this one definitely got high marks from me. And evidently from everyone else as well. Congrats on another win, Doan!!


Emily recently unearthed a crockpot she had gotten as a wedding gift many years ago and decided to put it to good use for this battle. Her Crockpot Herb & Garlic Pork Roast wasn't over the top garlicky, but had really subtle flavor and made a great garlic main course. And gravy! Who doesn't love gravy?


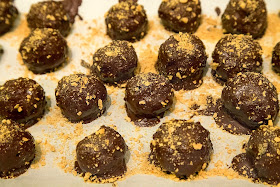
Shu was brave and took on one of the garlic desserts. She made Garlic Cheesecake Chocolate Truffles with crushed graham cracker that she felt were maybe a bit too garlicky for dessert. I thought they were fine, though. I mean, garlic and cheesecake maybe should just stick to their own corners as a general rule but for something like an Iron Chef competition where we are pushing the boundaries a bit, these were a great attempt. 


I also chose to do a dessert and tried a garlic peanut brittle that I then put into chocolate chip cookies. I actually didn't think it was too bad, considering, again, that garlic dessert makes very little sense. The garlic paired with peanuts made for a savory brittle. If you were unfortunate to get a big chunk of garlic though, you definitely knew it was there. I don't think I'd ever make these cookies again, but I also ate a fair amount of them, so I consider it a valiant effort. 

That did it for the dishes for the evening, but trust me when I tell you that they stuck with us for a long while, in scent alone. I think I had garlic coming out of my pores the next day, and I definitely did not have any fear of a vampire attack. Our next Iron Chef will be in August and it looks like we've forced Doan to host just so she can't beat us all again.

Monday, June 9, 2014

Ultimate Peanut Butter Chocolate Cookies

My friends had a cookout the other weekend, and I was contemplating what to bring. I believe last year I made homemade cupcakes, and while they were somewhat of a hit I got outplayed by someone who brought a box of cupcakes from one of our fabulous local bakeries. Sigh. Well, this year I decided to go with what I'm best at, and that's making cookies! Mmmm. Cookies. 

As per the usual, I found this recipe on Sally's Baking Addiction. And, O.M.G. These were frigging awesome. I kid you not! The cookie was thick and the peanut butter cups just burst in your mouth. Man, I could really use one of these right now. This recipe was very simple to make, and I highly recommend you get in the kitchen this evening and make me some. Oops, I mean make you some! :) Enjoy!


Ingredients:
1 and 1/2 (190g) cups all-purpose flour (accurately measured)
1/2 cup (64g) unsweetened natural cocoa powder
1/2 teaspoon baking soda
1/4 teaspoon salt
1/2 cup (1 stick or 115g) unsalted butter, softened to room temperature
1/2 cup (100g) light brown sugar, packed
1/2 cup (100g) granulated sugar
1/4 cup (60g) cup creamy or chunky peanut butter
1 large egg
1 teaspoon vanilla extract
2 Tablespoons (30ml) milk
1 and 1/4 cups Reese’s Peanut Butter Cups, chopped (about 16 Reese’s miniatures)
Drizzle: 1/3 cup (85g) creamy or chunky peanut butter (I omitted this step)

Go ahead and take out a medium sized bowl, and add in the flour, cocoa powder, baking soda, and salt. Whisk to combine, and then set the bowl aside for later.

Now, take out your standing mixer bowl (with the paddle attachment) and beat the butter on high until nice and creamy. This could take about a minute or so. If needed; scrape down the sides of the bowl and then add in the sugars and peanut butter and mix on medium speed until combined. Add the egg and vanilla, and mix till combined. Scrape down the sides of the bowl if necessary. Carefully, add in the flour mixture and stir until just combined. Having the speed on low is best for this. Go ahead and add in the milk and stir until just combined. Lastly, add in the peanut butter cups and stir until evenly disbursed. Wrap the bowl with plastic wrap, and refrigerate for an hour or at the most 24 hours.

Once you're ready to start baking; go ahead and pre-heat your oven to 350. Take out your cookie sheets and your dough. Roll the dough into balls and place on the sheet. I believe I got about 20 cookies out of this dough. Anyway, go ahead and place in the oven and bake for about 10-12 minutes. According to Sally, the dough won't spread much (and it didn't) so gently press down on the cookies with the back of a spoon once it comes out of the oven. Transfer to a wire rack, and cool.

Pork Tenderloin Lettuce Cups

Recently, I wanted to try a new pork tenderloin recipe, and one that I didn't have to grill. So, as any technologically savvy individual would do; I went to the world wide web to find a great recipe! The recipe I ended up using was courteous of the Food Network. Ellie Krieger created this Pork Tenderloin Seasoned Rub, and the reviewers gave it 5 stars. The good thing about it is I had all the ingredients in my kitchen already. I like not having to go out to the grocery store to purchase just one or two ingredients for a recipe. Anyway, I have to say the pork tenderloin turned out delicious. Originally, I had the pork tenderloin just by itself with a baked sweet potato accompanying it. But, I decided to use the leftovers in these lettuce cups as pictured. I included my pineapple salsa in the lettuce cups, and it turned out simply divine! Please see the recipe below for the Pork Tenderloin Seasoned Rub recipe. And, click here if you'd like to include the pineapple salsa. Enjoy!


Ingredients:
1 teaspoon garlic powder
1 teaspoon dried oregano
1 teaspoon ground cumin
1 teaspoon ground coriander
1 teaspoon dried thyme
Salt (I used half a teaspoon)
1 1/4 pounds pork tenderloin
1 tablespoon olive oil
1 teaspoon minced garlic

First go ahead and pre-heat your oven to 450 degrees. Now, take out a small mixing bowl and combine the garlic powder, dried oregano, cumin, coriander, thyme, and about half a teaspoon salt. Stir with a fork until well combined. Take out your pork tenderloin, and sprinkle the rub all over and pat the seasoning into the tenderloin so it adheres well. 

Next, go ahead and grab a medium to large skillet (depending on the size of your tenderloin) and add the tablespoon of olive oil to the pan. Make sure the temperature is set to medium-high, and then add the minced garlic. Once the garlic becomes fragrant go ahead and add the tenderloin to the pan. Sear the tenderloin for about 10 minutes making sure to flip to the other side, so both sides are nice and seared. Then, transfer the mean to a roasting pan and bake for about 20 minutes or until the tenderloin is about 165 degrees internally. Enjoy!

Wednesday, June 4, 2014

Nutella Banana Bread

I had a bunch of very ripe bananas on my counter the other day. Normally, I would unravel the skin and store them in my freezer for smoothie days. But, I already had about 4 or 5 bananas in the freezer, so I didn't need to add anymore. Of course, the easy option is to make banana bread, and that's precisely what I did. However, this isn't your basic/boring banana bread. This is banana bread swirled with nutella via A Cup of Jo. Mmmm. Nutella. The best! This recipe calls for 2 loaves of bread, so I brought one to volleyball. They loved it. I also gave one to my little ol' neighbor, because she gave me a bunch of peonies from her yard. Well, I was walking my dogs the other day, and she ran out (as fast as she could) to let me know know how much she looooved the banana bread. She actually wants this recipe, too. So, you have several reviews right there letting you know how good is this bread! Please give it a try, and you won't be disappointed!


Ingredients:
3 large or 4 medium (2 cups mashed) bananas, yellow with brown speckles
1 cup brown sugar, packed
4 oz. (1/2 cup) unsalted butter, melted
1/2 cup milk
2 large eggs
2 tsp. vanilla extract
1 tbsp. rum, optional
3 cups all-purpose flour
2 tsp. baking powder
1 1/2 tsp. baking soda
1 1/2 tsp. salt
1/2 cup Nutella

First, preheat your oven to 350 degrees.
 Next, take out two loaf pans and prep it by inserting parchment paper and lightly coat with cooking spray. Or, flour and oil it very well. Set aside.

Take a medium bowl and mash the bananas with a potato masher, and set aside. Take out another medium bowl, and combine the flour, baking powder, baking soda, and salt. Whisk together, and set aside.
Next, take out your standing mixer and mix the butter, milk, sugar, vanilla, rum (if using), and eggs. Gradually, add in the flour mixture to the butter mixture. Stir until just smooth, and then add in the bananas and stir until just combined.

Now, go ahead and microwave the nutella for about 20 seconds to soften. Drizzle about 2/3 of the nutella into the batter. Use a spatula to gently fold in the nutella, but don't overmix. You want to see the swirls when you cut into the banana bread once it's baked. Pour half the batter into one loaf pan, and pour the remaining batter into another loaf pan. Add the rest of the nutella on top of the batter, and swirl with a knife. Bake for about 45 minutes or until a toothpick comes out clean. Allow to cool in the pan, remove, and enjoy!