Pages

Thursday, December 29, 2011

Hazelnut Gelato (or is it Ice Cream?)

Okay, maybe I've become a bit of a nut (no pun intended) with the Nutella thing. But, there really is a ton you can do with this stuff. Plus, it is sooooo very good. Well, I came across this recipe for Hazelnut Gelato and I bookmarked it a while ago. I had the perfect opportunity to make it for Christmas this year, and I am so glad I did. I mean it was divine, spectacular, fabulous. Sigh. I'm so glad I bought this ice cream maker from Sur La Table this past Spring. The look on my mother's face when she tried this gelato (or is it ice cream?) was priceless. She really liked it. But, then the look on my face was probably even more priceless when I saw my sister make a look of disgust when she tried it. Of course, she was kidding, but she got me for a minute there. The reason why I call this Hazelnut Gelato (or is it Ice Cream?) is because my mom and sister were wondering which one it was. To be honest, I have no idea. It's probably ice cream, but, no matter, it was delicious either way. I highly recommend this recipe. It was wonderful!

Ingredients:
2 cups whole milk
1 cup heavy cream
1/2 cup sugar, plus 1/4 cup
4 egg yolks
1/2 teaspoon vanilla extract
1/2 cup chocolate-hazelnut spread (recommended: Nutella)
1/2 cup toasted hazelnuts, crushed

First thing you do; take the hazelnuts place on a baking sheet and insert this into a 350 degree oven for about 5 minutes. Remove from oven, and carefully place the hazelnuts into a dishtowel. Fold the towel together and rub the hazelnuts together. This helps remove the shell from the nuts. Remove the nuts from the towel, and shake out the towel into your garbage can (to remove the shells). Place the towel over the hazelnuts and using a meat tenderizer smash the nuts. Place the smashed nuts in a bowl, and set aside. Next, take the milk, heavy cream, and sugar and pour this into a small saucepan. Place over medium-low heat and cook just enough so the sugar dissolves. I just let it sit on the burner for about 3 minutes, stirring occasionally. Now, take the egg yolks and place into a standing mixture and whisk the yolks. Pour in half the milk mixture into the egg yolks and stir to combine. Pour the egg mixture into the saucepan. Cook this over low heat until the mixture becomes thick enough to coat the back of a wooden spoon about 10 minutes.

Now, take your nutella and vanilla and place this into a medium bowl. Place a strainer over the medium sized bowl and pour in your milk/egg mixture. Stir this until the nutella is nice and dissolved. Chill mixture for at least 5 hours (overnight is fine) until it's nice and cold. Follow your ice cream directions to finish it off. For mine; I poured in the nutella mixture into my ice cream maker and when it started to form into ice cream (about 15 minutes) I added in my hazelnuts. Enjoy!

(click here for printable recipe)

Swedish Tea Ring

Ever since I was a little girl my mother has made these English Tea Rings for Christmas day breakfast. Basically, they are a type of cinnamon roll. The rolls, however, are much fluffier than cinnamon rolls and they don't have as much cinnamon goodness. The other difference is the rolls are made into a ring instead of rolled and cut. As far as the flavor goes; they are very delicious. Just the right amount of cinnamon. I absolutely love them. Well, I wanted to make these for my neighbor who has helped me out a lot since I've lived in this home. I found this recipe for a Swedish tea ring, and I thought it looked pretty similar to the version my mom made. I decided to give it a whirl. Boy, they turned out excellent. The cardamon and lemon zest really gave the rolls a nice zing. I highly recommend this recipe. And, it was really easy to make. Enjoy!


Ring Dough:
1 package instant yeast (2 1/4 tsp)
1/2 cup milk
1/4 cup butter, softened
2 Tb sugar
1 egg, beaten
1/4 tsp salt
1 tsp. cardamom
zest of one lemon
2 1/2 - 3 cups all purpose flour

Filling:
1/4 cup butter, softened
1/4 cup brown sugar
1/2 TB cinnamon
1/2 cup walnuts, chopped

Glaze:
1 cup powdered sugar, sifted
2 Tb milk
1/4 tsp vanilla extract


First, heat your milk in the microwave for about a minute and a half until the reading of your thermometer comes out to 105-110 degrees. Set aside. Next, add in the flour, sugar, salt, cardamon, instant yeast, butter, and lemon zest into your bowl. Briefly, mix together. Now, with the dough hook attached pour in your milk and egg; mix until it forms a nice dough that pulls apart from the bowl. Turn the dough onto a floured surface and knead for a couple minutes until the dough becomes smooth and shiny. Take a large bowl; lightly spray with cooking oil, and place your dough into the bowl. Cover with plastic wrap and place the bowl in a warm oven (around 80 degrees). Let rise until doubled in size...about an hour or two. I let mine rise for 2 hours.

Once the dough has doubled in size, remove from the oven. Punch down the dough, and turn out onto a floured surface. Roll the dough into a 12x18 rectangle. Now, get your filling together. I did not use walnuts. Pour the sugar/cinnamon mixture onto the dough and spread evenly leaving a slight border around the dough. I did make another batch of the cinnamon sugar mixture because I didn't think it was enough. Roll your dough into a log starting at the short end of the dough. I had to kind of pull the dough as I rolled to make it long enough so I could make it into a ring. Once you have the dough in the form of a ring, take scissors and cut every inch or so only about 3/4 of the way. You don't want to cut the ring. Twist each piece slightly so the rolls fan out from the ring. Place the ring on a parchment lined cookie sheet and put plastic wrap over the dough. Place in your 85 degree oven and let rise for an additional hour. Remove from oven; and pre-heat at 375 degrees. Place the ring in the oven and let cook for about 20-30 minutes or until the rolls have a nice golden color. Remove from oven. And, let cool on a cooling rack. When completely cooled; gather together the ingredients for the glaze into a small bowl. Pour with a spoon over the ring. Enjoy!

(Click here for printable recipe)

Wednesday, December 21, 2011

Nutella Brownies

The second Christmas dessert post is yet another brownie recipe. But, this isn’t just any brownie recipe; this is a Nutella brownie!! And, this brownie is very, very good! It’s a moist brownie, and comes out perfectly every time I bake them. Yes, I’ve made them twice in a week. Can you blame a girl?! I’m always looking for new nutella recipes, and I found this one at this blogger’s website . It’s really good. I made these treats for my fellow co-worker's Christmas goody bags. I know they will like them. And, I know you will, too! Enjoy!

Ingredients:
1/2 Cup All-purpose flour
1/4 Teaspoon salt
2 eggs
1 Cup Nutella
1/2 Cup brown sugar
1 Teaspoon vanilla extract
1/2 Cup melted unsalted butter


First, you need to set your oven to 325 degrees. Next, take a small bowl and add in your flour and salt. Set aside. Melt your butter, and when cooled; pour into a mixing bowl. Add the nutella, eggs, brown sugar, and vanilla into the same mixing bowl as the butter. Mix until combined. Gradually add in your flour mixture. Stir until combined. Take an 8x8 pan and place enough foil in it so that you can easily lift the brownie out of the pan. Lightly spray the foil. Pour in your brownie mixture. Bake for about 30 to 40 minutes until an inserted toothpick comes out fairly clean.

(click here for printable recipe)

Walnut Fudge Tart


Just in time for Christmas, I have a couple dessert recipes to post. Christmas is that fun time of year where you get to look for presents for your friends and family. Hang up Christmas lights, the tree, and all your Christmas decorations; having the opportunity to spend some quality time with your family and favorite friends, too. But, the best part of Christmas; is all the baking you get to do! Recently, at my work; some co-workers hosted a Pig Fest. What pray tell could that be; you ask? Well, everyone (in our IT department) gets together and makes some of their favorite dishes and brings it to our 8th and 5th floors. I decided to participate this year, and I stuffed myself silly eating all the glorious food. I decided to make this brownie-like tart from a local chef here in Richmond. I found this recipe when Richmond.com was featuring some “favorite” Thanksgiving recipes from our local Chefs. I thought this pie sounded delicious, and I was definitely right. It was a big hit at the Pig Roast and everyone wanted the recipe. So, here it is. Enjoy!

Crust:
• 1¾ cup flour,
• Pinch salt
• 1/3 cup unsweetened cocoa powder
• ¼ cup sugar
• ¾ cup butter (chilled & cut into 12 pieces)
• 1/3 to ½ cup cold strong coffee

Filling:
• 12 oz. semisweet chocolate, melted
• 2/3 cup sugar
• 2 tbsp. melted butter
• 2 tbsp. milk
• 2 tsp. Kahlua (I used Frangelica since I didn’t have Kahlua)
• ½ cup chopped walnuts, toasted
• 2 eggs

First you need to get your oven nice and heated, so set this to 350 degrees. Next, you want to get going on your crust. Take your flour, sugar, cocoa, and salt and toss in your food processor. Pulse until it starts to look like coarse cornmeal. Then, add about 1/3 cup of coffee and blend just until it’s incorporated. If the dough appears too dry feel free to add coffee one tablespoon at a time. Once the dough is ready; press it into your lightly oiled 10” tart pan (with a removable bottom) and chill.


Now, for the filling: combine your chocolate, sugar, butter, milk, eggs, and walnuts into a bowl and stir to blend. Pour into a chilled tart shell and bake until top is firm and dry. About 30 to 40 minutes. You can always insert a toothpick and see if it comes out clean, too.


(Click here for printable recipe)

Thursday, December 1, 2011

Spinach Garlic Spaghetti

The Muppets are everywhere these days, promoting their new movie (and yes, I AM going to see it.) And I’ve heard Kermit say his famous line “It isn’t easy being green,” about a million times. I like to twist that line to apply to my own life: “It isn’t easy eating green.” At least that is the truth for me. And I think that’s why I was so intrigued by this recipe, and so happy that it actually tastes really good. I’m not sure if it really counts as healthy eating, but at least it’s got some leafy greens involved so that’s a step in the right direction.

Spaghetti
3 tablespoons olive oil
1 package baby spinach
Salt and freshly ground pepper
2 tablespoons heavy cream
4 large garlic cloves, minced
Parmesan cheese

I made enough spaghetti for three servings on the large side, but this recipe is pretty flexible, so just make however much you need. It also called for a full pound of spinach, but I just used one of those small plastic packages (I think about 6 oz) and it was plenty. Again, if you want more spinach, use more.

Get your spaghetti going in boiling water. Then heat the oil in a large skillet over medium heat. Add about a handful of the spinach, cooking and stirring, until it starts to wilt down and get smaller. Then add another handful. Keep this going until all the spinach is wilted. Salt and pepper to taste, and then add the cream. Cook for about 5 to 10 minutes, until the liquid is gone or mostly gone.

Now it’s blender time! Put the spinach mixture and any liquid into the blender (or food processor) and add the garlic. The original recipe said you can just throw in smashed cloves, but I had a hard time getting those to blend, so I would recommend using your handy garlic press. I also added in some Parmesan cheese at this point. Not a whole lot, just like ¼ cup. Then blend! Get it as smooth as possible to make a sauce.

Set aside some of the pasta water, and then drain the spaghetti. I like to put the pasta back in the skillet over low heat, and then pour the sauce on top. Toss it a few times to cover everything. If the sauce seems really thick (mine didn’t) you can use a little bit of the pasta water to loosen it up a little. Once the spaghetti is mixed, serve and sprinkle with more Parmesan cheese. It looks really beautiful on a plate, and tastes even better. 


(click here for printable recipe)

Wednesday, November 30, 2011

Lemony Goat Cheese Ball

This isn’t so much a “recipe” per se, as it is an idea. I found it on The Kitchn, which is pretty much the best site out there for those of us who love to cook (or just eat). I’ve always loved cheese balls, but there is something sort of retro about them. Maybe because I am used to my mom making them for family get togethers as a kid. This idea takes the cheese ball into today, and makes it a little more classy than the traditional. I was told this recipe was a “home run,” and it’s so simple that there’s no reason not to try it!


Ingredients
About 10 oz soft Goat Cheese
1 Lemon
Fresh herbs of your choosing (I used chives)

Put the goat cheese in a bowl. Chop up your herbs and put them in the bowl as well. The original called for parsley, but I used chives. You can use any kind you want, really. Zest some of the lemon into the bowl, as much as you like. Cut the lemon in half and squeeze the juice into the bowl. Don’t get vigorous with it—just a simple squeeze with your hand. You don’t want to pull out the citrus press on this one or it will be way too lemony. Then mix it all together with a fork. Once it’s mixed enough use your (clean) hands to form it into a ball. Cover it with plastic wrap and keep it in the fridge until you’re ready to serve! I made little garlic toast pieces to go with it. The tang of the goat cheese and the lemon play off each other really well. It’s the foodie’s version of a cheese ball, and is a sure way to impress everyone at any of the holiday parties you attend.

Saturday, November 26, 2011

Cranberry Salad Dressing


After Thanksgiving and two days of leftovers, we were in serious need of some greens. I was thrilled with this healthy use of Thanksgiving leftovers.


Ingredients
2/3 cups of cranberry sauce
3 tablespoons of olive oil
2 tablespoons of cider vinegar
2 tablespoons of pomegranate juice
1 tablespoons of maple syrup
1 teaspoon of lemon juice
pinch of salt


Simply mix all ingredients and toss with your choice of greens. I decided to dress my salad up a bit with turkey, almond slices and slices of mozzarella. Easy and afterwards you won't feel weighed down or sleepy.


(Click here for printable recipe)

Iron Chef Citrus: Simple White Sangria


The first time I had white sangria was when Cara served it at Sara's Bachelorette Party. I thought it was so much better than Red Sangria. Of course, I'm not a big red wine drinker so that probably had something to do with it. The version Cara made was really good. Since the theme of Sara's Bachelorette was apples' she incorporated them into the drink. I wanted to attempt this at home, so I found this recipe. This is more of a citrus version but I'm sure you could do apples, or whatever fruit you like. I've been making this version ever since. I even got 2nd place with this drink at Iron Chef Citrus. And, if I'm not mistaken this is one of the few times a drink has placed at our fun competitions. It's very simple to make, and you will love to serve this at any party or just for yourself on a nice warm day. Enjoy!


Ingredients:
1 Bottle of white wine (Riesling, Albarino, Chablis,Gewurztraminer, Pinot Gris, Chardonnay,Sauvignon Blanc)
2/3 cup white sugar (or you can make a simple syrup)
3 oranges (sliced) or may substitute 1 cup of orange juice) (I used both oranges and
oj)
1 lemon (sliced)
1 lime (sliced)
1/2 liter of ginger ale or club soda (ginger ale for those with a sweeter tooth!)

Take your favorite pitcher, and pour in the wine (I used Chablis); the simple syrup; the orange juice. Take your sliced oranges, limes, and lemons and squeeze into the pitcher and toss in. Lastly, add in your club soda or ginger ale. I used club soda. Add ice if the liquids are not cold otherwise you can refrigerate overnight. Enjoy!

(click here for printable recipe)

Tuesday, November 22, 2011

Iron Chef Spicy Recap

Sorry for the major delay in getting this recap up but finally, here it is and it is spicy! Ok, maybe not everything was spicy. In fact, except for a few items we might as well rename this Iron Chef Mild. I think most of us didn’t want to go crazy spicy, but in our respect for each other’s taste buds we ended up turning the volume too far down. That’s not to say that everything wasn’t tasty, because we had a lot of delicious food that night. But not everything was exactly spicy. Note that I’m saying “not everything.” This will become clear later.


This was a smaller crew, which ended up being great since my place doesn’t have a whole lot of counter space that isn’t reachable by my dog. He did manage to get a few pieces of toasted bread out of our first dish of the night, Laura’s Spicy Shrimp in Cream sauce. We all groaned when she announced that she made shrimp since that is our perennial winning dish, but of course we stopped groaning when we tasted it. While it wasn’t a bit spicy, the shrimp was delicious and we all appreciated having the bread to soak up that delectable cream sauce as well. Laura won a prize, just not the Iron Chef title. She came the closest to guessing how many hot tamales were in the jar! (Answer: 488)


Our second appetizer entry was from Kristy and ended up taking home the runner up title. She made Indian Spiced Pinwheels that were tasty little bites of pastry with curry and other spices inside. Sort of like a savory mini cinnamon roll. Kristy always thinks of great presentation tricks, and this time she included bits of apple carved to look like leaves. Very creative! And it’s always nice to have edible decorations.


We moved on to the sides next starting with Chelyen’s Jalapeno Popper Mac & Cheese. I mean, every single one of those words sounds like something I want to put in my mouth immediately. She even made it into convenient little cups using muffin tins that were a perfect portion, and a technique I’ll definitely be stealing. As was the theme for the night, it wasn’t as spicy as she had hoped, but that didn’t stop us from having seconds and thirds (or was that just me?).


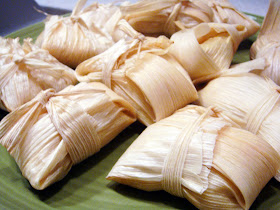
Around this time, someone smelled something burning, and it turns out it was my side dish: Goat Cheese Tamales with Spicy Mole. Well, it was actually just the bamboo steamer that was burning, luckily. I was pretty disappointed in the tamales… they seemed pretty gummy and bland to me, although everyone else thought they were ok. The sauce was nice, although again, not as spicy as it had seemed earlier. This was my first attempt at tamales, so hopefully I will improve in the future!


We only had one main dish for the evening, but it turned out to be the only one we needed. Emily’s Spicy Pork Tacos won the night, and they were also the first actually quite spicy dish of the meal. She was inspired by Richmond’s own Boka Truck and recreated this dish based on what she had tasted in their spicy Asian tacos. They not only tasted great with a pleasant kick from sriracha and guajillo peppers, but they also looked gorgeous. Congrats to Emily!


We ended the night on a spicy note, with Cara’s Chocolate Cayenne Ice Cream and Spiced Walnuts. And when I say spicy, I mean hot, hot, hot! My love of cayenne is well documented on this site, and even I couldn’t take the heat. It was a fun combination though, with the chocolaty cool ice cream and then the heat in the back of your throat. I think that with a little balancing, this creative dish could be a great one.


There you have it! All in all, as always, we enjoyed each other’s food and each other’s company, and nobody went home with heartburn, as far as I know. I’ll call it a success! 

Saturday, November 19, 2011

Spicy Corn Chowder w/ Cheese


I guess you could say this is corn chowder part deux! Sara posted this delicious sounding corn chowder recipe a year ago. Unfortunately, I didn't have all the ingredients, so I wasn't able to try it. But, I definitely will one day. I have been wanting to make a spicy corn chowder after trying La Parisienne's (in downtown RVA) version. It was super good. Plus, it had a bit of cheesiness along with a nice spicy kick. I found many, many corn chowder recipes, but I thought this one from food.com sounded right up my alley. Even better I had all the ingredients save for heavy cream. But, I just grabbed that ingredient when I made a grocery store run. I have to say this soup was very, very delicious. I loved that I added cheese to it. I think next time I will only use about a cup of diced potatoes. I think 2 cups is a bit overboard. I agree with a lot of the commentators from food.com that you don't need to use a quart of chicken stock. I just added enough so that it had a thick but just right consistency. I highly, highly recommend this soup. Enjoy!

Ingredients:
2 cups fresh or frozen corn kernels
lime, juice and zest of
2 tablespoons corn oil (I used olive oil)
1 large yellow onion, peeled and minced
1 quart chicken stock, preferably homemade (I wouldn't pour all of the chicken stock in there just enough until the consistency is more like a chowder...about 3/4 of the quart)
2 cups peeled diced russet potatoes
1 teaspoons ground red chili powder
1/2 to 1 teaspoon crushed red pepper flakes
1 teaspoon ground cumin
1 tsp cayenne (optional)
1 anaheim chili, stem and pith removed,seeded and chopped (I used a jalapeno pepper)
1 cup heavy cream
1/2 cup chopped fresh cilantro, plus
5 sprigs cilantro, tops for garnish
1/2 teaspoon kosher salt
Shredded cheddar cheese (optional)
garnish with drained salsa, if desired

Take a medium sized bowl and pour in the corn. Add the lime zest and the juice of the lime. Set aside.
Next, take your large saucepan and add in the oil and the chopped onion and sautee until the onions are soft and translucent. Add about 1/2 the quart of chicken stock, the potatoes, chili pepper, salt, red pepper flakes, cumin, and cayenne. Bring to a boil. Then cover the sauce pan and reduce heat to medium-low. Cook until the potatoes are very soft. Poke the potatoes with a fork to determine if they are soft. Add in the corn that you had set aside from earlier, and the heavy cream. Continue to cook until the soup thickens. At this point, try the soup and determine if you need to add any more of the spices and/or salt. I definitely did. When you get the seasonings just right add in the chopped cilantro. Add in your shredded cheese. I probably used about a 3/4 cup of cheese. I did not add salsa to the soup. But, feel free if you would like. And, enjoy!


(Click here for printable recipe)

Tuesday, November 8, 2011

Iron Chef Spicy: Spicy Pork Tacos (Boka Truck Style)


Cara's husband, Whit, looooves Boka Truck. He posts often (on facebook) about the truck coming to his office, and being excited about it. Well, a co-worker of mine also loooves the Boka Truck. It started making appearances at the Martin Agency right down the street from our building. Well, one day I decided to try it since both Whit and my co-worker seriously love it. I ordered 2 tacos; the Spicy Asian and the Mexican with pork as the meat. I first tried the asian, and I thought I had died and gone to heaven. I mean it was packed with flavor, spice, and cilantro. I looooved it. Then, I tried the Mexican. I mean it was good, but after eating the asian I wished I was eating that instead of the mexican taco. I've been hooked ever since on Boka's asian tacos.

Well, come to find out the next iron chef was going to be a theme instead of an ingredient. The theme was spicy! So, I immediately started looking for spicy main course recipes. My sister suggested a fish taco. I ended up making this, but it just didn't grab me. I will post this at some point in the near future.

Then, I thought to myself; why don't I try to re-create Boka Truck's asian tacos. On their website they explain what's in each of their featured tacos, so I thought I had a shot at it. I knew I had to figure out how to make kimchi, the guajillo pork, and the sesame aioli. This is where the Internet becomes your friend. I found this
recipe for guajillo pork. And, this one for sesame aioli. However, when it came to the kimchi I seriously didn't want to make this. It seemed too complicated and cumbersome. So, I went to Tan-A and purchased a bottle of it in their "refridgerated" section. I'll be sure to post a picture of it the next time I make a trip there. Next, I knew there was some kind of cabbage in the taco and cilantro and sesame seeds. While I was at Tan A, I purchased a bottle of their black sesame seeds. I knew white would work, but the black sesame seeds really livens up the taco. At Kroger, I purchased a bag of cole slaw it was on Manager Special, and I just threw away the packaged dressing. I purchased the corn tortillas and cilantro, and I already had Sriracha in my fridge. So, now I was ready to make the tacos. The pork is really simple to make and so is the sesame aioli. I know this seems like a lot, but it really isn't all that bad, and you will love it. I mean, obviously, my friends loved it since they chose me as the winner of this Iron Chef. Enjoy!

Guajillo Pork

Ingredients:
3-4 lbs pork shoulder or butt, cut into 2 inch cubes
2 Tablespoons sea salt or kosher salt
1 bay leaf

10 guajillo chiles (Whole Foods had these, but I was told that Kroger does, too)

1 large onion, peeled and cut in half through the middle
3 fresh plum tomatoes, cut in half lengthwise

1/4 cup olive oil
2 Tablespoons white flour

First, take your pork shoulder and cut it (carefully) into 2 inch cubes. Add the pork to a dutch oven or a large saucepan. Add in the salt and the bay leaf and pour in enough water to cover the pork. Bring the liquid to a boil, and then simmer for an hour with the lid covering the pot.


While the pork is simmering away, take your guajillo peppers and remove the stems and shake out the seeds. I did leave some of the seeds in the peppers. Take a medium sauce pan and bring 3 cups of water to a boil. While the water is boiling; take your peppers and place on a large skillet and over medium-high heat let the peppers cook until they turn a reddish color and start to crisp up some. I turned the peppers to make sure both sides were cooked. This took about 5-10 minutes. Once the peppers have crisped up some, remove from the pan and place in a medium to large bowl. Take your boiling water and pour over the peppers. Let the peppers soak for about 20-30 minutes. Set aside.

While the peppers are soaking, take a large skillet and cut your plum tomatoes length-wise and place in skillet. Do the same with the onion. Let the tomato and onion cook over medium-high heat until they are nice and charred. 
About 10 minutes.
Remove from heat and place in a blender. About this time, the pork should have simmered for an hour. Remove about 2 cups of the water from the pork, and place into the same blender as the tomatoes and onion. Puree them. Next, drain your peppers and place into the same blender and puree.
Next, remove another 2 cups of the juice from the pork. Set aside. Drain the pork and clean your pot with a paper towel. Add in the oil and flour and stir for a couple minutes until well combined.
Place the pork back in the pot, and pour in your tomato, onion, and pepper puree. Simmer for another hour with the lid covering the pot. If necessary, add some of the saved liquid to the pot if the mixture becomes too thick. I never had to do this. The recipe says to serve over rice.

But, I served on tacos!

Sesame Aioli

Ingredients:
1/4 cup mayonnaise
1 to 2 tablespoon Asian sesame oil
2 teaspoons soy sauce
2 teaspoons fresh lemon juice (about half a small lemon)
1 teaspoon toasted sesame seeds
1/2 teaspoon minced fresh ginger
1 clove garlic, minced
1 tsp sugar (optional)

To make the sesame aioli; combine all of the ingredients into a small bowl. Stir to combine. I found that I needed to add more of the sesame oil and some sugar to help combat the lemon taste. Really it's up to your palette on how you think it should taste.

Remaining Taco Ingredients:
Kimchi (purchased at Tan A on West Broad Street), chopped up a bit
Cilantro
Sriracha
Corn or Flour tortillas (Corn is preferred); warmed
Cole Slaw (or any bagged shredded cabbage) without the dressing, however add a couple tablespoons of the Sesame Aioli to the cabbage and stir to combine
Black Sesame Seeds (or white if that's what you have)

Assembling the Tacos:
Take 2 warmed tortillas (I used a skillet and set to medium to medium-high heat and warmed both sides for a minute or two), and place on top of each other. Set them on a plate. Brush some of the sesame aioli on the taco. Add the cabbage to the taco. Add the kimchi (I chopped up some of the kimchi because I thought the pieces were a bit too big). Add several pieces of pork (shred a little with a knife or fork). Add some of the cilantro to the taco. Squeeze some of the sriracha onto the taco. Add a couple shakes of the sesame seeds. And, now you are ready to eat your taco (or 3). It really does taste like the Boka Truck's asian tacos. Enjoy!!

(click here for printable recipe)

Monday, November 7, 2011

Beer and Cheddar Soup


How many of you utilize Kroger's digital coupons? I do, and I love it. The only bad thing about it is that you have to remember (when you go to the store) what all you had put on your kroger plus card. Well, I remembered that I had selected this digital coupon for Food & Wine magazine. It alloted me a dollar off the regular $4.99 price. Also, I knew I had till the end of October to utilize this discount. Well, I'm glad I did. The November issue of Food & Wine talks about Thanksgiving. They have plenty of other recipes as well. One of the "other" recipes I picked out was this Beer and Cheddar soup. I thought it sounded really good. I mean it contains beer, cheddar cheese, jalpenos, bacon, heavy cream. How could it possibly be bad? Well, it wasn't. Buuuut, it also wasn't totally awesome either. I definitely over-salted the soup a tad, which was a bummer. And, I ended up using smoked gouda because Whole Foods didn't have smoked cheddar. Also, I used a Pale Ale instead of a Pilsner or a lager. So, maybe it was partly my fault since I didn't follow the recipe exactly. My Dad really, really liked it. And, if you like beer then you'll love this soup. You could really taste the ale thru all that cheese. So, maybe it was just my palette.
Oh, a little tid-bit, I looked up if there are any immediate remedies for over-salting soups. I found that if you peel and quarter a large potato and let it sit in your soup for 15 minutes then discard it this will help eliminate some of the over-salting. My Dad confirmed today that it really did help. One last thing, obviously this soup is not a low-fat soup. So, I probably won't be making this soup very often. Enjoy!!

Ingredients:
1/2 lb piece of slab bacon, sliced 1/3 inch thick (I just purchased a pack of bacon and chopped it into little pieces)
1 celery rib, finely chopped
1 small onion, finely chopped
1 large jalapeno, seeded and chopped
2 large garlic cloves, minced
1 tbsp chopped thyme (I used 1.5 tsp of dried thyme)
1 12 oz bottle lager or pilsner
About 2 1/4 cup low-sodium chicken broth
4 tbsp unsalted butter
1/4 cup all-purpose flour
1 cup heavy cream
1/2 lb sharp yellow cheddar cheese, coarsely shredded
4 oz smoked cheddar cheese, coarsely shredded
salt and freshly ground pepper

In a large saucepan cook your bacon pieces until crispy. Remove the bacon and place on a paper towel and then place into a small bowl. Set aside. Next, add the celery, onion, jalapeno, garlic, and thyme into the same saucepan and cook over medium heat until the onion is tender. Add half the beer to the pot and cook until reduced by half. About 5 minutes. Add 2 1/4 cups of chicken broth and bring this to a simmer.

Next, take a small skillet and melt your butter. Add in the flour and cook over medium heat. Stir the mixture until lightly browned. This could take up to 2 minutes. Incorporate the roux into the soup and bring to a simmer. Cook until the soup has thickened. This could take about 8 minutes. Add the heavy cream, the cheeses, and the remaining beer. Simmer and stir occasioinally until thick and creamy. This could take up to 5 minutes. Stir in the bacon and season with salt and pepper.

(click here for printable recipe)

Friday, November 4, 2011

Bubble Up Pizza


While I generally love to cook, there are sometimes those nights where I’m just not feeling it. I’m not sure if it’s just because of a long day of work, or if I’m just in a funk, but on those nights Steve is usually subjected to me whining (and wine-ing) and we end up either ordering pizza or eating whatever we can find in the fridge (generally hummus and pita chips for me). So, when I find a recipe that looks as easy as this one for Bubble Up Pizza (from Pass the Sushi), I’m definitely game to try it. Especially when it’s what I like to call a “Stir & Plop” recipe. Just stir together the ingredients and plop them into a dish. Super easy.

But, here’s the unfortunate news. It ain’t good.

I mean, pizza is pretty hard to mess up, but this recipe made a valiant effort and, in the end, triumphed. There was hardly any flavor. It was soggy. It didn’t even smell good, and it offended the eyes. Overall, there were no redeeming qualities, and I don’t recommend making it. But in the spirit of experimentation upon which this website was built, I am posting it so this never happens to anyone else.
Ingredients
2 containers refrigerated biscuit dough
1 jar/can pizza sauce
2 cups shredded mozzarella cheese, divided
1 cup pepperoni (or other favorite toppings)
5 fresh basil leaves

Check out the directions on the dough and preheat accordingly. Take out a bowl, and cut your biscuit dough into small pieces. Divide each biscuit into four, which is about the right size. I used scissors to cut up the biscuits, which I think was easier than a knife. Pour in the sauce and add 3/4s of the cheese plus whatever topping you like. Kroger was inexplicably out of pepperoni, so we went with plain cheese. Stir this all up together, and then put in a baking pan or oven safe skillet. We used a cast iron skillet.

Mince the basil and sprinkle on top, along with the remainder of the cheese, then bake according to the directions on the dough. Because we used the cast iron, we ended up increasing the bake time quite a lot. Basically, just make sure the dough is cooked.

There you have it. Hopefully you can understand why I was attracted to the ease of this recipe. But as they say, if it’s not hard, it’s not worth doing. Or in this case, easy come, easy go—straight into the trash can. 

(no printable recipe because, seriously, you don't want to make this.)

Sunday, October 30, 2011

Cinnamon Sugar Pull Apart Bread


Yesterday was a cold, windy, and rainy day. It was a perfect day to stay in and do absolutely nothing. Because of this cold and dreary day; I had decided to make chicken and dumplings for dinner. And, while I was looking for this recipe I came across this one for Cinnamon Sugar Pull Apart Bread. It sounded delicious so I decided to bake this as well. I have to say baking anything that has cinnamon in it is so delightful. The house smelled so lovely. This bread tasted awesome. If you are home on a dreary day be sure to bake this bread. You won't regret it. Thanks to Joy the Baker for the recipe! Enjoy!

Ingredients

For the Dough:

2 3/4 cups plus 2 tablespoons all-purpose flour
1/4 cup granulated sugar
2 1/4 teaspoons (1 envelope) instant yeast
1/2 teaspoon salt
2 ounces unsalted butter
1/3 cup whole milk
1/4 cup water
2 large eggs, at room temperature
1 teaspoon pure vanilla extract

For the Filling:

1 cup granulated sugar
2 teaspoons ground cinnamon
1/2 teaspoon fresh ground nutmeg
2 ounces unsalted butter, melted until browned


To make the bread; mix the 2 cups flour, sugar, salt, and yeast in a mixing bowl. Next, take your butter and milk and melt over medium heat. Once the butter has melted, remove from heat and add the water and vanilla. Once the temperature of the milk mixture reaches 115 to 125 degrees pour this into your flour mixture. Stir with a dough hook. Add the eggs and mix well. Add the remaining 3/4 flour. The dough should be sticky. Place the dough into a well-oiled large bowl. Cover with plastic wrap, and place in a warm oven (85 degrees) for 1 to 2 hours. While the dough rises; incorporate the sugar, cinnamon, and nutmeg into a small bowl. Next, take 2 ounces of butter and melt until nicely browned. Set aside. Once the dough has doubled in size, remove from oven, punch down the dough, and knead in another 2 tbsp of flour. Let rest on the counter with a kitchen towel over the dough for about 5 minutes. Now, roll out the dough to about 20 inches in length and about 12 inches in width. Mine was only around 15 inches in length and about 10 inches in width. Now, brush the butter onto the dough. Then pour the brown sugar evenly onto the dough. Next, cut the dough vertically into 6 strips. Then layer the dough on top of each other and cut into 6 more strips. You should have 6 stacks of 6 squares. I didn't really have this, but I just went with it. Next, place the dough (like flip books) into your oiled and floured loaf pan. Place a kitchen towel over the bread and place in a warm oven and let rise for another 30 to 45 minutes. Remove from oven. Pre-heat oven to 350 degrees. Place bread in oven and let bake for about 30-35 minutes or until the bread has a nice dark, golden brown color. Remove from oven and let rest for another 20-30 minutes. Use a knife to run around the edge of the pan to help loosen the bread from the pan. Invert onto a plate. Turn the bread right-side up and serve.
Best eaten the same day, but will keep for 1 to 2 days as long as it is tightly wrapped. Enjoy!

(click here for printable recipe)

Friday, October 7, 2011

Easy Double Chocolate Chip Brownies


I know, I know. I've posted several other brownie recipes. I think that's what makes baking brownies so much fun. Because there are numerous ways to make them. I remember my friend, Virginia and I used to make boxed brownies and we would try to see how many different ingredients we could throw into the batter. Normally, these "ingredients" consisted of Reese's peanut butter cups, Reese's Pieces, M&M's, caramel, Caramello, etc.


 It was a lot of fun, and I have to admit that the brownies always turned out sooo yummy. Usually, when you are craving chocolate making brownies is a quick and easy way to satisfy that craving. And, that's precisely what I did the other night. I have this cookbook called Nestle Classic Recipes and they offer a lot of different dessert recipes. I came across this brownie recipe and thought it sounded easy. Plus, they had me at "double chocolate." I used milk chocolate chips and they turned out delicious. My co-workers enjoyed them, too. I hope you do as well.

Ingredients:
2 c (12 oz semi-sweet chocolate chips, divided)
1 stick (1/2 cup) butter; cut into pieces
3 lg eggs
1 1/4 c flour
1 c sugar
1 tsp vanilla extract
1/4 tsp baking soda
1/2 cup chopped nuts

Preheat your oven to 350 degrees. Lightly grease a 13x9 pan.

Take 1 cup of your chocolate chips and the butter and place in a sauce pan. Let melt over low heat until smooth. Remove from heat. Once the chocolate has cooled pour into a bowl. Mix in the eggs. Next, stir in the sugar, flour, baking soda, and vanilla. Stir thoroughly. Stir in the remaining cup of chocolate chips and the nuts. Pour into your prepared baking pan. Bake for 18-25 minutes or until a toothpick comes out slightly sticky. Enjoy!


(Click here for printable recipe)

Tuesday, September 27, 2011

Chicken Tortilla Soup


I'm posting this recipe more for selfish reasons. I was trying to find this recipe on the food network's website, and I was upset to learn that they had taken it down. Fortunately, I still have a printed copy, however, it's on its last leg. Also, I've been saving this recipe to use in an iron chef. But, I like it sooo much that I think if I didn't win I would be really devastated. Okay, that's a bit dramatic. But, I would be disappointed. My verison of this recipe is much different than the one food network had posted. Well, the base of the recipe is the same, but I've tweaked it. So, I'm going to post how I do this recipe. If I ever come across the basic recipe I will be sure to include it in this post. I hope you like it. To me it's the best chicken tortilla soup I've ever had. Enjoy.

Ingredients:
1 Spanish Onion (Or red onion) cut in wedges
7 cloves of garlic, mashed
1-2 jalapeno peppers (seeded and deveined)
1 serrano pepper (seeded and deveined); optional
I also used 5 red chili peppers from my garden (seeded and deveined); optional
1/2 can chili peppers in adobo sauce (seeded)
1 28 oz can whole peeled tomatoes
5 cups chicken broth
1 small bag corn
cilantro (I used about a handful)
6 tbsp lime juice
Shredded chicken
2 tsp kosher salt
1 bag of shredded cheddar (or mexican) cheese
tortilla chips

If you need to; boil about 4 chicken breasts so their cooked thoroughly. Remove from pot and when cool enough to handle; shred chicken, place in a bowl, and set aside. Next, place the cut onion, mashed garlic, and peppers on a skillet turned to medium heat. Char both sides for a total of 5 to 10 minutes. Take the can of tomatoes and pour into a blender (include the juice). Remove the onions, garlic, and peppers and place into the blender. Don't forget to add the chili peppers in adobo to the blender as well. Blend ingredients. Pour the puree into a pot. Bring to a boil. Let thicken for about 4 minutes. Pour in the 5 cups of chicken broth. Let simmer for about 20 minutes. Feel free to put in the chicken and corn while the soup simmers. Add 2 teaspoons of kosher salt. You may need more depending on your palette. Add in the lime juice. I just used the juice of 2 limes. Add in the chopped cilantro. Also, I added a couple dashes of cayenne, pepper, and cumin to the soup. Pour soup into bowls and add shredded cheese and crushed tortilla chips. These ingredients aren't necessary, but they really make the soup. Enjoy!

(Click here for printable recipe)

Tuesday, September 20, 2011

Baked Chicken Taquitos


I heard a joke once that all Mexican food is essentially the same ingredients just combined in different ways. And it’s true if you think about it. Nachos: tortilla chips covered with beans, meat and cheese. Burritos: tortillas filled with beans, meat and cheese. Tacos… well, you get the idea. It’s essentially meat, cheese and tortilla, sometimes beans (unless you’re me). Salsa is always in the mix, too. And I’m here to say—that’s A-ok with me. Cause I like meat. And cheese. And tortillas. Beans and I don’t get along, but that’s alright. And if this recipe for taquitos is just another combination of stuff I like? Hey, there ain’t a thing wrong with that.

I based this recipe on one I found here, but modified it slightly to fit my own tastes. It definitely turned out really good and will be making many more appearances in the dinner line up. It was crunchy, creamy and (when made with pickled jalapenos) nice and spicy. Everything Mexican food should be.

Ingredients:
2 large boneless skinless chicken breasts, cooked and shredded
4 ounces cream cheese, softened
¼ cup salsa
1 Tbsp lime juice (half a lime)
1 tsp salt
1 tsp chili powder
½ tsp ground cumin
½ tsp onion powder
2 cloves garlic, minced
3 Tbsp chopped cilantro
1 small can pickled jalapenos (less to taste)
2 large chicken breasts, cooked and shredded
1 cup shredded Mexican mixed cheese
Small flour or corn tortillas
Cooking spray

Start by boiling your chicken. Everyone has their own way of doing this, but here’s my method. Bring a large pot of water to a boil. Cut your chicken breasts into thirds for faster, more thorough cooking, and add them to the boiling water. Boil for about 10-14 minutes, checking your thickest piece to see if it’s cooked through. When it is, use two forks to shred the chicken, put it in a bowl and set aside.

Preheat the oven to 425 degrees and prepare a baking sheet either with parchment paper, or spray it lightly with cooking spray. Mix the cream cheese, salsa and lime juice first. I recommend breaking out your mixer, even though it’s a hassle. Trust me, it's worth it. I tried mixing with a fork, and then a spoon, and there is just no way to get all the cream cheese lumps out without using a mixer. Once it’s mixed add in all the spices, plus the garlic and cilantro and combine. Finally mix in the chicken, jalapenos and cheese. I unfortunately didn’t have pickled jalapenos and used green chiles instead, but they imparted no heat whatsoever. That was my only regret with this recipe. 

To build your taquitos, spoon on your desired amount of chicken mixture in a line on the tortilla. I made mine pretty thick. Maybe that means it wasn’t technically a taquito, but I just didn’t want a mouthful of tortilla. Roll it as tightly as you can and then put it on the baking sheet with the rolled side down. If you put it the wrong way you’ll know because it’ll start to unroll. Once you have all your taquitos rolled (I had 8, which was perfect for my baking sheet, but if you put in less filling you’ll have more taquitos), spray the tops lightly with cooking spray and then cook for about 10-15 minutes. Mine went for 13 and that was perfect. They should be a light golden brown and crunchy. Watch that the tips of the tortilla don’t burn.

Serve with salsa, sour cream or whatever Mexican topping you love. My husband put Tabasco sauce on his and really enjoyed it. I hope you will too! 

(Click here for printable recipe)

Sunday, September 18, 2011

Mojo Chicken Empanadas

I love snacky foods. Can I hold it in my hand? Can I dip it in something? Then I'm probably a fan.

So when I saw a recipe for baked empanadas a while back, I was intrigued. Empanadas, in case you don't know, are like little savory pastries, like apple turnovers with meat. And while I'm a southerner who'd eat just about anything fried, frying is a pain in the butt. And also an expansion of the butt. So I perked up at a baked version.

These were the baked empanadas I first spotted on the Internet: http://www.skinnytaste.com/2009/01/baked-empanadas-3-pts.html I made picadillo from that site (and fell in love with capers), stuffed the shells and knew I'd found a food that felt like a snack and filled like a grown-up meal. So naturally I thought, what else can I put in an empanada shell? I think the answer is probably "anything." But Jon and I decided to try a chicken filling. I envisioned something like a chicken fajita, chopped up and in a pastry.


I had to go to a local Latin market to find the shells, which are in the freezer area. (Sure, you can make your own, but I'm lazy, and the store-bought shells are delicious, and only cost a couple of bucks for about a dozen). We chose a Goya brand of empanada shells, with a red and blue package that said "tapas para empanadas." They also said "para horno," which I believe means "for baking." There are different types for baking or frying, so do make sure you get a baking shell.

We also got a big bottle of Goya mojo sauce. Several years ago we visited Miami, briefly, and ate some sort of local fast-food that involved shrimp with a mojo sauce for dipping. Thereafter we tried to recreate the mojo sauce (with not much luck) but decided to try out the Goya mojo as a marinade.

Ingredients:

1 package chicken (we used chicken tenderloins, it was a bit over a pound)
1 onion
1 bell pepper (we used green)
Most of a big bottle of Goya mojo sauce
Two packages of Goya brand frozen empanada discs
Some cilantro and green onion, to taste
A few dashes of hot sauce, a few sprinkles of cumin
Some cheese, like monterey jack or queso blanco or cheddar
Water
Spray oil


Directions: Remove the empanada discs from the freezer and let thaw for about an hour. Trim and marinate the chicken in the mojo sauce, using as much as seems necessary to coat the chicken. We let it sit for a couple of hours, stirring the chicken around now and then although I think thirty minutes is probably a minimum. Cook the chicken in the marinade and then shred with a fork. Dice the onion and green pepper. Return the chicken to a skillet and add the onion and green pepper, sauteeing until the vegetables are softened. Taste your chicken -- while the mojo was strongly-flavored in the bottle, the chicken was actually was pretty mild (still flavorful) once it was cooked.We wanted a slightly stronger flavor so we added a tablespoon or two more mojo sauce (you want it flavorful but you're not looking for a wet, liquid result here) and a dash or two of hot sauce and a sprinkle of cumin). Remove from heat and mix in the cilantro and green onion (and you can leave these out if you're not someone who likes cilantro. We had them on hand). Let cool.

I didn't take a picture of the chicken mixture after we cooked the empanadas, so here's a picture of the filling:


Heat the oven to 350 to 400, depending on your oven. Open the package of empanada shells, take one out, and lay it on a flat surface. Use a rolling pin (or, if you're like me, a large canned-food item, with saran wrap protecting the shell) to roll it out slightly larger. Spoon a tablespoon or two of filling into one side of the shell, leaving a half-inch or so of free shell around the edge, and sprinkle some cheese on top of the filling. Dip your finger in a bowl of water and run it around the edge of the shell, which will make it stick together. Fold the other side of the shell over the filling, lining up the two edges (it should look like a half-moon now) and then folding the edges over to seal. You could probably fork it. Whatever, just make it seal. Spray a baking pan with oil and lay the empanadas on it, then spray them again with oil. (You can also whisk an egg and brush it over the tops, which I did the first time I made empanadas, but then I decided it wasn't necessary.)

Here's what they look like before they're cooked:


Bake about 15 minutes and check them; Jon decided to flip these and bake a few more minutes, which worked with these Goya shells, although I haven't done the flip with past shells. If they've browned, they're done. We dipped them in green salsa and corn salsa.


*A note on shells: different brands seem to provide quite different consistencies. The brands I'd tried in the past created hard shells, but this one had a delicious buttery, flaky crust, like a pastry. Jon ate his with a fork. It depends on your preference, but just make sure you're getting a type meant for baking. Also, when filling them, be careful because the dough can rip. But it's also possible to sort of push the filling around once you've folded the shell over, to help lessen the chance that it'll puff up and half your empanada will be air.

(click here for the printable recipe)

Monday, September 12, 2011

Coconut-Lime Peanut Chicken

You might have noticed that one of our home cook contributors, Emily, has an affinity for coconut. No wait, affinity isn’t strong enough. Attraction? Obsession, maybe? Let’s just say, there’s some Single White Female style love going on there. She’s been espousing the virtues of coconut milk to me for a long time and I never listened. But when I found this recipe, I decided to give it a shot finally. And I’m glad I did. It was slightly spicy (I’d add more spice next time) and slightly peanutty. I do think that the name of this meal is a misnomer, because I didn’t taste coconut or lime. But the peanut part was excellent, and even my peanut butter hating husband enjoyed it. I found this recipe on Tasty Kitchen


Ingredients
½ cups peanut butter
½ cups light coconut milk
1 tbsp Thai red curry paste
1 tbsp lime juice
1 tbsp soy sauce
2 tbsp fish sauce
2 tsps toasted sesame oil
½ tsp honey
1 pinch black pepper
1 pinch cayenne pepper
1 pinch cinnamon

For the Chicken:
1 teaspoon coconut oil (or oil of your choice)
½ cups onion, diced
3 cloves garlic, minced
1.5 pounds chicken breast

Whisk together all the ingredients for the sauce in a bowl. Taste a little and decide if you want more spice or more peanutty flavor and adjust it to fit your tastes. Set it aside and start on the chicken. Heat your oil over medium high heat. I didn’t use coconut oil, since I didn’t have it and didn’t want to get a whole thing of it just for this. I used olive oil and it worked just fine. Add your onion to the pan and cook just until soften, about 4-5 minutes. Add in your garlic and make sure it doesn’t burn. Just cook about 30 seconds or so and then add the chicken and cook for about ten more minutes until it browns and is cooked through. Then you just pour the sauce over the whole shebang and let it simmer, partially covered, for about 5 minutes.

The original recipe called for asparagus, but it didn’t seem to work for me so I left it out (although I love asparagus!). Broccoli might work better, or definitely some traditional Chinese additions like water chestnuts or bamboo shoots. Add those at the same time as the sauce. I also thought it would be good with some actual peanuts, kind of like Kung Pao chicken. Serve over rice and garnish with sliced green onion. It may not appease the coconut-obsessed but it made me consider that coconut milk might not be all that bad. Enjoy!

(click here for printable recipe)

Wednesday, August 17, 2011

Peanut Butter Pie (for Mikey)


The other day I went to tastespotting's website, and noticed something odd. There were about 10 different pictures with this same peanut butter pie recipe. I thought to myself; hmm, that's odd. I've never seen several pictures of the same recipe on this website. So, I clicked on one of the pictures, and that's when I realized what it was all about. Recently, a woman, Jennie, who blogs about food suffered a devastating loss. Her husband of 16 years past away from a sudden heart-attack. She asked in her blog that everyone tell their family, spouse, children, etc that you love them. And, for those who asked; to please make this pie in honor of her late husband. It was a touching tribute and a beautifully written letter that I found myself wanting to create this pie in honor of her husband. I hope you make this pie, too. And, when you do; be sure to tell your family that you love them. Enjoy.

Ingredients:
8 oz chocolate cookies (I used chocolate graham crackers)
1 stick plus 2 tbsp unsalted butter, melted
4 oz semi-sweet chocolate chips
1/4 c chopped peanuts
1 c heavy cream
8 oz cream cheese
1 c creamy peanut butter
1 c confectioner's sugar
1 14 oz can sweetened condensed milk
1 tsp vanilla extract
1 tsp fresh lemon juice (I omitted this step)

I used 2 packages of chocolate graham crackers, and added them to my food processor. Pulse on high till the crackers are a fine crumb. Add in your butter and pulse until combined. Pour into your pie dish, and press into the dish. Place in fridge.

Next, take your chocolate and melt in a double boiler. I just melted it in my saucepan directly on the stove. I just made sure to watch it so that it didn't burn. Chop your peanuts. Take your pie dish out of the fridge, and pour the chocolate on top of it. Spread evenly across the crust. Sprinkle your chopped peanuts on top of the chocolate. Place back in fridge

Take your heavy cream and pour in your standing mixture. Mix on medium speed until it forms stiff peaks. Pour into a small bowl, and place in the fridge.


Clean out your mixing bowl. Place back on your standing mixture, and add your cream cheese and peanut butter. Mix until light and fluffy. Add your powdered sugar, sweetened condensed milk, vanilla, lemon juice (optional) and beat on medium speed until ingredients are combined.

Next, stir in 1/3 of the whipped cream mixture into your creamy mixture. Fold in the remaining whipped cream. Pour the filling onto your pie crust. Sprinkle some peanuts and chocolate chips on top if you so desire. Refrigerate for 4 hours or overnight. If you don't refrigerate for 4 hours or more; your pie will come out looking like this:

Still good, but messy! Enjoy!

(click here for printable recipe)