Pages

Wednesday, March 31, 2010

Jerk Chicken with Rice, Black Beans, and Pineapple

Last week, pineapple snuck onto our ingredient list once again for some kabobs. It’s funny how foods are often dictated by the weather. Winter is a time of stews and comfort food, but spring is a time for freshness. New leaves pop out on the trees, and fruits and berries suddenly appear again on my dinner plates. I love the turning of this season. Fresh pineapple just makes me think of sunshine.
Apparently, I didn’t have enough with last week’s kabobs. I went for pineapple again tonight as I tried Jerk Chicken with Rice and Beans:

Jerk Chicken with Rice, Black Beans, and Pineapple

The full recipe is from Real Simple.

I over-cooked the rice a little bit. I was chatting while doing dinner, so I guess it happens. Otherwise, all was fine - not great, but fine. I think I just need practice with this one. I'll definitely try it again, though.
Happy cooking!
-KSP

Pork Cutlets with Brussels Sprouts

No, this isn’t your mother telling you to eat the hated Brussels sprouts. You’re going to have to trust me…they’re a wonderful, bitter, scrumptious veggie. But if you’re still totally against it, you can go to your room without your dinner, missy!! Sorry, what I meant to say is that you can substitute any veggie you want…this recipe is really about the sauce. As a matter of fact, when I made this, I used chicken instead of pork and I cheated by using frozen Brussels sprouts, so the meal I ended up with barely resembles the recipe.

Ingredients:
4 ½ -inch-thick boneless pork chops
¼ cup all-purpose flour
2 tsp. paprika or smoked paprika
1 lb. Brussels sprouts, trimmed and halved
2 Tbsp. butter
1 8 oz. carton light sour cream
2 Tbsp. milk or half-and-half
1 tsp. packed brown sugar

First, I tossed my frozen sprouts into boiling water, following the package directions. Next, I heated a skillet with vegetable oil instead of butter. Make sure the pan is very hot – it helps to brown your meat. I coated the chicken in the flour mixture and cooked it for about 10 minutes – just make sure whatever meat you choose is thoroughly done. While that was cooking, I made up the sauce by combining the sour cream, milk and brown sugar.


Once the chicken is done, turn down the heat to low…if you don’t, you’ll end up with scorched sauce. I poured off any excess oil and scraped the bigger chunks of “stuff” that were left in the pan – but I didn’t clean the pan. I like the added flavor that you get from the chicken drippings (yeah, yeah, I can hear the collective ewwww). When the pan cools a little, add the sauce and whisk briskly so it doesn’t burn. Make sure you heat it long enough to get the sauce hot.

I really liked the flavor of this sauce, but I thought it was pretty runny. I think that might have been caused by using light sour cream instead of the regular kind. I was going for low-cal and low-fat, so that often makes recipes just a little “off.” The original recipe (not my altered one) claims to only have 395 calories and 22 grams of fat. So be a good girl now and eat all your Brussels sprouts!


(Click here for printable recipe)

Tuesday, March 30, 2010

Fish Tacos with Southwest Slaw, Chipotle Pico de Gallo & Mexican Cream

My favorite part about having to go out to LA for work every once in awhile is the fresh fish. Well, maybe the stocked minibar first, but after that, it’s definitely the fresh fish. Growing up in Indiana we didn’t really do fresh fish, unless we caught it ourselves (which we sometimes did). So to me, LA is a magical wonderland of sushi and tuna tartare and fish tacos. Let me tell you, fish tacos are hard to do right. I’ve gotten some here in RVA that have been pretty bad (I’m looking at you, Cha-Cha’s.) But this recipe I found on Epicurious is truly fantastic. Not sure it can match eating fish tacos on the sandy beaches of LA, but it’s close.


When you’re making this meal, the first thing you want to do is mix up the slaw. I’d say do it 2 to 3 hours before serving so the flavors really sink in.


Southwest Slaw
2 cups fine-shredded green cabbage
2 tsp lime juice
2 tsp honey
2 tbsp minced red onion
2 tsp minced jalapeños
2 tsp chopped cilantro
Salt, to taste


I use prepackaged slaw mix, which works fine. I also add more lime juice and use a whole jalapeno. Simply mix this all together and stick it in the fridge. Next you can mix up the Mexican Cream, which is really just a limey sour cream.


Mexican Crema
1/2 cup Mexican sour cream
1/2 tsp finely grated lime zest
2 tsp lime juice

Mexican crema is apparently slightly milder than sour cream, but I just use regular sour cream and it’s pretty good. I actually don’t eat the Chipotle Pico because I’m not a huge fan of tomatoes. But Steve eats it and enjoys it, so you may too. We make ours pretty spicy, but you can control that with the amount of chipotle you put in. I do recommend saving the extra chipotle and adobo sauce that’s in the can—there are a lot of recipes you can use it in.

Chipotle Pico de Gallo
1 cup medium-dice tomatoes (seeded before dicing)
4 tsp minced red onion
1/2 tsp red wine vinegar
1 chipotle pepper, minced
Salt, to taste
1 tbsp cilantro

Mix all these up, and you can use them right away or refrigerate. Now, on to the main dish—the fish tacos!


Fish Tacos
2 lb mahi-mahi
1/2 cup vegetable oil
3 tbsp lime juice
5 tsp chili powder
1 1/2 tsp ground cumin
1 1/2 tsp ground coriander
1 1/2 tsp minced garlic
Salt, to taste


One pound of mahi-mahi was plenty for just the two of us, but if you’re having a larger crowd, two is a good amount. You can also use tilapia, but it’s a little more delicate. Cut the mahi-mahi into small slices (from 2 pounds, it should be around 16 slices). I don’t recommend going too small or it will be hard to turn the fish without it falling apart. Combine all the other ingredients well and coat the fish in it. Make sure you don’t leave the fish in the marinade too long, because the lime juice will make it tough. We cook the fish on the broiler, about two minutes each side until it’s cooked through and flaky. Take the fish out and throw your tortillas right on the oven rack with a watchful eye. It won’t take long to heat them up and make them soft. Then assemble your tacos and enjoy! It’s a nice, light meal that is still filling. If you want to make it even healthier, lose the sour cream (although I think it’s worth the extra calories). This is definitely a recipe I’m going to make whenever I start dreaming about those fish tacos out in LA.


(Click here for printable recipe)

Saturday, March 27, 2010

Mojito

The first time I tried a Mojito was in a bar in Las Vegas. Don't ask me which casino I was in, because I have no idea. It was my first time in Vegas and all my co-worker and I did was walk from one casino to the other stopping in each to have a cocktail (or two). My co-worker was very, um, knowledgeable, about alcoholic beverages. And, while sitting in this one bar I was trying to decide what to order. He suggested I try a Mojito. He was quite convinced that I would like it. He was wrong. I loved it! The Mojito was the perfect combination of rum, mint, soda, and sweetness. And, it had a real sugar cane in it. It was perfection.
Upon my return to Richmond, I've been seeking out the perfect Mojito. Havana 59 came a little close, Cha Cha's that much closer, and Cheesecake Factory (funny enough) hit the nail right on the head. But, I wanted to figure out how to make my own Mojito in the comfort of my own home. So, I went out and bought some peppermint, which to my surprise wasn't the proper herb. Mojitos actually calls for Mint, which I've since planted.

The following recipe is the perfect Mojito in comparison to that awesome one in Vegas. Enjoy on a nice hot day!


1 cup of water
1 cup of sugar
Bunch of Mint picked off the vine (maybe about 3/4 to a cup of mint leaves)
Slice of lime
Dash of Club Soda
2 oz Light Rum
Crushed Ice

First boil 1 cup of water and 1 cup of sugar to make a simple syrup. Stir and then keep an eye on it, because the sugar melts really fast once the water boils. As soon as the sugar is dissolved turn off the burner. Set aside to cool.

Now, take out two glasses, and divide the mint leaves (about 1/4 cup), rum, and simple syrup (about 1/4 cup if you like your mojitos sweet) into each glass. Using a muddler; crush the mint leaves to release the mint flavor from the leaves. Then, add crushed ice to about 3/4 of the glass, top with the club soda , and the juice from a slice of lime into each glass. Stir really well. Serve!

(Click here for printable recipe)

Friday, March 26, 2010

Easy Granola Cereal

I found this recipe in the most recent issue of Real Simple magazine, but I think I have made it even simpler and better. It appealed to me because I am also looking for quick breakfast snacks. However what really got me was a vision I had while making it of our future children telling their friends that their mom makes their cereal from scratch. What an awesome mom!!!


Easy Granola Cereal (If you don't trust me, you can check out Real Simple's version)


4 cups old-fashioned oats (not the quick kind)
1 cup shredded sweetened coconut
1/2 cup pure maple syrup
2 tablespoons canola oil
2 tablespoons of honey
2 cups raisins & dried cranberries


Heat oven to 350° F. In a bowl mix the oats & coconut with the maple syrup, oil, and honey. Bake for 15 minutes then toss/flip. Bake another 15 minutes until golden. Return to bowl and mix in raisins & dried cranberries. Let cool then put in an adorable clear container!


(Click here for printable recipe)

Thursday, March 25, 2010

Beef Tacos with Mango Hot Pepper Salsa


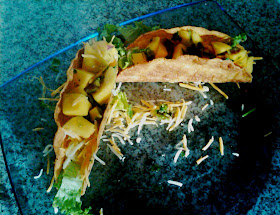
Tacos. That’s what I was going for last night; a messy, juicy, concoction of beef, lettuce, cheese, salsa, and fried tortilla heaven. It wasn’t a homerun. I’ve always had a kind of love and hate relationship with Tacos. I never found my Mom’s version of Taco’s all that great. Sorry, Mom. It was always just dried beef, cheese, lettuce…boring, boring, boring. However, if I go to a Mexican restaurant and want an entrée that is what I usually order; 2 tacos, side of beans, and rice. Mexican restaurants are usually just right with their Taco concoction. It’s juicy, tons of flavor, and a big ol’ mess. This is what I was hoping to accomplish with the following recipe. The mango salsa was delicious by itself or with tortilla chips. However, the tacos were a mess; flavor and taste wise. It probably didn’t help that I burnt my first two tacos. Even though I wasn’t all that hungry, I went for a third taco hoping that if I didn’t burn it it would taste better. And, it did. I think the problem lay in the fact that the meat wasn’t super juicy and I may have cooked the beef extra-well done. I didn’t have any kind of leftover lasagna filling, so I sautéed ground chuck, cumin, and the chili powder in a skillet with a little olive oil. I think i maybe could have spiced up the beef with some minced garlic and finely chopped onions.

The Mango Pepper Salsa was a hit however. I will definitely make that again, and it would probably taste fabulous over grilled Chicken or Pork. The recipe didn’t call for topping the tacos with the mango salsa, but I did it anyway. It was okay. Perhaps this would be better in a burrito than on top of a taco. I don’t know. My dinner wasn’t the most successful, but maybe you will have better success with it.


2 cups leftover lasagna filling
2 teaspoons chili powder
1 teaspoon ground cumin
2 cups diced fresh mango
1 jalapeno pepper, seeded and minced
2 tablespoons minced red onion
2 tablespoons chopped fresh cilantro leaves
2 tablespoons fresh lime juice
Salt and ground black pepper
8 taco shells
1 cup shredded Romaine lettuce
1 cup grated Cheddar (regular or reduced-fat)
1/2 cup sour cream (regular or reduced-fat)

I ended up making my own filling using ground hamburger meat and adding olive oil, Emeril's Essence, minced garlic clove, a tad chili powder, cumin, and some dried herbs. I cooked until brown. Meanwhile, in a medium bowl, combine the chopped mango, jalapeno, red onion, cilantro, and lime juice. Season, to taste, with salt and black pepper. Then I served my beef mixture with taco shells I got from the store. I put shredded lettuce, shredded cheddar cheese, and the mango mixture in the taco shell.p>
Recipe courtesy of: http://www.foodnetwork.com/recipes/robin-miller/beef-tacos-with-mango-hot-pepper-salsa-recipe/index.html

(Click here for printable recipe)

Tuesday, March 23, 2010

Moroccan Carrot Soup

Judging by most of our entries, healthy eating isn’t really our jam. I mean, pretty much every recipe so far has cheese as a main ingredient. And I don’t blame us. For me, eating a healthy dinner usually leads to having a healthy serving of ice cream later in the night. Healthy food just isn’t filling. But last night I decided to try this carrot soup from the latest issue of Bon Appetit, and let me tell you: not only is it healthy, but it’s also super tasty and incredibly filling. It’s the best of all worlds! Kristy, I think you may even be able to get Frank to eat this. Maybe.

Sidenote: if you don’t have a subscription to Bon Appetit, I highly recommend it. There are difficult recipes in there, sure, but there are also easy ones. And at the very least it will give you great ideas for new meals to try. It’s also pretty darn cheap.


I made just a few changes to the original recipe that I’m just going to write into this because I think they worked so well.

Ingredients:
2 tablespoons (1/4 stick) butter
1 cup chopped white onion
1 pound large carrots, peeled, cut into 1/2-inch dice (about 2 2/3 cups)
2 1/2 cups low-salt chicken broth
1 teaspoon cumin
1 tablespoon honey
1 teaspoon fresh lemon juice
1/8 teaspoon ground allspice
¼ teaspoon cayenne (optional)
Plain yogurt, stirred to loosen
Cream cheese

This makes either two meal-sized servings of soup, or four servings of appetizer sized bowls. First, melt the butter in a large saucepan medium-high heat. Slicing up the butter into smaller chunks helps it melt faster and more evenly. Then add the onion and sauté about two minutes. Add the broth (which is about 1 ½ cans) and the carrots, then bring to a boil. Reduce heat and simmer, covered, for about 20 minutes or until the carrots are fork-tender. Then, take the soup off the heat and transfer it to your blender. I used a ladle to get most of the carrots so they wouldn’t splash, then poured in the liquid. We were able to fit the whole batch in our blender, but don’t push it if it’s not fitting. You don’t want hot soup flying all over the kitchen!

Once it’s pureed and smooth return it to the pan over very low heat and whisk in the honey, lemon juice, and spices. I added the cayenne, which gave the soup a nice spicy kick. But I like things sort of spicy, so don’t do it if you have a sensitive tongue. I also added two heaping spoonfuls of plain yogurt. You could probably omit this, but it gives a little tang that’s nice. Now, the soup was tasting a little thin to me and Steve, so we decided to add about a half a brick (4oz) of cream cheese. Yes, it takes a little away from the pure healthiness, but only a little. It just makes it a little thicker and creamier. After the cream cheese is fully incorporated, it’s ready to eat! Salt and pepper it to taste and ladle it into bowls. You can serve with crusty bread or pita chips, but it’s also filling enough just on it’s own. This soup is pleasantly spicy, warming, and has plenty of depth. It’ll taste like you spent all day, but it really only takes about 45 minutes from start to finish. And it’s really cheap to make! I recommend you make it immediately. Go!


(Click here for printable recipe)

Monday, March 22, 2010

Almost No Fat Banana Bread


I know what you’re thinking…”There’s fat in banana bread? But I thought bananas were good for me!” Well that depends on how you use them…banana split? Not so good for you. Almost No Fat Banana Bread? Not only a pretty darn good snack, but it gets bonus points for not (banana) splitting your pants.

Ingredients:
1 ½ cups all-purpose flour
¾ cup white sugar
1 ¼ teaspoons baking powder
½ teaspoon baking soda
½ teaspoon ground cinnamon
2 egg whites
1 cup banana, mashed
¼ cup applesauce
1 teaspoon vanilla (optional)

Preheat the oven to 350 degrees and use spray Pam to grease an 8x4 inch loaf pan. Stir together the flour, sugar, baking powder, baking soda and cinnamon. Add all the remaining ingredients.
Now for the helpful hint section. Learn from my mistakes - always separate your egg whites in a separate bowl so you don't mess up the dry ingredients. Make sure your bananas are good and ripe before you start – they should be brown on the outside and probably past the point where you’d chow down on them. Two bananas equal a cup, give or take. Be sure to really mash those bananas – the first time I made this, my bananas weren’t quite ripe enough and I was lazy and didn’t mash them thoroughly and ended up with chunks of banana throughout the bread. Not a bad thing taste-wise, but it didn’t look too appetizing. I added the vanilla to this recipe, because personally, I think everything tastes better with a dash of high quality vanilla. I prefer Watkins brand, but it’s pricey and not available in the grocery store. I used White House apple sauce (plain, with no added flavorings) the first time I made this and Motts the second time because it was all I could find. I prefer White House…it just seems thicker and less watery.
Back to the directions...don't stir the batter too much - just until it's all combined. Pour it into the prepared pan. Bake for 50 to 55 minutes, until a toothpick inserted into center of loaf comes out clean. Turn out onto wire rack and allow to cool before slicing.

The real key to this bread is patience…the “crust” tastes a little on the rubbery side at first. Not a winning sales pitch, but just wait! The older it gets, the better it gets. I’m usually not one for eating “old” food, but trust me…this bread just starts to reach its peak two to three days after baking.

Here’s the best part – each slice is a measly 127 calories and only .2 grams of fat! You can work off those few calories as you walk to the kitchen for another slice.


(Click here for printable recipe)
Five Spiced Coconut Chicken

So, I was craving a Coconut chicken recipe on a nice warm day. I love coconut and chicken so what could be a better combination? Let me tell you Rachel Ray’s 5-Spiced Coconut Grilled Chicken is to die for. Even for all of those coconut haters you will love this recipe. In my humble opinion, you taste more of the Chinese 5-spice than you do the coconut milk. I have been known to add some coconut flakes to this marinade, which in that case you Coconut Haters might not like. I paired this with Coconut black beans and my Citrus Salad side dish. I spiced up the Coconut Black beans by adding a chopped pepper from a can of Chili Peppers in Adobo Sauce. Just be sure to remove the seeds, otherwise it will be super spicy. I also added some chopped cilantro to the beans. And, I omitted the Avocado and Mango. This dinner completely satisfied my craving for coconut.


Five Spiced Coconut Chicken


1/3 Cup Coconut milk
2 tablespoons honey
1 tablespoon lime juice
2 tablespoons soy sauce
1 clove garlic, finely chopped
2-1/2 teaspoons Chinese five-spice powder


In a large bowl, combine the 1/3 cup coconut milk, 2 tablespoons honey and 1 tablespoon lime juice with the soy sauce, garlic, five-spice powder and salt. Add the chicken, coating well. Marinate for 15 minutes. And, grill to your liking.
http://www.rachaelraymag.com/Recipes/rachael-ray-magazine-recipe-index/dinner-recipes/Five-Spice-Coconut-Chicken


Coconut Black Beans


1 tablespoon vegetable oil
3 large cloves garlic, pressed
1/2 cup chopped white onion
2 to 3 whole dried chilies (I used one pepper, chopped and removed seeds, from Peppers in Adobo Sauce)
2 teaspoons cumin
1 (15-ounce) can coconut milk
2 (15-ounce) cans black beans or 1/2 (16-ounce) package dried beans
salt, to taste
pepper, to taste
1 mango sliced
1 avocado sliced


In a medium sauce pan, heat a little bit of vegetable oil. Add the garlic and onions; simmer on low for a few minutes. Add the chili peppers and the cumin. Pour in the can of coconut milk and let all the ingredients mix together. Rinse and drain the black beans and add to the mix. Salt and pepper to taste. (If you are using dried beans, prepare them as per the package and cook separately for 45 minutes before starting the rest of the mix.) Let beans simmer for 10 to 15 minutes. While they are simmering, cut up the avocado and mango and place in a bowl on the table. (The mango and avocado should be eaten with the beans. I place them right on top. The sweetness of the mango and buttery texture of the avocado complement the spiciness of the beans.) The mix will be soupy.
Serves: 4
Preparation time: 25 minutes


Citrus Salad


1 jar (or small carton for individual serving) Del Monte Citrus Salad
1/8 cup chopped Cilantro
1 small Shallot chopped
Dash of Salt


Remove some of the juice from the Citrus Salad, and pour into a bowl. Add chopped cilantro, salt, and onion. Stir and refridgerate for about 15 minutes. Be careful how much salt you add. Just use a small dash or none at all. This is a simplified version of my mom’s Black Bean and Avocado Citrus Salad recipe.


(Click here for printable recipe)

Friday, March 19, 2010

Parmesan Crusted Tilapia

The Italians have two Cardinal rules. The rules that, when broken, have old Italian grandmothers rising from their graves to deliver a solid slap across your cheek and a cringe-inducing glare. Rule number one: you do not cheese your fish. Rule number two: you do NOT cheese your fish.

Well, I cheesed my fish. And it’s goooood.

This is what my husband, Steve, calls “our easiest adult meal.” It’s also one of my favorites. I can’t say it’s healthy, but you could do worse. And it’s seriously easy. I’m talking, under ten minutes easy.

Ingredients (for two generous portions):
3-4 tilapia filets (we get the individually frozen kind in bulk so we always have them)
Old bay
½ cup shredded Parmesan (not grated!)
¼ cup butter, softened
3 Tbsps Mayo
1 Tbsp Lemon juice
¼ Tsp Basil
¼ Tsp Pepper
1/8 Tsp Onion powder
1/8 Tsp Celery Salt
¼ Tsp Paprika
¼ Tsp Garlic powder
1/8 to ¼ Tsp Cayenne pepper (to taste)
¼ cup Panko bread crumbs

You can use any breadcrumbs you like, but I personally feel that Panko has the best crunch. You can find it in the specialty Asian section.

First take out your filets and generously sprinkle both sides with Old Bay. Then, in a small bowl, soften your butter. How much or little you soften your butter really makes a difference. If it’s completely melted, you’ll have a harder time spreading the mixture on your fish later. If it’s two hard, you won’t be able to mix it completely. I put it in the microwave for about 45 seconds and it’s perfect. Add your Parmesan, followed by all the rest of the ingredients. Put in the breadcrumbs last so they don’t soak up all the butter and get soggy. Mix all the ingredients together very well.

Steve has perfected the cooking process on these, so I can tell you with certainty that these times are dead on (at least for our oven). Put your filets on a broiler and broil for 2 minutes. Flip quickly and carefully and broil for 1-½ minutes.

Now comes the fun part. The schmearing. Not smearing. Trust me—once you do it, you know it’s a schmear. If you’ve done it right, it’s thick enough that it won’t fall off the fish as you schmear it on top. You probably will have to use your fingers. This is ok. Don’t be afraid. You’ve already got zombie Italian grandmothers chasing after you with open palms, nothing worse can happen to you. Make sure you’ve completely covered the fish, and then pop it back in. Broil for 1-½ minutes and then start watching through the oven door. You can actually see it browning. Once it’s brown enough for you (which will be less than 30 seconds) pull it out and serve. I’m telling you, it’ll make you unbelievably glad you cheesed your fish.

(Click here for printable recipe)

Wednesday, March 17, 2010

Chicken Divan Casserole

When you think of good old home cooked meals, what do you think of? Myself, I think of a gray-haired Betty Crocker type with a frilly, white apron pulling a steaming casserole out of the oven with red-checkered oven mitts. Yet, alas, here is the problem. I have a grand total of one casserole recipe on my regular dinner menu list. This was a flaw that had be fixed.

So today, I took on the casserole. I tried to find a recipe that had few ingredients, little prep time, was healthy, and, of course, sounded delicious. Here is what I came up with:

Ingredients:
Chicken, cubed and cooked (4 breasts)
Rice (2 cups uncooked)
Pepper
Four-cheese Alfredo Sauce (thank you Classico Signature Recipes)
Broccoli (12 oz. frozen package)

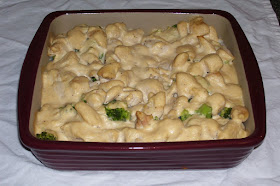
  1. Start boiling water for your rice. While the water is boiling, cube your chicken breasts. I cooked them over medium heat in a few teaspoons of olive oil, with a few dashes of pepper. While this is going, simultaneously start cooking your rice, and pop the cook-in the bag broccoli into the microwave. (If you can time this correctly, I’m impressed.)
  2. Pour rice into a casserole dish; pour cooked broccoli on top of rice; pour cooked chicken cubes on top of that. Lastly, pour alfredo sauce lightly over the top, creating a thin layer over it all.
  3. Cook for 25 minutes at 350 degrees.
I imagine this would serve four. We had a lot of left-overs.

Suggestion: We peppered the final result, and it was really tasty.

The great casserole discovery: Sticking something in the oven, with nothing else to do in the kitchen for twenty-five minutes, I actually had a clean kitchen by the time dinner was ready. How’s that for feeling accomplished?

Not to say that I have a frilly, white apron, red-checkered oven mitts, or that my hair has started to gray, but I think I would have made a modern Betty Crocker proud.


(Click here for printable recipe)

Chocolate Brittle Surprise

This past December I was invited to a Christmas Cookie Exchange that alas never happened thanks to the first major Snowstorm that hit Virginia. I had decided on what I was going to bring for the Cookie Exchange went out and bought all the ingredients only to have it cancelled. Since I was snowed in I made it anyway. And, I made it again this past dreary March weekend. It is super yummy, and you won't be able to just eat one. You will end up eating about a hundred of them.

Sara Kuhs had originally suggested this to me at Volleyball one night, and I thought I would give it a go. However, I did make some adjustments to the original recipe to help "spice" it up a bit. I added peanut butter chips and milk chocolate chips instead of semi-sweet chocolate chips. I used about a cup of each if not more. And, I did use the chopped pecans. I tried using the soda crackers once, but they didn't do anything for me. However, I think the Saltines worked great. I used Low-Fat Saltine crackers to make myself feel a little better about eating this scrumptious snack.


35 unsalted soda crackers. I used about 3 sleeves of Saltine Crackers
1 cup butter
1 cup packed brown sugar
1 cup milk chocolate chips
1 cup peanut butter chips
1 cup chopped pecans (optional)

Preheat oven to 350 degrees F (180 degrees C). Cover cookie sheet with foil. Spray foil with cooking oil spray.
Place crackers on foil in 5 x 7 inch rows.
Microwave butter on high for 2 minutes. Add brown sugar and stir. Microwave on high for 2 more minutes, stirring every 30 seconds.
Pour over crackers. Bake 17 - 20 minutes (should bubble but not burn). In my oven it only takes about 5-8 minutes before it becomes a nice golden brown color. So, keep an eye on them when first attempting this recipe.

Sprinkle chips and chopped pecans over hot crackers. Spread after 2 minutes (chips have softened). I did have to put the cookie sheet back in the oven for about a minute more so the rest of the chips would soften. I think this is because I put the one type of chips on first and then the second. By the time I get the second set of chips on; the crackers have cooled some. Maybe I am just slow or I could use a tip on how to better this process.
Refrigerate 1 hour. Break into pieces. Can be frozen.

I dare you to eat just one.


(Click here for printable recipe)

Tuesday, March 16, 2010

Potato Leek Soup

I am not sure where exactly my Aunt got this recipe, but what I do know is that it is very delicious. A couple of notes here, last night I used regular white potatoes as opposed to the russet this recipe called for. And, since the white potatoes are rather small I used six of them. Be sure to wash the leeks really thoroughly as dirt is often inside the crevices. And, I have gotten away with using 3 large leeks and it turned out fine. Be sure to boil the potatoes and leeks 'til the potatoes are soft otherwise it will come out tasting really weird. I can attest to this. Also, as far as the puree goes I don't have one of those emulsion tools nor do I have a food mill, which would probably make this process a heckuva lot easier. So, I take a ladle full of soup and add it to my blender. Be super careful about this because the soup is very hot and the lid can fly off once you start blending if you don't have it on tight. I usually put a towel over the blender, hold it down, and I do several pulses until I know the soup isn't going to fly out everywhere , which I can also attest to, and then I blend. I pour it out into another bowl, and continue doing this in batches until the soup is completely pureed.

4 Large Leeks
2 Large Russett Potatoes
4 Tbsp Butter
6 cups Chicken stock
Salt and Pepper to taste

Peel and dice the Potatoes. Wash and cut the Leeks (only use the whitish part of the Leeks).
In a Dutch Oven, or whatever pot will do for Soup, sauté the Leeks and Potatoes into the butter for about 15-30 minutes over Medium heat.
Pour in the 6 cups of chicken stock and let simmer till potatoes are soft. I "boiled" the soup to make it go even faster due to having to play volleyball within the hour. Add salt (I did several shakes of the salt shaker). Puree. Add back to Soup pot and continue to add salt and pepper to taste.

Again, I just use several shakes of the salt and pepper shaker until it tastes seasoned. I eat the soup with a nice chunk of french bread. Yum. And, despite all the words I've put in this post, the soup is relatively quick to make. It took me a little over an hour from prep to finish.

Enjoy!

Emily


(Click here for printable recipe)

Sunday, March 14, 2010

Cheese-It Chicken

“It is said that love makes the world go 'round - the announcement lacks verification. It's wind from the dinner horn that does it.” – O. Henry

Really, I think we all need more dinner horns, although what a dinner horn is exactly, I’m not quite sure.


I didn’t need any dinner bells or horns this weekend, though. Cheese-it chicken is one of my husband’s favorites. Warning: I can’t guarantee the heath benefits here, but it sure is delicious. I made it with sides of asparagus and cous cous.

You can see I used chicken tenders instead of chicken breasts here. For some reason, everyone in Richmond was acting like it was about to snow on this cloudy 60 degree day, and the grocery store was a mad-house. Chicken tenders were all I could find.

Ingredients: 
Boneless skinless chicken breasts
Philadelphia cream cheese
White Cheddar Cheese-its

1. Allow cream cheese to reach room temperature for ease of spreading.
2. Put roughly a half-cup of cheese-its into a ziplock bag. Make sure you get all of the excess air out of the bag to avoid it popping. Crush the crackers. (This can be done by hand or on a very bad day with a mallet of sorts. Meat hammers, soup cans, and fists all work lovely.)
3. Smear chicken breasts with a very thin layer of cream cheese. (Thicker cream cheese is definitely delicious, but I try to be a little bit good, here).
4. Pour crushed crackers onto a small plate. When the chicken is coated, bread it by using tongs to roll chicken over the cheese-it crumbs.
5. Bake for 45 minutes at 350 degrees (Fahrenheit, just in case anyone international is reading).
Total prep time: 55 minutes
Alternatives and notes:
  • White Cheddar Cheese-its seem to give the best bread-crumb-esque coverage.
  • I can’t tell the difference between Cheese-Its and Low Fat Cheese-Its, though my husband can.
  • Instead of cream cheese, I’ve used olive oil to moisten the chicken and give the smashed crackers something to hold onto.
Happy Cooking, and if you figure out what a dinner horn is, let me know.
-KSP


(Click here for printable recipe)
Saturday, March 13, 2010

Spaghetti alla Carbonara

I was hoping my first recipe for the club would be a smashing success, but as those great philosophers say, you can’t always get what you want. However, this was a failure in cooking, not in recipe, so you may fare better.

Spaghetti carbonara is what I would call restaurant-only fare. Something about the method of adding raw egg and cooking it with the hot spaghetti has always intimidated me. But every time I order it (often, at Maldini’s) I enjoy it so much, so I guess it’s no surprise that I’d eventually have to face my fears and try to make it myself. I shouldn’t have.

I found this recipe on Leite’s Culinaria (http://leitesculinaria.com/) along with this photo, which sealed the deal.


Ingredients
1 tablespoon extra-virgin olive oil
6 ounces thickly sliced pancetta, cut into 1/4-inch pieces
2 tablespoons kosher salt
1 pound spaghetti
3 large eggs plus 1 egg yolk, well beaten
3/4 cup grated Parmigiano-Reggiano combined with 1/4 cup grated Pecorino Romano
3/4 cup of boiling pasta water
Freshly ground black pepper, to taste


A few notes on the ingredients before we start. I substituted bacon for the pancetta because we had it, and it’s cheaper. That made the olive oil unnecessary since bacon has built in oil. I also used a straight Parmesan and Romano mix. And finally—a pound of spaghetti is a lot of spaghetti, yo. Like way too much for one or two people. Don’t make that much.

You might want to start the water boiling right away if your water is practically unboilable as mine is. Then, heat the olive oil in a skillet over medium heat. Add the pancetta and cook, stirring often, until crisp. Set it aside. Once the water is boiling (finally) add the salt and spaghetti. I’m not going to tell you how to cook spaghetti here because I sure hope you can handle that on your own. Once that’s done, drain it but keep ¾ of a cup of pasta water.

Here’s where it all went wrong for me. I think it’s in the timing, so you need to add all these ingredients very quickly! Put the spaghetti in a skillet right away while it’s still hot. Put it over very low heat. Add half the cheese, the pancetta and the eggs and toss well (but quickly). You don’t want the eggs to actually cook before you add the pasta water to make it creamy. This is what happened to me. So, add enough of the pasta water to make it creamy, but do it with speed. If you succeed, add pepper, sprinkle cheese on top and enjoy. If you fail, you can buck up and eat it anyway like we did. It’s fine. Edible anyway.


(Click here for printable version)